Quick Overview:
While operating a WordPress site, one must come across switching hosting providers. And it can be due to several reasons, but saving money and availing better bandwidth and storage are the top among them. WordPress site migration is a complex task to some extent and requires complete focus. Whether you are a freelancer, who owns a WordPress site, a WordPress developer, or an organization, you must understand the migration procedure. And if you are availing of WordPress migration services, it would help you have greater control over the process.
So, let’s get started to know the answer to “How To Migrate WordPress Website To New Host?”.
The Need Of WordPress Website Migration
When someone migrates to a WordPress website, there can be multiple reasons. But some of the prominent ones include:
- The current hosting provider doesn’t offer support services.
- Current hosting plans are expensive.
- The hosting provider has faced a data breach.
- The WordPress site is not compatible with the platform.
- The dedicated dashboard limits the configuration.
Similarly, due to several reasons, someone takes such a decision. And you must know these if you provide WordPress migration services.
How To Migrate WordPress Website Manually: Complete Procedure
When migrating a WordPress site, the manual method gets considered chiefly due to higher control over the procedure. However, you must only follow the manual method if you thoroughly understand FTP (File Transfer Protocol).
Further, in the manual process, you must manually migrate all the WordPress website files and databases. Therefore, access to all the core directories and files is required. So, let’s have a look at each manual WordPress migration step.
Step 1: Select The New Host for WordPress Website
By default, when you develop a WordPress website, it gets hosted on the platform itself. But, most companies avail third-party hosting services to publish the site. However, sometimes they must change the hosting provider for lack of services, security, or other reasons.
If you also want to migrate WordPress website from the current host to a new host. Then, you must search the internet for a reliable WordPress hosting service provider. And while selecting a provider, keep in mind to check the availability of the following factors. It would help you assess whether the services are reliable or not.
- SSD Storage for faster database operations
- Unlimited Bandwidth for constant website availability
- SSL for security
- Malware Scanner
- Free email
- Managed WordPress service and acceleration
- 24/7 Support Service
- eCommerce Optimization support
- Free Migration
- Frequent backups and uptime guarantee
If the provider offers the mentioned services, you must consider it for availing the hosting services. And before finalizing anyone, compare it with others to better judge pricing and features.
Step 2: Perform Complete Back Up Of WordPress Site
Backing up the website files is necessary, as you need to upload the files to a new host. And at this step, File Transfer Protocol will get used. You can use an automated tool for this procedure, such as FileZilla, cPanel backup, or similar.
Once you connect with the current server, navigate through directories to find the folder containing all the necessary files. The folder must be available with the site’s name or public_html. After finding it, please right-click on the folder and download it. As a result, all the files will get downloaded to your local machine. But before you disconnect, verify that all files are downloaded in the correct format.
Further, if any files get corrupted or don’t download, perform the procedure again. Although to prevent such situations, I prefer using cPanel backup. And you will see an impeccable backup of all website files.
Step 3: Execute WordPress Database Backup
Along with other website files, you must back up the database also. And for the database, cPanel is required. It’s the control panel the hosting service provider provides to manage the website and associated resources. Creating a database backup will retain details about your users, content, login credentials, and any other information your site stores.
To create a database backup, go to the phpMyAdmin option. Primarily, it would be available under the database section. Once it is located, you can create the database backup. In addition, you can also utilize it for creating a new database and downloading it.
Further, phpMyAdmin will show you a list of all the available databases. You must check the relevant ones and then navigate to the export tab.
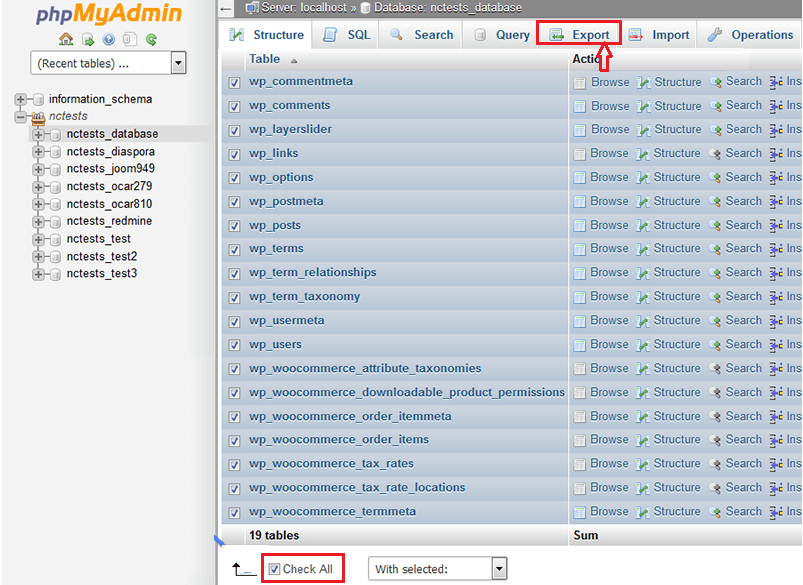
Step 4:Export WordPress Database and Generate a SQL Database
- After going to the Export tab, please select the format of the database in which you want to download it.
- For WordPress migration, select SQL as its format.
- Click on the Go button to initiate the process.
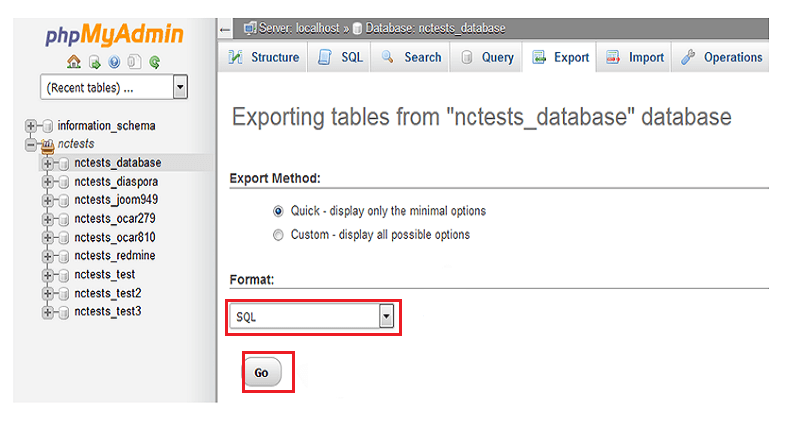
As an outcome of the export process, you will see database files with a .sql extension on the system.
Now, it’s time to move to a new host and set up the WordPress site. If the new hosting provider also uses cPanel, it would be effortless to set up the database. Otherwise, it would help if you discovered their dedicated panel for importing the SQL files. However for cPanel, follow the below instructions:
- Step 1: Log into the cPanel of the new WordPress hosting service provider.
- Step 2: Navigate to the Database section.
- Step 3: Under database, select the MySQL Databases option.
- Step 4: Generate and remember a new SQL database with a user name.
- Step 5: Now, go to the phpMyAdmin interface.
- Step 6: Select the Import tab and upload the SQL files that you downloaded/exported previously.
Under the procedure mentioned, your new host will run the WordPress site database.
Step 5: Upload WordPress Site Files on the New Host
Following the database import on the new host, you must now upload the website files. Like the second step, connect to the new host using the File Transfer Protocol. Then, open the root folder and right-click anywhere. It will display the option to upload.
- Further, click on Upload and select all the associated files, folders, and directories.
- After that, initiate the upload process.
- You will see all your files on the new host as soon as the procedure is completed.
Now, the new WordPress site host contains the database and site files.
Step 6: Configure the wp-config.php File
The new host server will not run the site even after uploading all the files and databases. To let end-users access the WordPress site, you must navigate the host toward the new database. And it would happen by modifying the content of the wp-config.php file.
You will find the wp-config.php file in the root folder. And by right-clicking on it, you can access and view its content. Further, search for the below three lines in the file.
define('DB_NAME, 'db_name');
define('DB_USER, 'db_user');
define('DB_PASSWORD, 'db_pass');
Now, replace the variable in small case letters with the database name, user, and password. You must put all three details of the new database created on the new host, within which you import the SQL databases.
Furthermore, save the file and access the site.
Step 7: Update the DNS (Domain Name Service)
Lastly, update the Domain Name on the server. It will ensure that the DNS server provides the end user with the correct website address. To update the domain name, you can follow any of the below methods:
- Transfer the domain purchased from a hosting provider to the new host.
- Switch your DNS nameservers.
Besides, check the guide of the new hosting provider to get insight into the DNS update process.
Recommended Read: How To Migrate From .NET Framework To .NET Core
Another Migration Method: Migrating WordPress Website With Plugins
Most people think that WordPress plugins are only for extending the website’s functionality. However, it can also be used for WordPress migration purposes. There are plenty of plugins developed only for helping in migrating from one host to the other. All such plugins can perform database backup, site file backup, and all other tasks.
Some of the most prominent WordPress migration plugins include:
- All-In-One WP Migration
- Duplicator
- UpdraftPlus
- WP Migrate DB
- Migrate Guru
You can use any plugins mentioned, but most professionals prefer the All-In-One WP Migration plugin. To use it, you must install it on both the current and new host. Then follow the below steps:
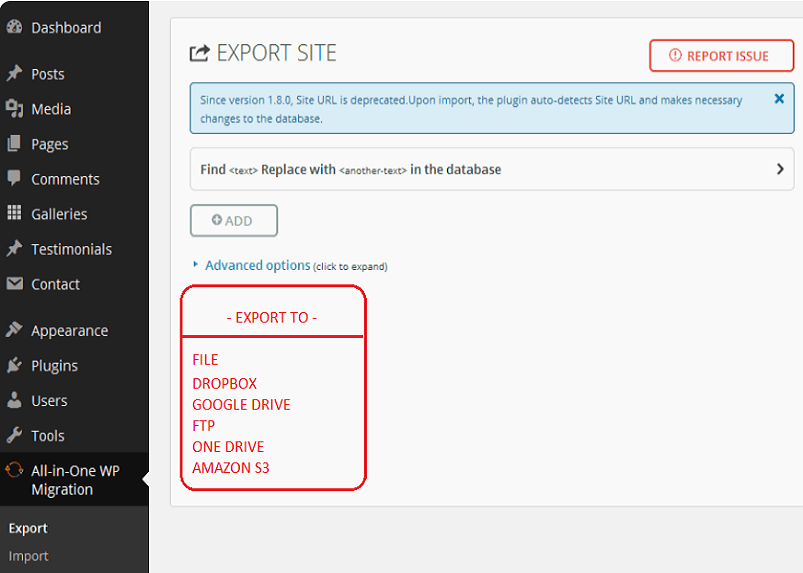
- Step 1: Select the All-In-One WP Migration plugin on the WordPress dashboard.
- Step 2: Select the Export To option, and under it, choose File.
- Step 3: Go to the new host server.
- Step 4: Log in with your WordPress username and password.
- Step 5: Go to the All-In-One WP Migration plugin and click the Import From option.
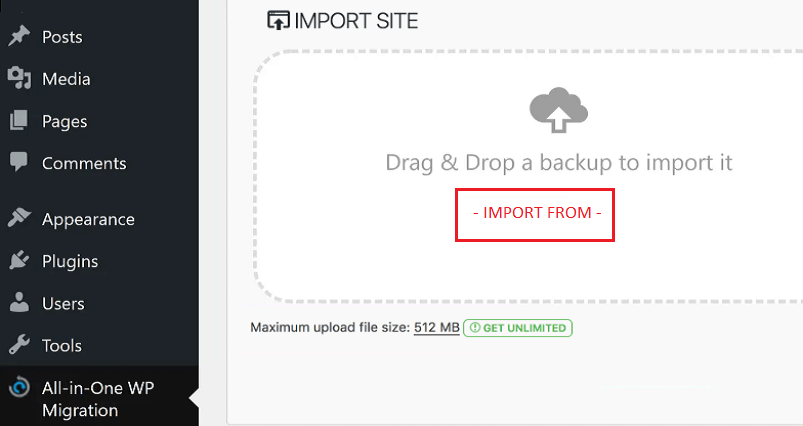
- Step 6: Select the location, and your website will get migrated.
But make sure that all the data is at most 512 MB. Otherwise, you need to purchase the premium version of the plugin.
Why Avail of WordPress Migration Services?
Suppose you are an organization running a WordPress site. Then, you must avail yourself of WordPress migration services to leverage technical expertise in the domain. With WordPress professionals’ help, you will know which migration method will be relevant. For instance, whether you need to follow the manual process or the one using plugins.
In addition, a WordPress development company will also ensure data integrity, confidentiality, and availability. And it will also help you find the best-in-class hosting services within cost constraints.
Therefore, such services must be your priority if you need more technical expertise. As a result, you will save time, cost, and effort and even eliminate complexities.
Hire WordPress developers who can assist you in accomplishing your objectives. Having a precise comprehension of your requirements and a rigorous screening procedure can assist you in quickly identifying the ideal candidate for your needs.
Wrapping Up
WordPress site migration is a crucial step, and you must follow the procedure with utmost focus to prevent complexities. Before you start with migration, understand the utilization of File Transfer Protocol (FTP) and plugins. Further, you can select from the two migration methods – manual and by using plugins.
In the manual method, you must back up the database and files and import them to the new host. However, the overall procedure will get somewhat automated if you use the plugin method. In addition, ensure to check and update the DNS server fields after each method to navigate the end-user to the right website.

Expert in Marketing Strategy and Brand Recognition
Jemin Desai is Chief Marketing Officer at Positiwise Software Pvt Ltd, he is responsible for creating and accelerating the company’s marketing strategy and brand recognition across the globe. He has more than 20 years of experience in senior marketing roles at the Inc. 5000 Fastest-Growing Private Companies.