Quick Overview:
API or Application Programmable Interface connects a website or software with other applications. It helps to send, receive, and modify data on each end. Integrating a third-party API is considered a complex task in the WordPress ecosystem. And it’s always considered to avail expert help for it, such as from a WordPress development agency.
Although, if you are a WordPress developer, this tutorial is for you. Here, you can learn to integrate third-party API to WordPress website seamlessly. So, let’s get started with the process.
The Need for WordPress API Integration
A business runs multiple operations through a WordPress website, sometimes requiring connecting with other applications. And in such cases, API comes into play, as it helps to connect with external sources. In addition, when you integrate API with WordPress, it also offers the following benefits:
- REST APIs enable embedding WordPress websites with other frontend development technologies and enhance the look and appeal.
- It makes organizations capable of fetching data from external sources and processing it to streamline business operations.
- It helps build headless websites that enable surface content across multiple channels without losing quality.
Overview of the Method Used To Integrate API with WordPress
We will use a WordPress-recommended plugin to integrate the site with external API. WPGetAPI plugin will be used, providing the ability to embed APIs without writing any code. In addition, it’s also considered the most effortless way of linking WordPress websites to a REST API for fast communication.
It can do both for you if you need to execute GET or POST data. And, if you are a newbie to WordPress, it’s the perfect solution for completing API integration within minimal time. However, before you utilize the WPGetAPI plugin, you must understand the basics of API and its working.
Moreover, the WPGetAPI plugin offers numerous advantages, such as:
- It aids in automating content display on the WordPress site by fetching any data.
- It enables the conversion of data into all major formats, including charts, HTML, image galleries, plain text, and more.
- Using it, you can send query string parameters, POST fields, and even headers in the body.
- It can effortlessly help to send data of WPForms.
- It works seamlessly with shortcodes, enabling the display of information within pages or posts as per requirements.
- It also supports all primary authentication mechanisms, such as Bearer Token, API keys, basic auth, OAuth, etc.
Complete Procedure: How to Integrate 3rd-party API in WordPress?
To thoroughly understand the WPGetAPI plugin’s procedure, follow the below-provided steps. We would be integrating an external API – Quotable API, which returns a random quote whenever the user calls it. After embedding it into the WordPress site, its data will be displayed.
Step 1: Install and Activate the Plugin
To initiate the process, install and activate the plugin on your WordPress website. If you don’t have a WordPress account, create one, and under the plugins in the left sidebar, search for the WPGetAPI plugin.
After the plugin activation, choose the API you want to integrate, similar to the Quotable API we use in this procedure. Before you start the integration, undergo the API documentation to learn about its authentication mechanism, proper functionality, API base URL, and more. Understanding API is essential, as all such data will be used in further procedures.
Moreover, WPGetAPI comes in two categories, the free and the pro version. If you are starting, then the free version is appropriate. Otherwise, you must opt for the pro version for extended features.
Step 2: Setup the 3rd-party API
After selecting the API you want to integrate, now is the time to configure it using the WPGetAPI plugin. First, navigate to your site’s WordPress dashboard, and from the sidebar panel, click on WPGetAPI. The plugin’s interface now offers different tabs, including Setup, OAuth 2.0, Zoho, Quotable, Binance, and WordPress.
You need to select the Setup tab to fill out the details of the third-party API.
Further, you must enter the details in three mandatory fields – API Name, Unique ID, and Base URL.
The API Name can be anything you choose, as its primary purpose is to identify the API. In this case, we have set it up as Quotable, as it becomes easy to refer to Quotable API. Further, Unique ID is also similar to API Name, as you can input anything. But remember to create an id with only lowercase letters, underscore, and numerical values.
For the Base URL field, you need to undergo the API’s documentation, as it’s present in it. The Quotable API base URL is ‘https://api.quotable.io.’
After filling in all the necessary details, Save them and move further with the process through the WPGetAPI interface.
Step 3: Configure the Endpoint Settings
In API integration, the endpoint is where API and WordPress site communication occurs. You can also treat it as a location where the resource or data resides. While integrating API for a WordPress site, it’s necessary to configure the endpoint. It will tell the website about the location where it can send and access data.
You can easily find the endpoint needed for its successful integration in your API’s documentation. After saving the API Name, Unique ID, and Base URL, you must configure the endpoint. The WPGetAPI plugin will show you a form asking for API’s endpoint details.
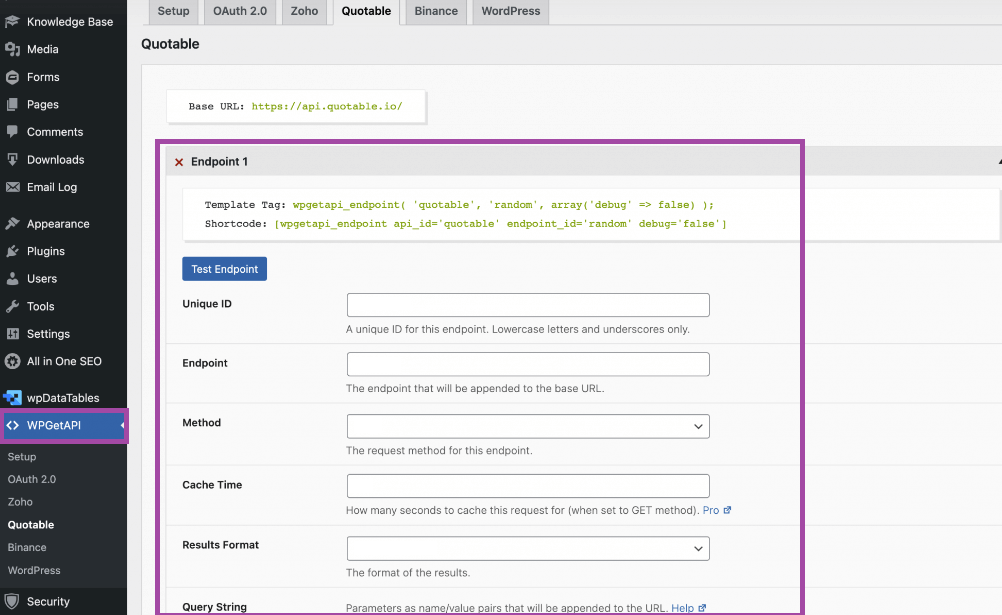
Further, you should input the following details:
- Unique ID
Likewise, for the API unique ID, you need to create such an id for the endpoint reference. It would be used while configuring the data display on the webpage.
- Endpoint
It’s the endpoint of the API, which you can get from the documentation or other legit sources of the API.
- Method
GET, POST, PUT, PATCH, and DELETE are the primary API methods you can enter in the method field. In the Quotable API case, we will use the GET method, as we need to get a random quote to display on our site.
- Result Format
You should declare the format in which you want to receive data from the API. You can select from the primary two alternatives – 1) JSON String and 2) PHP Array. Experts prefer JSON string due to its compatibility with template tags and shortcode data display methods.
Step 4: Test the API Configuration
When you integrate an API manually, testing it becomes a tedious task. Also, manual testing requires more effort and time, which can also increase the development budget. However, with the built-in testing mechanism, the WPGetAPI plugin eliminates additional effort, time, and costs.
After inputting all the endpoint details, the plugin will unblock the Test Endpoint button. And when you click on it, the API testing will get initiated. In our case, we have declared the GET method, which means the API will fetch a random quote.
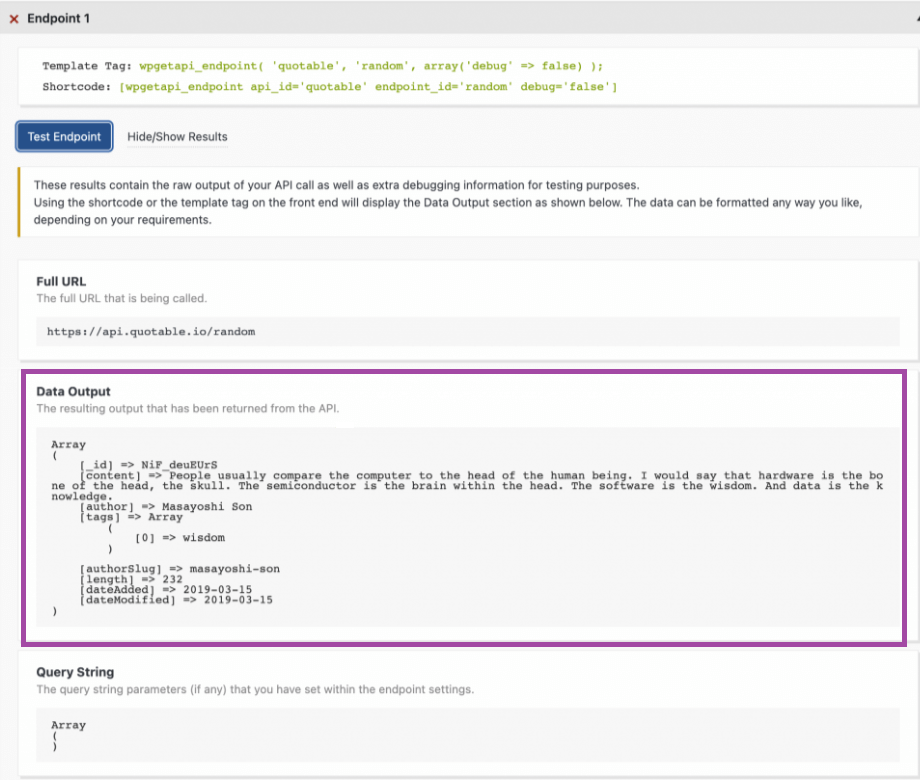
To start the testing, click the Test Endpoint button and await the response. After completing the process, the plugin will display all the results on the same interface. You can view all the parts of the test, including Full URL, Data Output, Query String, Headers, and more.
As the above snippet demonstrates, API has been set up successfully and is getting the data (random quote). The output is in the array form because we selected the PHP array in the previous step as the data format.
Furthermore, the output can vary according to the API working, the method selected, the data format, and other associated factors. Therefore, you must always test the integration before configuring the mechanism for displaying data on the website.
Step 5: Display Data Received Through API
After the endpoint configuration and testing, it’s time to display fetched data on the interface. To do so, WordPress provides a Template Tag and Shortcode approach. However, for both mechanisms, you must understand PHP, as it gets used in the WordPress backend and supports API requests and responses.
Let’s explore both methods one by one.
Alternative #1: Template Tag
The template tag mechanism is quite effortless if you know PHP. Under this method, you must declare a variable and store the data fetched by API. Further, you can utilize that variable at any place on the webpage.
You should add the template tag code to the core WordPress theme files. For instance, to display the fetched data in the header, add it to the header.php file; otherwise, select the relevant PHP file.
Alternative #2: Shortcode
If you choose Shortcode, then you don’t need to know PHP. But ensure you select JSON string as the data format while setting up the endpoint. To display data using Shortcode, go to the WordPress dashboard, and under the pages, add the Shortcode of your API.
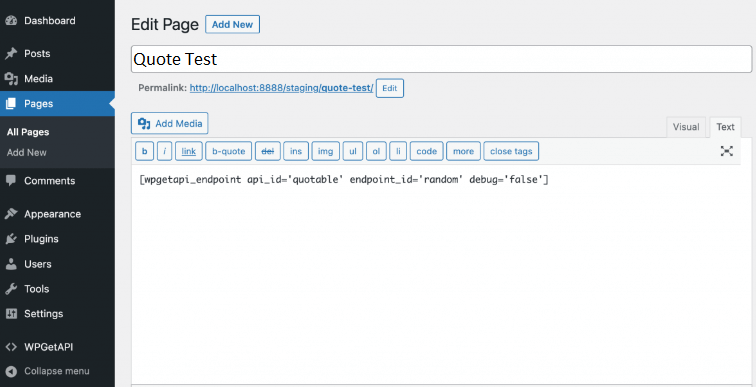
Now, when you view the page, it will display the complete code of the response received from API. But, you can only display the data by converting the API data format to HTML.
The Role of WordPress Development Agency in API Integration
A WordPress development agency is a necessity for integrating third-party APIs with the WordPress website. Such enterprises hold decades of expertise in embedding numerous APIs, testing them, and displaying data on the interface.
In addition, development agencies also know about both manual and plugin-based mechanisms. It also provides consultation to select the most reliable method for your WordPress website. In addition, they have certificated developers who know all about WordPress, HTML, CSS, and PHP, ensuring a top-notch website and fulfilling all business requisites.
But, you must select a trusted WordPress development partner for your project, like Positiwise Software Pvt Ltd.
Positiwise provides all kinds of WordPress development services. It employs professional WordPress developers who can create a site from scratch, integrate APIs, migrate the site to another host, and provide consultation for every process and project. Moreover, Positiwise has worked with numerous clients and knows the best WordPress fit for your business website. Also, it provides:
- WordPress maintenance and support services
- Guarantee to secure all your data
- A dedicated team of WordPress developers, designers, and testers
- Complete control over the WordPress site
- Affordable solutions with avant-garde functionalities
- Timely delivery within business constraints
Grow Your Business with a Custom WordPress Website Development
Reach more customers with a custom WordPress Ecommerce website. Our WordPress developers create optimized, secured, & conversion-focused WordPress solutions. Get a free proposal.
Wrapping Up
Integrate Third-Party API to WordPress site helps connect external resources with helpful information. The easiest way to perform integration is using the WPGetAPI plugin, available in free and pro (paid) versions. It entirely depends on your need and which plugin version is relevant for you.
Install and activate the WPGetAPI plugin through the WordPress dashboard to start with integration. After that, navigate to the plugin from the sidebar option available on the dashboard. Once the WPGetAPI interface displays, input the required information, such as API Name, ID, and Base URL.
Following it, enter the endpoint information, which you can get from the API’s documentation. After that, test the integration and display data using a template tag or shortcode approach. As a result, your WordPress will connect to a third-party API.

Expert in Marketing Strategy and Brand Recognition
Jemin Desai is Chief Marketing Officer at Positiwise Software Pvt Ltd, he is responsible for creating and accelerating the company’s marketing strategy and brand recognition across the globe. He has more than 20 years of experience in senior marketing roles at the Inc. 5000 Fastest-Growing Private Companies.