
Quick Overview:
The blog will introduce you to the SOAP services with ASP.NET Core with a brief description of its structure and a detailed process to implement it. In addition, you will be exposed to the difference between REST and SOAP-based web services, leading you to choose the right API approach for your project.
Create SOAP Web Services in DOTNET Core
An ASP.NET Core web application can be required to communicate with services distributed across digital platforms. And an API is the most reliable way of connecting it to them and exchanging data. However, not every API can provide seamless data exchange in a heterogeneous environment. In such scenarios, the only option where professionals get narrowed down is a SOAP-based web service.
The SOAP supports the application in exchanging data with other services and providing the necessary functionalities to users. Also, it’s a de facto standard used for writing web services, whose implementation you will learn in this blog.
What is SOAP Based Web Service?
SOAP (Simple Object Access Protocol).
The SOAP protocol enables data exchange across heterogeneous and distributed systems. It works with HTTP, which is an application layer protocol. XML defines the message structure that SOAP uses for exchanging data between the service provider and the client.
The SOAP message format consists of the following components:
- An envelope <envelope>: All other components are contained inside the envelope per the defined structure.
- Header <header>: The header stores the information associated with the application, such as encryption details.
- Body <body>: A SOAP body consists of fault, body element objects, and XML data defined by the application.
- Fault <fault>: The fault provides the details about the error and status. Developers only use it while sending responses through APIs.
When you use a SOAP API, it uses the POST method to deliver the envelope containing the header and body as the payload. Further, the configured service processes it and provides the response in a compatible format.
Ready to Build an ASP.NET Core Web Applications for Your Organization?
Empower your organization with custom ASP.NET Core Web Applications crafted by our team of 10+ years of experienced .NET developers. Let’s build excellence together!
How To Use Soap Services with ASP.NET Core?
To learn how to use SOAP services in .NET Core, we’ll be using the Visual Studio 2022 IDE. The procedure will start by creating an ASP.NET Core API project, installing the required NuGet packages, and then configuring and testing the services.
Configuring a SOAP-based web service in ASP.NET Core web applications results in completing the overall process within minimal time. So, let’s start.
Phase 1: Creating the Visual Studio Project
To create the ASP.NET Core Web API project, follow the below steps:
1: Open the Visual Studio IDE (version 2022).
2: Use the left-click on the “Create a new project” option.
3: In the list of provided templates, choose “ASP.NET Core Web API” and click the “Next” button.
4: Now, set the name for the ASP.NET Core API project in the “Configure your new project” screen. Again, click the “Next” button.
5: Configure the setting in the “Additional Information” section. Here, you need to do the following setup:
- Uncheck the minimal API usage option.
- Check the “Use Controllers” option.
- Choose the “None” option as “Authentication Type“.
- Check the box for “Enable Open API Support” and “Configure for HTTPS” options.
6: Lastly, click on “Create,” and you will see Visual Studio displaying your ASP.NET Core project.
Phase 2: Installing the Required Package
After the project creation, it is time to install the SOAP NuGet package, known as “SoapCore.” To install this NuGet package, undergo the following procedure.
Step 1: Navigate to Solutions Explorer >> right-click on the project >> Manage NuGet Packages. It will open a new NuGet Package Manager window.
Step 2: In the search field, input “SoapCore.” Once the package manager displays the package, install it in your project.
Besides the GUI-based NuGet manager, you can also use the NuGet console and dotnet CLI.
Command for NuGet Package Manager Console:
PM> Install-Package SoapCoreThe command for dotnet CLI (Command Line Interface):
dotnet add package SoapCoreYou can choose any of the methods for SoapCore installation. All three will do the same work without any compromise, error, or exception.
Phase 3: Data Contract Configuration
The main purpose of configuring a data contract in the .NET Core web service is to maintain the compatibility between exchanged data. A data contract offers the following functionalities:
- Define the format and structure of data.
- Supports the exchange of strings, numerical, and Boolean values.
- Leverages to exchange composite data type, including the structures and classes.
In addition, data contract enables communication between service and clients developed using different platforms and programming languages. For this project, you need to generate a new class file, “Author.cs,” and add the below code to it for configuring the data contract.
using System.Runtime.Serialization;
namespace SoapCore_Demo
{
    [DataContract]
    public class Author
    {
        [DataMember]
        public int Id { get; set; }
        [DataMember]
        public string FirstName { get; set; }
        [DataMember]
        public string LastName { get; set; }
        [DataMember]
        public string Address { get; set; }
    }
}
Saving the file completes your data contract implementation.
Phase 4: Service Contract Configuration
A service contract is used to establish mutual communication between the service provider and the client. It consists of two main components – the interface and the associated metadata, offering the service description. Whenever you use SOAP web service in ASP.NET Core API, use a service contract for interoperability advantage.
To use it, create another class file, “AuthorServiceContract.cs” and modify it with the following code block.
using System.Diagnostics;
using System.ServiceModel;
using System.Xml.Linq;
namespace SoapCore_Demo
{
    [ServiceContract]
    public interface IAuthorService
    {
        [OperationContract]
        void MySoapMethod(XElement xml);
    }
    public class AuthorService : IAuthorService
    {
        public void MySoapMethod(XElement xml)
        {
            Trace.WriteLine(xml.ToString());
        }
    }
}
In the above code, the “ServiceContract” attribute is used for designating an interface. Additionally, MySoapMethod() is annotated so that clients can invoke it to communicate with the configured service.
Phase 5: SOAP Service Registration
Now, we need to register the SOAP service in the Program.cs file by adding the following two code lines.
Code Line 1: Adding the Service
builder.Services.AddSingleton<IAuthorService, AuthorService>();
Code Line 2: HTTP request pipeline configuration
app.UseSoapEndpoint<IAuthorService>("/Service.asmx", new SoapEncoderOptions());
The final Program.cs file will look similar to the following:
using SoapCore;
using SoapCore_Demo;
var builder = WebApplication.CreateBuilder(args);
// Add services to the container.
builder.Services.AddSingleton<IAuthorService, AuthorService>();
builder.Services.AddControllers();
var app = builder.Build();
// Configure the HTTP request pipeline.
app.UseSoapEndpoint<IAuthorService>("/Service.asmx", new SoapEncoderOptions());
app.UseAuthorization();
app.MapControllers();
app.Run();
Phase 6: Testing – Use SOAP Service in .NET Core
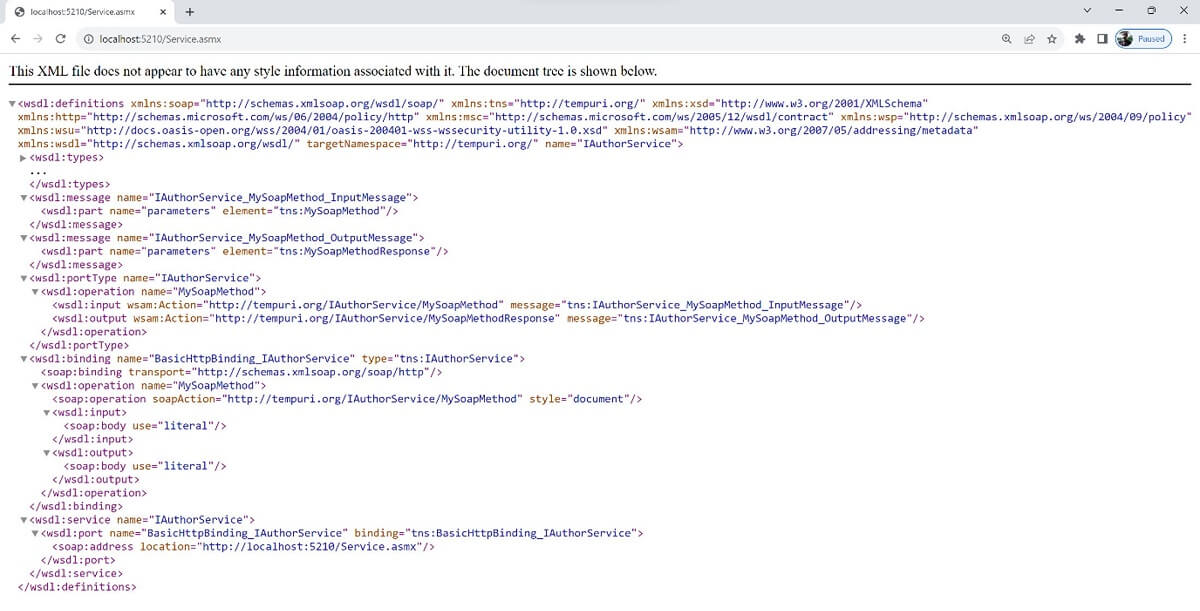
Run the ASP.NET project and navigate to “http://localhost:5210/Service.asmx” using the web browser. You will see the functioning of the SOAP web service, displaying the Web Service Description Language (WSDL).
The Difference Between REST and SOAP Service in .NET Core
In comparison to SOAP, REST APIs are also highly used with ASP.NET Core web applications. You should understand the difference between both. It will help you choose the right approach for your .NET Core apps.
| Basis | SOAP | REST |
|---|---|---|
| Full Form | Simple Object Access Protocol | Representational State Transfer |
| Is it a Protocol? | Yes | No |
| Is it a standard? | Yes. It’s a web service writing de facto standard. | No |
| Distributed Application Support | Yes | Yes |
| Support for binary content | Yes | Yes |
| Use Case | Medium to large-scale application | Small to medium-scale apps with simple functioning |
| Message Format | It uses the SOAP envelope format, consisting of header, body, and fault. | There is no defined format. You can use JSON and XML as required. |
Concluding Up on SOAP Services with ASP.NET Core
Configuring SOAP services with ASP.NET Core applications is an effortless task. Once you create the project using Visual Studio, you need to install the SoapCore package using the NuGet package manager. Further, you should implement the data and the service contract, following with the SOAP service registration in the Program.cs file.
Lastly, you need to run the ASP.NET Core web API project and verify its functionality. Once you undergo the procedure mentioned above, you will gain a clear insight into how to use soap service in .NET Core.

Expert in Software & Web App Engineering
Parag Mehta, the CEO and Founder of Positiwise Software Pvt Ltd has extensive knowledge of the development niche. He is implementing custom strategies to craft highly-appealing and robust applications for its clients and supporting employees to grow and ace the tasks. He is a consistent learner and always provides the best-in-quality solutions, accelerating productivity.


