

Quick Overview:
In this blog, you’ll find a detailed description of the NuGet packages and the tools it offers for .NET developers. An example also explains the NuGet manager work, making it understandable for both newbie and professional .NET developers. In addition, a practical procedure is provided, in which you can learn the steps of accessing the NuGet package manager in Visual Studio IDE and using it for installing a package.
Introduction
Nowadays, one of the most essential, useful, and reliable tools for developers is a platform for sharing pre-built code blocks. It helps them to integrate new features and complete the development promptly. Also, such tools help to enhance collaboration, reduce vulnerabilities, and easily manage dependencies.
In .NET development, that tool is known as NuGet Package Manager. It provides all crucial code-sharing functionalities that a .NET developer needs. To learn more about this package manager for .NET, continue this blog.
NuGet Package Manager: A Complete Insight
To understand the NuGet package manager, first, let’s learn about the NuGet package. It will help to capture the package manager’s details effortlessly.
Let’s put it in the simplest form.
The NuGet package is a zip file that contains the codebase required to integrate an additional feature or functionality in the .NET application. Mainly, NuGet packages come with a “.nupkg” extension. When you open any of the .nupkg files, it contains the following three components:
- DLLs (Compiled Code)
- The code’s descriptive manifest
- Files associated with DLLs
Dedicated .NET developers highly use this kind of zip file for sharing code. The platform used to share the NuGet packages is called NuGet Package Manager.
The NuGet package manager is now integrated with Visual Studio IDE and Visual Studio Code. You can seamlessly navigate to the CLI or the GUI option to find and install the required NuGet package. From all this information, we can conclude that the NuGet package manager works as a centralized repository that helps to host, store, and download code packages.
NuGet Package Manager Example
The example is divided into steps, defining how the NuGet package manager works and leveraging .NET developers to collaborate efficiently. Also, the example uses two hypothetical developer characters, Max and Alex.
#1: A developer named Max creates a NuGet package holding code for enabling SignalR in the .NET application.
#2: Max uploads the created package on the NuGet package manager.
#3: Another developer (Alex) opens the NuGet package manager in the Visual Studio IDE and searches for the package uploaded by Max.
#4: Alex finds the package, downloads, and installs it. Further, Alex can embed the code in the package in its .NET application and enable SignalR functionality.
As a result, the process of sharing code gets streamlined with the NuGet package manager.
Similarly, thousands of professional developers create packages and upload them on the NuGet platform. Anyone in need of them can download, install, and use them for their project. But, not every time or every developer wants their package to be accessible by others. Some developers only want their team members to use a specific package/code base. To fulfill the requirement, NuGet supports private and public hosting.
If you choose a private NuGet host, the packages you upload will be accessible to people with specified permission. Contrastingly, anyone can use any package available in the public NuGet host. It all depends on your needs and projects, which determine how you want to host the package and share a code unit with other dedicated .NET developers.
The NuGet Package Manager Tools for .NET App Development
The NuGet package manager offers numerous tools to support package hosting, download, and installation. Both package users and the creators/developers can use the tools. The list of tools includes:
- dotnet CLI
- nuget.exe CLI
- Package Manager Console
- Package Manager UI
- Manage NuGet UI
- MSBuild
dotnet CLI
The .NET CLI is a command line-based interface used for installing NuGet packages for .NET Standard and .NET Core. Most of its capabilities are by default present in .NET Core, but you can also use it for SDK-style .NET framework projects.
nuget.exe CLI
The nuget.exe CLI is for both NuGet creators and consumers. It provides the commands used for hosting and installing the packages for .NET framework libraries. Also, you can use it with non-SDK-style projects.
Package Manager Console
To utilize the package manager console, you need Visual Studio IDE on the Windows operating system and knowledge about PowerShell commands. And this tool is only for NuGet package consumers.
Package Manager UI
It’s a GUI-based (Graphical User Interface) interface used for consuming NuGet packages for a .NET application project. It comes installed by default in the latest Visual Studio versions. You will see its usage in the upcoming section, providing a practical hands-on on NuGet package manager usage.
Manage NuGet UI
Manage NuGet UI is for macOS users. It runs on Visual Studio and is available for Apple users. A GUI-based interface, similar to the Package Manager UI tool, is provided for consuming NuGet packages.
MSBuild
A NuGet package creator and a consumer can use the MSBuild tool. It’s available for the Windows operating system with additional functionality to restore packages through the toolchain.
How To Use NuGet Packages for .NET Development
Now, we are going to undergo the practical procedure of using the NuGet package manager. For this process, you will need the Visual Studio 2019 or later version. We prefer you to download the latest version of Visual Studio IDE for Windows due to the built-in NuGet manager.
Let’s start the process. You can execute simultaneously for better insight.
- Step 1: Open the Visual Studio IDE for Windows and go through the following path.
- File >> New >> Project. It will open the “Create a new project” dialog window.
- Step 2: Use the search box input “WPF” and choose the “C#” and “Windows” options from the drop-down list.
- Step 3: Select the “WPF Application” and right-click on the Next button.
- Step 4: Input the project name and solution name in the “Configure your new project” window.
- Step 5: Click on the Next button.
- Step 6: Select .NET 6.0 in the “Additional Information” dialog window. Lastly, hit the Create button.
As an output, the Visual Studio will build a WPF application project.
Use of GUI-based NuGet Package Manager
Now, we’ll be using the NuGet package manager to install the “Newtonsoft.Json” package to the WPF application project. To do so, undergo the following procedure.
Step 1: Navigate to Project >> Manage NuGet Packages. It will open the NuGet Package Manager window.
Step 2: Do the following settings:
Package Source: nuget.org (Public NuGet host)
Search box: Newtonsoft.Json
Now, the manager will show the appropriate package. You need to select the package from the results and then choose its version. For this practical, select the stable 13.0.1 version or any of the latest ones.
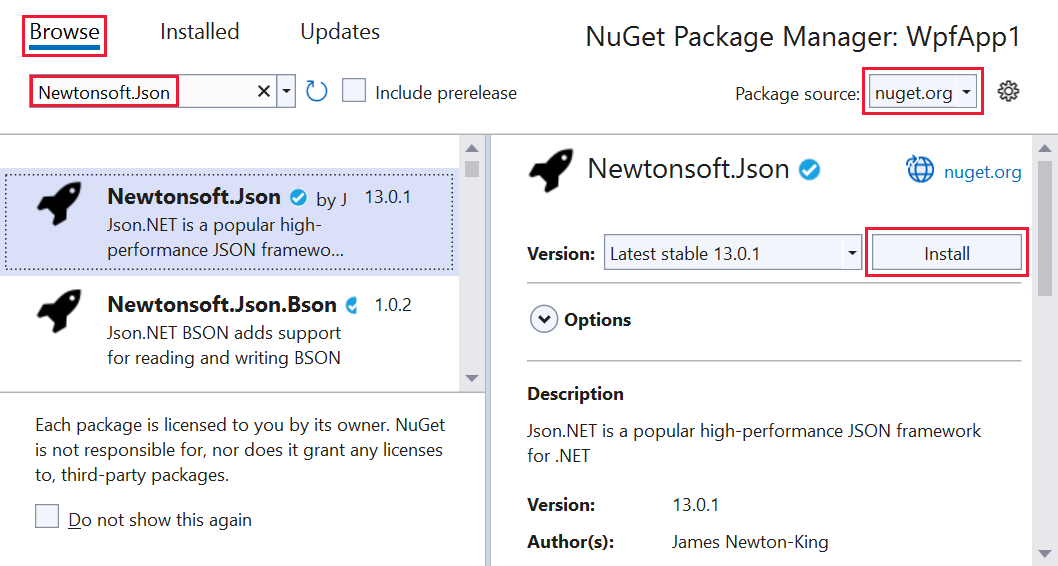
Step 3: Click on the Install and OK if prompted.
All the steps are completed, and you will see that the NuGet package is integrated with your WPF project. You can open the package files to view DLL, manifest, and other associated files.
Using the Package Manager Console
In addition to a GUI-based manager, there’s also another way of installing a NuGet package. In the second method, we’ll be using the Package Manager Console. The steps to use the console are as listed:
Step 1: Go to Tools >> NuGet Package Manager >> Package Manager Console.
Step 2: Once the console opens, ensure the current project is displayed in the drop-down list. But if you have only a single project, then it’s selected by default.

Step 3: In the console, execute the following command.
Command: Install-Package Newtonsoft.Json.
Now, wait for the process to complete. You will see the final output on the screen, along with errors, if any. And that’s how you use the GUI and console-based NuGet package manager. As a result, you will see a Newtonsoft.Json package in the project.
To Use this NuGet Package, You Can Follow the Below Procedure
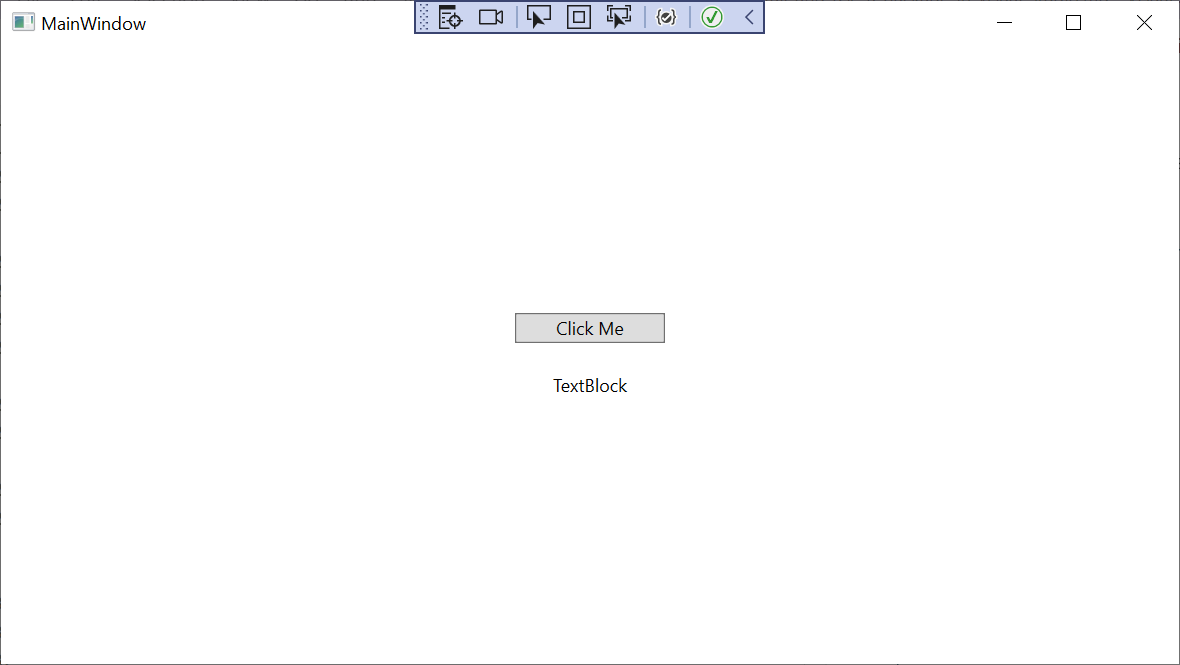
Step 1: Go to Solutions Explorer and open the MainWindow.xaml file. Inside the file, replace the <Grid> element with the following code.
<Grid Background="White">
    <StackPanel VerticalAlignment="Center">
        <Button Click="Button_Click" Width="100px" HorizontalAlignment="Center" Content="Click Me" Margin="10"/>
        <TextBlock Name="TextBlock" HorizontalAlignment="Center" Text="TextBlock" Margin="10"/>
    </StackPanel>
</Grid>
Step 2: Expand the MainWindow.xaml node and open the MainWindow.xaml.cs file. Now, put the below code block in the file.
public class Account
{
public string Name { get; set; }
public string Email { get; set; }
public DateTime DOB { get; set; }
}
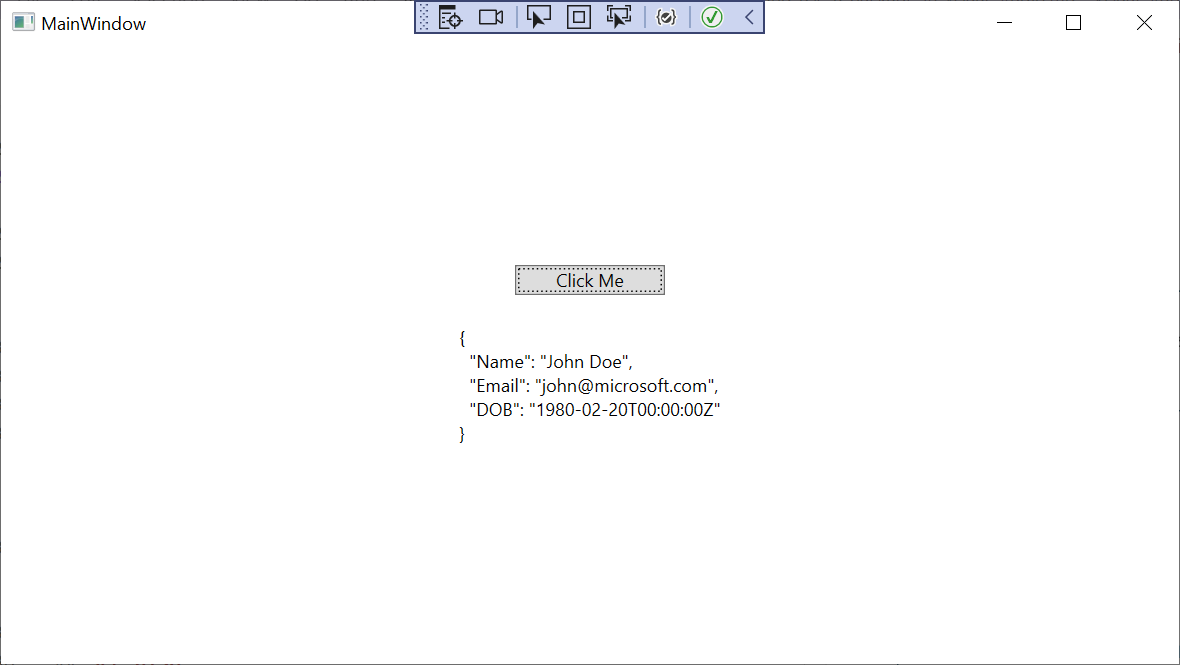
private void Button_Click(object sender, RoutedEventArgs e)
{
Account account = new Account
{
Name = "John Doe",
Email = "[email protected]",
DOB = new DateTime(1980, 2, 20, 0, 0, 0, DateTimeKind.Utc),
};
string json = JsonConvert.SerializeObject(account, Newtonsoft.Json.Formatting.Indented);
TextBlock.Text = json;
}Step 3: Add the below statement at the start of the file. It will prevent “JsonConvert” errors, as the Newtonsoft.Json package is used to convert objects into human-readable format.
using Newtonsoft.Json;Step 4: Use the Ctrl + F5 combination to run the WPF application. The output will be similar to the below snippet.
Step 5: Hit the “Click Me” button in the center to view the “TextBlock” content, replaced with JSON-based text format.
Similarly, you can install any of the NuGet packages and use its code in your .NET project to add new functionalities. It will help you save time and effort, as you will not be required to write code from scratch. But you should use the packages provided by authorized creators only. Otherwise, it can lead to open loopholes in the application. Additionally, we always prefer to test the software, especially the code within the package at your end, for complete security assurance.
Concluding Up
NuGet package manager is a centralized repository for sharing code and associated files for .NET development projects. It helps the development teams to collaborate and utilize the code base per requirements efficiently. In addition, it comes in two versions – private and public. In the private version, only authorized people are allowed to use a package. But, in the public version, anyone can use the package.
Furthermore, numerous NuGet package manager tools are available, helping the consumers and creators to perform their tasks. Among all the tools, the package manager console and UI are demonstrated above. You can undergo the procedure to understand how the package manager for .NET works thoroughly.

Expert in Software & Web App Engineering
Parag Mehta, the CEO and Founder of Positiwise Software Pvt Ltd has extensive knowledge of the development niche. He is implementing custom strategies to craft highly-appealing and robust applications for its clients and supporting employees to grow and ace the tasks. He is a consistent learner and always provides the best-in-quality solutions, accelerating productivity.


