
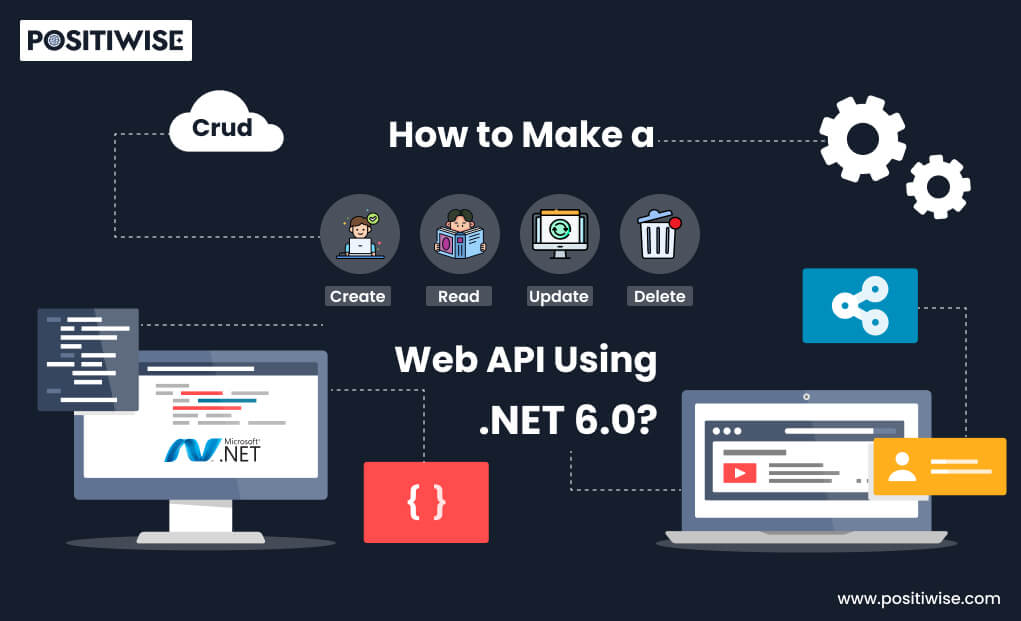
Quick Overview:
In the dynamic world of technology, creating robust web APIs has emerged as a crucial and indispensable skill for developers. These APIs serve as the vital link that fosters smooth communication between diverse applications, empowering seamless data retrieval and manipulation. The focus of this article is to create a Web API for CRUD Operations in .NET 6.
To achieve this, we shall leverage the incredible capabilities of .NET 6.0, an advanced and cutting-edge framework offered by the tech giant Microsoft. Before we embark on this journey, let’s ensure we comprehensively understand what exactly .NET 6 Web API best practices entail. Thus, let’s commence with a detailed exploration of the same.
What is .NET 6 Web API?
NET 6 Web API is an advanced framework an innovative framework meticulously crafted to construct resilient Application Programming Interfaces personalized for web applications. ASP.NET Core provides the foundation for dotnet 6, which offers high performance & cross-platform capabilities, making it an ideal choice for modern web development.
Transitioning from earlier versions, .NET 6 Web API introduces significant improvements, enhancing its efficiency and productivity for developers. With dotnet 6, developers can enjoy the hot reload feature, which lets them apply code changes instantly without restarting the application during development. It also has powerful diagnostic and testing tools for quick issue resolution, promoting teamwork, and higher-quality code.
Furthermore, you gain control over API CRUD operations and secure your data through authorization and authentication implementation.
What is CRUD in Web Services?
CRUD is an acronym that stands for Create, Read, Update, and Delete. It illustrates the four primary operations that can be performed on data:
- Create or C: adds new data or records to a database.
- Read or R: retrieves or fetches existing data from the database.
- Update or U: modifies existing data in a database.
- Delete or D: removes data from a database.
These operations represent the essential (basic) functionalities required for interacting with data stored in a database or data source through web APIs.
What are Get, Post, Put, and Delete Methods?
To interact with servers in .NET Development, the HTTP methods typically used are GET, POST, PUT, and DELETE. They’re crucial for transmitting and retrieving data. Before discussing the differences between CRUD and HTTP methods, knowing each method’s specifics is paramount.
- Get: retrieves data from a web server.
- Post: submits data to a specific resource on the web server for processing.
- Put: updates or replaces existing data on the server with new information.
- Delete: removes a specific resource from the web server.
CRUD vs Get Post Put Delete (HTTP Methods)
The main difference between CRUD and HTTP methods lies in their scope and purpose:
CRUD is a higher-level concept representing the four fundamental operations that manage data within an application or system. In contrast, HTTP methods are the specific means by which these CRUD operations are carried out in the context of web APIs and web services.
In lay terms, CRUD is a general concept illustrating data management operations, while the HTTP methods explain how those operations are executed within the context of web APIs.
Building Web APIs with ASP.NET Core in .NET 6 in Seven Steps
Before building web APIs with ASP.NET core in .NET 6, ensure that you have all of these essential tools and technologies installed:
- Visual Studio 2022: Confirm that your machine has installed the most current version of Visual Studio 2022. This robust development environment supports .NET 6 development, providing a seamless and efficient coding experience.
- .NET SDK 6.0: Install the .NET SDK version 6.0 or higher; it retains both – tools and libraries needed to build potent web APIs.
- SQL Server: Ensure you have access to a SQL Server database, as it will be the storage and management hub for your Web API’s data. Setting up a SQL Server database is crucial for successful data handling and retrieval within your application.
Step 1: Initiate a New Project
Follow the steps mentioned below to create a new project:
- Click the Search button placed on the taskbar.
- Type Visual Studio and press Enter.
- The Visual Studio window will appear.
- Click Create a new project.
- Select ASP.NET Core Web API as the project type.
- Click Next.
- In the Project Name field, enter the project’s name (CRUD_Project).
- In the Location field, enter the location to save the project.
- Click Next.
- From the Framework list, select .Net 6.0 (Long-term support).
- From the Authentication type list, select .Net 6.0 (Long-term support).
- Under the Docker OS section, verify that checkboxes in front of the Use controllers (uncheck to use minimal APIs) and Enable OpenAPI support options are checked.
- Click Create.
Step 2: Install Microsoft.EntityFrameworkCore.Tools & Microsoft.EntityFrameworkCore.SqlServer – (NuGet packages)
Follow the steps mentioned below to install the .Tools package:
- In the Visual Studio window, right-click Dependencies.
- Select Manage NuGet Packages.
- Select the Browse tab.
- Type Microsoft.EntityFrameworkCore.Tools and press Enter.
- Install the latest version.
- Now, add (install) the .SqlServer package in the same manner.
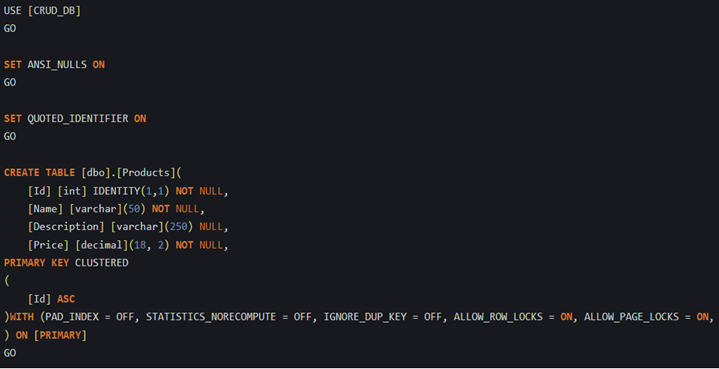
Step 3: Create a New Database in SQL
Follow the steps mentioned below to build a fresh database in SQL:
- Create a new SQL database named CRUD_DB (you can choose a different name if desired).
- Execute the script to create a Product table inside the CRUD_DB database.
Step 4: Create DB Context and Model
Follow the steps mentioned below to build a fresh database in SQL using the database first approach in ASP.NET Core Web API project:
- Click the Search button placed on the taskbar.
- Type Visual Studio and press Enter.
- The Visual Studio window will appear.
- From the Tools list, select NuGet Package Manager, and then click Package Manager Console.
- The Package Manager Console window will appear.
- Type “Scaffold-DbContext “Server=SERVERNAME;Database=CRUD_DB;Integrated Security=True” Microsoft.EntityFrameworkCore.SqlServer -OutputDir Models.” (Replace CRUD_DB with your database server name)
- Press Enter.
Additional Info:
After executing the command, the Model folder will be created in the project solution, housing two essential files: ProductDBContext.cs and Product.cs. The ProductDBContext.cs file handles database interactions, while Product.cs serves as a model representing the structure of the “Products” table in the database.
To maintain a clean and efficient codebase, it is recommended to remove the OnConfiguring() method from ProductDBContext.cs, as it contains the database connection string, which should be managed differently for better organization. Instead, the connection string will be added to the appsettings.json file. Moreover, the ProductDBContext() constructor in the same file will be removed to enhance code simplicity and performance. These adjustments contribute to a well-organized project adhering to the best practices in .NET Core development.
Step 5: Setup DB Connection
Follow the steps mentioned below to set the DB connection:
- Open the appsettings.json file.
- Insert the required database connection string.
- Substitute servername with the name of your database server.
- Configure the database connection using the connection string in the Program.cs file.
Update Program.cs
To accommodate the changes introduced in .NET 6, configuration adjustments are now made in the Program.cs file, as Startup.cs is no longer utilized for configurations. Include the following lines in Program.cs:
var connectionString = builder.Configuration.GetConnectionString("ProductDB");
builder.Services.AddDbContextPool(option => option.UseSqlServer(ConnectionStrong));
Don’t forget to include the necessary “using” statements at the top of the Program.cs file to enable the required functionalities.
USING Microsoft.EntityFrameworkCore;
USING ProductAPI.Models;
Step 6: Insert Products Controller
Follow the steps mentioned below to insert product controller:
- In Solution Explorer, right-click the Controllers folder.
- Select Add and then click Controller.
- The Add Controller dialog box will appear.
- In the Controller name field, enter the name. (CRUD_CONTROLLER)
- From the Template list, select Empty API Controller.
- Click Add.
Step 7: Add Methods in ProductsController.cs
In the ProductsController.cs file, we will incorporate essential endpoints to accomplish the four primary CRUD operations: GET, POST, PUT, and DELETE. These endpoints enable communication with the API and the handling of data effectively. You can use the provided code snippets within your ProductsController.cs file to implement these functionalities. By doing so, you will be equipped to perform “n” number of CRUD operations on the “Products” table and ensure seamless data handling within your web API.
using Microsoft.AspNetCore.Mvc;
using Microsoft.EntityFrameworkCore;
using ProductCRUDAPI.Models;

namespace ProductCRUDAPI.Controllers
{
    [Route("api/[controller]")]
    [ApiController]
    public class ProductsController : ControllerBase
    {
        private readonly ProductDBContext _context;

        public ProductsController(ProductDBContext context)
        {
            _context = context;
        }

        [HttpGet]
        public async Task<IEnumerable<Product>> Get()
        {
            return await _context.Products.ToListAsync();
        }

        [HttpGet("{id}")]
        public async Task<IActionResult> Get(int id)
        {
            if (id < 1)
                return BadRequest();
            var product = await _context.Products.FirstOrDefaultAsync(m => m.Id == id);
            if (product == null)
                return NotFound();
            return Ok(product);

        }

        [HttpPost]
        public async Task<IActionResult> Post(Product product)
        {
            _context.Add(product);
            await _context.SaveChangesAsync();
            return Ok();
        }

        [HttpPut]
        public async Task<IActionResult> Put(Product productData)
        {
            if (productData == null || productData.Id == 0)
                return BadRequest();

            var product = await _context.Products.FindAsync(productData.Id);
            if (product == null)
                return NotFound();
            product.Name = productData.Name;
            product.Description = productData.Description;
            product.Price = productData.Price;
            await _context.SaveChangesAsync();
            return Ok();
        }

        [HttpDelete("{id}")]
        public async Task<IActionResult> Delete(int id)
        {
            if (id < 1)
                return BadRequest();
            var product = await _context.Products.FindAsync(id);
            if (product == null)
                return NotFound();
            _context.Products.Remove(product);
            await _context.SaveChangesAsync();
            return Ok();

        }
    }
}
Step 8: Launch the Web API
Follow the steps mentioned below to launch the Web API:
- Press F5 in Visual Studio to launch the Web API.
- Open a fresh tab in Chrome.
- In the URL bar, type “https://localhost:{port}/swagger/index.html.” (replace “{port}” with the actual port number your API is running on).
- Test the functionality of your CRUD Web API.
Take Your .NET Projects to New Heights with Our Talented Developers!
Drive your projects to success with our expert .NET developers – Let’s build something incredible together!
Conclusion
I hope everything is clear and you can easily make a CRUD Web API Using .NET 6.0. When looking to hire .NET Web API developers, ensure they have hands-on experience building CRUD-based APIs with .NET 6.0 and can smoothly handle any uncertainties that arise. If you have any questions on the development process, an experienced .NET Web API developer should be able to advise and clarify properly. Until then, keep coding, and have a great day!

Expert in Software & Web App Engineering
Parag Mehta, the CEO and Founder of Positiwise Software Pvt Ltd has extensive knowledge of the development niche. He is implementing custom strategies to craft highly-appealing and robust applications for its clients and supporting employees to grow and ace the tasks. He is a consistent learner and always provides the best-in-quality solutions, accelerating productivity.


