
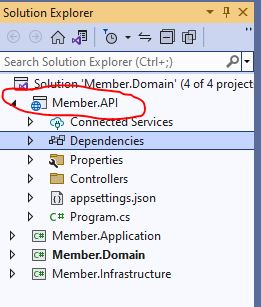
Quick Overview:
With the increasing of an application with effortless maintenance, and higher flexibility, .NET core clean architecture has been a top choice. You can consider it as an approach used for developing software with minimal dependency. The clean architecture, known as the onion architecture, features four main layers that individualize the interface, business logic, databases, and entities. In this blog, you will get a clear insight into the .NET clean architecture by creating an API based on it. As a result, you will know how to implement clean architecture for other projects and how exactly its benefits the .NET software development.
Introduction
With the rapidly evolving global market and user needs, every organization looks for an easy-to-maintain and upgrade application. In recent years, creating such an app has been a complex task. But, with the introduction of Clean Architecture .NET Core, it has become easy to update an app and improve flexibility.
Also, in this blog, we’ll discover the benefits and layers of .NET clean architecture and its practical implementation.
What is .NET Core Clean Architecture?
Before we dive into the tutorial for understanding the .NET Core clean architecture, it’s essential to have basic information about it. You ought to understand how Clean Architecture operates, its advantages, and the constituent layers it comprises.
So, let’s start.
You can consider .NET clean architecture as a development approach, available in a layered form to reduce dependency. In simple terms, you can say that it provides more freedom to all components and improve application testability, maintainability, scalability, and flexibility.
In addition, clean architecture is also considered onion architecture due to its multiple layers, similar to an onion. Primarily, it consists of four layers: The domain or the core layer, the Application layer, the Infrastructure layer, and the Framework layer.
In addition, one of the main benefits of using clean architecture .NET core is its ability to separate implementation details from business logic. Further, its other advantages include:
- It leverages .NET developers to efficiently focus on each logic and curate it accurately.
- It helps to maintain the coding practices, leading to improve application stability and security.
- It aids in writing effective automated test cases, focusing on core business logic.
- The clean architecture improves the flexibility of the .NET business solution.
- It aids in quickly adding new features, APIs, and third-party components.
Overview of Four Primary Layers of .NET Clean Architecture
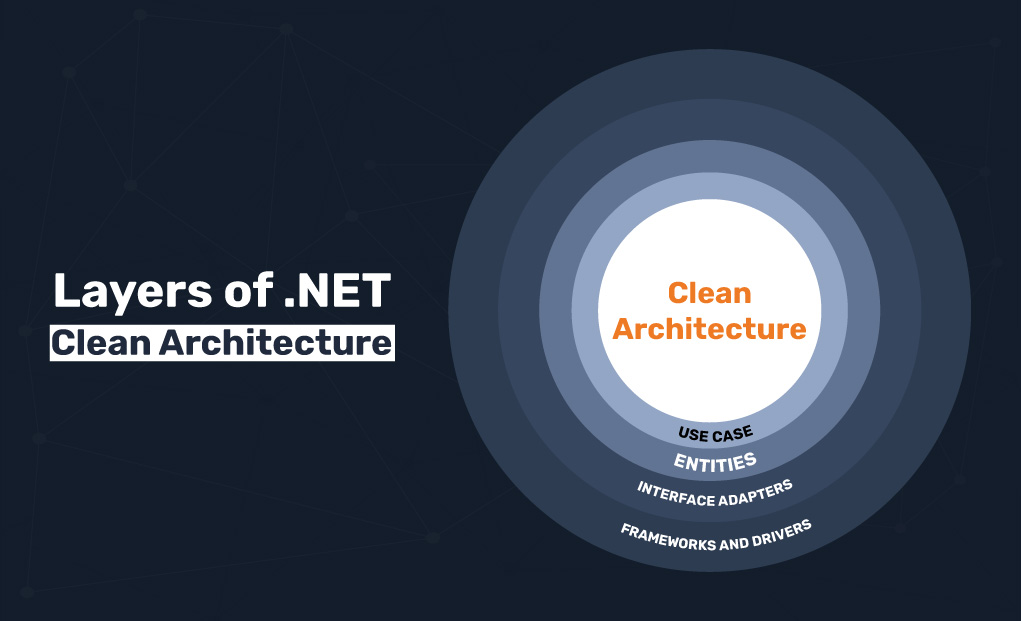
The main four layers of clean architecture consist of:
- Domain Layer
- Application Layer
- Infrastructure Layer
- Presentation Layer
Domain Layer: It’s the core of the architecture, where business logic gets implemented. In addition, this layer doesn’t depend on any other layers and functions per the code written using classes and interfaces.
Application Layer: The application layer resides in the middle of the presentation and domain layer and functions as an intermediate between them. Primarily, it maintains the data between corresponding layers but is independent of the infrastructure and presentation layer.
Infrastructure Layer: All the file systems and databases get configured at the infrastructure layer. It aids the application to interact with external components to maintain the workflow and process data.
Presentation Layer: As the name defines, the presentation layer is for writing the interface code. ASP.NET Core is used for building the interface. You should hire a dedicated .NET developer for it, as they ensure an attractive and smooth GUI for a better user satisfaction rate.
The Implementation of ASP.NET Clean Architecture
To better understand the clean architecture, we are going to see its implementation with the following tutorial. It will help you know the working and configuration of each ASP.NET Core clean architecture layer. As a result, you can develop any API and application using the same architecture and improve productivity.
Furthermore, this tutorial will implement the architecture using ASP.NET Core, which is based on .NET Core technology. The primary reason for selecting ASP.NET Core is to provide an easy understanding of clean architecture. Also, it gets used for building interfaces for clean architecture-based software.
Requirements before starting the clean architecture .NET Core implementation
To begin with .NET clean architecture, you must have experience in ASP.NET Core development and install Visual Studio 2019 or a higher version on your machine. Otherwise, building a clean architecture based on ASP.NET Core Web API will be a highly complex task.
- Configuration of Domain Layer of Clean Architecture .NET
- Configuration of Application Layer
- Configuration of Infrastructure Layer
- Configuration of API
- Test and Confirm
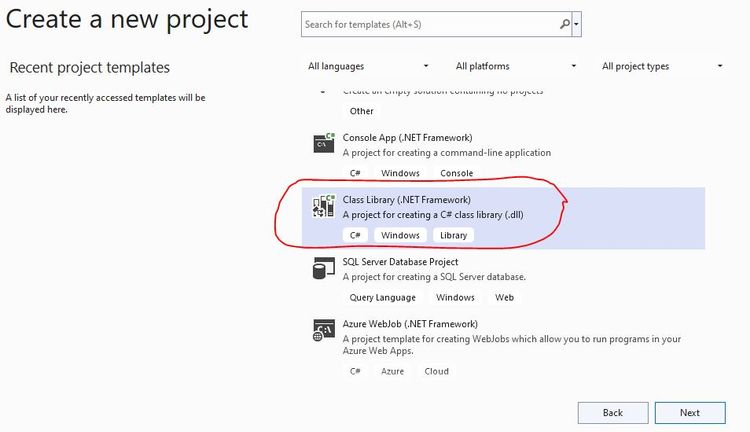
Phase 1: Configuration of Domain Layer of Clean Architecture .NET
You must start the development from the core layer, i.e., the domain layer. And as you know, it doesn’t depend on any other layer in the onion architecture.
- Open the Visual Studio on your machine and select the Class Library from the Create a new project list. Then, click on the Next button.
- Now, you must provide the project details to configure it. Input the project name, storage location, solution name, and the framework (ensure you select the latest version available for better stability).
- In this example, we have set the project name to Member.Domain.
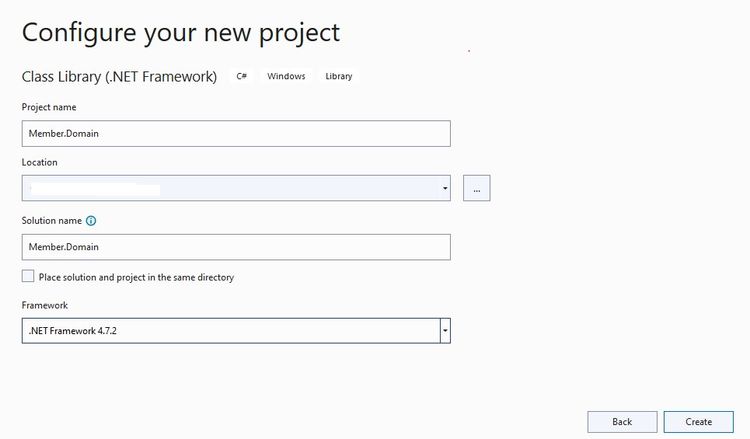
- Further, hit the Create button to finish the creation of the project. Once visual studio displays the project, you should create a domain class with the name ‘Member.cs’.
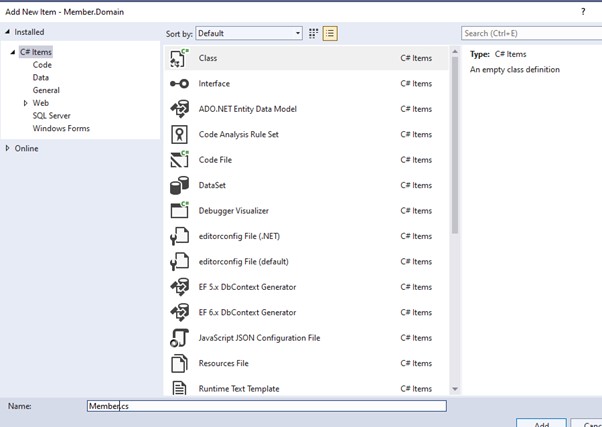
- After the Member.cs class creation, add the following code and save the file.
namespace Member.Domain
{
    public class Member
    {
        public int Id { get; set; }
        public string Name { get; set; }
        public string Type { get; set; }
        public string Address { get; set; }

    }
}
Phase 2: Configuration of Application Layer
Now, we are at the second phase/second layer of our clean architecture .NET project. As per the layered architecture, you should now configure the application layer, where use cases and business rules reside.
- Go to the solution manager, available on the right side of Visual Studio, and generate a new class library named ‘Member.Application‘.
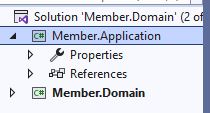
From this layer, we are going to make reference to other layers. For instance, you need to take reference of the domain layer to the application layer.
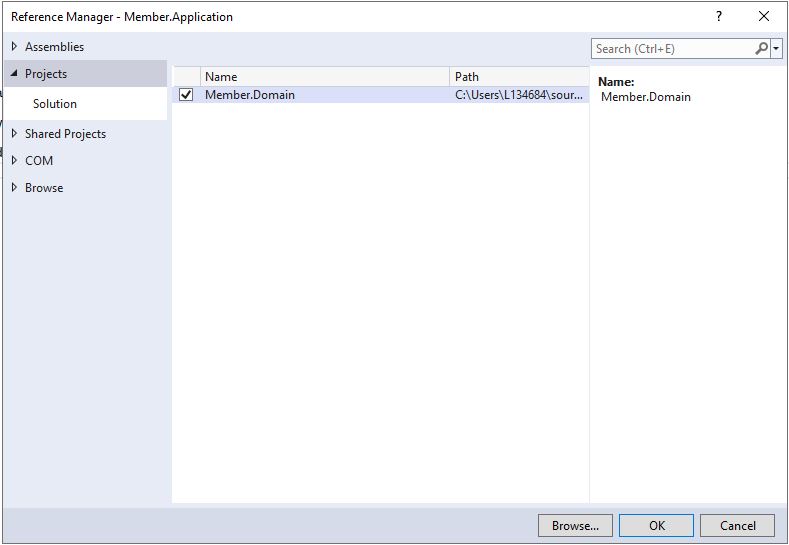
- Click on the references to open the Reference Manager. Further, select the Member.Domain using the checkbox and click on the OK button.

- After taking the reference of the domain layer, create three new classes with the name – ImemberRepository.cs, IMemberServices.cs, and MemberService.cs. In addition, input the code as provided below for each file and save it.
ImemberRepository.cs
using System.Collections.Generic;

namespace Member.Application
{
    public interface IMemberRepository
    {
        List<Domain.Member> GetAllMembers();
    }
}
IMemberServices.cs file
using System.Collections.Generic;

namespace Member.Application
{
    //This interface is use for Bussiness Rule / USE CASE
    public interface IMemberService
    {
        List<Domain.Member> GetAllMembers();
    }
}
MemberService.cs file
using System.Collections.Generic;

namespace Member.Application
{
    //Implement Bussiness Rule / USE CASES
    public class MemberService : IMemberService
    {
        private readonly IMemberRepository memberRepository;
        public MemberService(IMemberRepository memberRepository)
        {
            this.memberRepository = memberRepository;
        }
        List<Domain.Member> IMemberService.GetAllMembers()
        {
            return this.memberRepository.GetAllMembers();
        }
    }
}
The application part gets completed.
Phase 3: Configuration of Infrastructure Layer
After the application layer comes the infrastructure layer. To this layer, we will provide the reference of the previous two layers – the domain and application layer.
- Similar to the previous phase, generate a new class library and name it ‘Member.Infrastructure’. Once the class library gets created, provide the reference of the application (Member.Application) and domain layer (Member.Domain).
- Click the OK button to generate a new class in the infrastructure layer. For this example, you can name the class as MemberRepository.
The main purpose of creating this class is to implement the ImemberRepository.cs class created at the application layer. You should add the following code and save the file.
using Member.Application;
using System.Collections.Generic;

namespace Member.Infrastructure
{
    public class MemberRepository : IMemberRepository
    {
        public static List<Domain.Member> lstMembers = new List<Domain.Member>()
        {
           new Domain.Member{  Id =1 ,Name= "Kirtesh Shah", Type ="G" , Address="Vadodara"},
           new Domain.Member{  Id =2 ,Name= "Mahesh Shah", Type ="S" , Address="Dabhoi"},
           new Domain.Member{  Id =3 ,Name= "Nitya Shah", Type ="G" , Address="Mumbai"},
           new Domain.Member{  Id =4 ,Name= "Dilip Shah", Type ="S" , Address="Dabhoi"},
           new Domain.Member{  Id =5 ,Name= "Hansa Shah", Type ="S" , Address="Dabhoi"},
           new Domain.Member{  Id =6 ,Name= "Mita Shah", Type ="G" , Address="Surat"}
        };
        public List<Domain.Member> GetAllMembers()
        {
            return lstMembers;
        }
    }
}
Here, the infrastructure layer configuration is completed.
Phase 4: Configuration of API
As per the clean architecture, now we need to configure the outmost layer. You can configure anything at this layer, including WPF and web applications. But, for this example, we are going to implement an API.
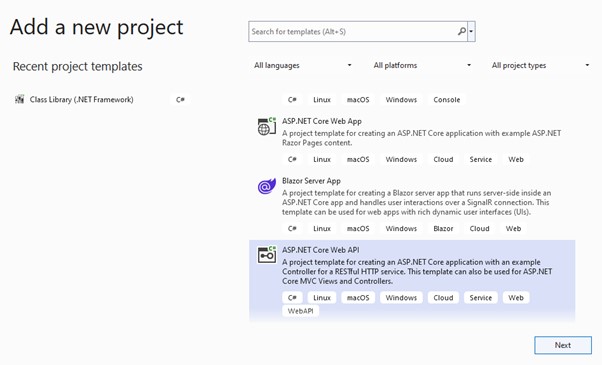
- To start with this layer’s configuration, create a new ASP.NET Core Web API project. Follow the similar procedure as in Phase 1. Input details and generate the project with the name ‘Member.API’.
- After project creation, set it as the default project, as highlighted in the below snippet.
- Similar to other layers in the architecture, except the domain layer provides the references to the API layer. Select the Member.Domain, Member.Application, and Member.Infrastructure is a reference for this layer.
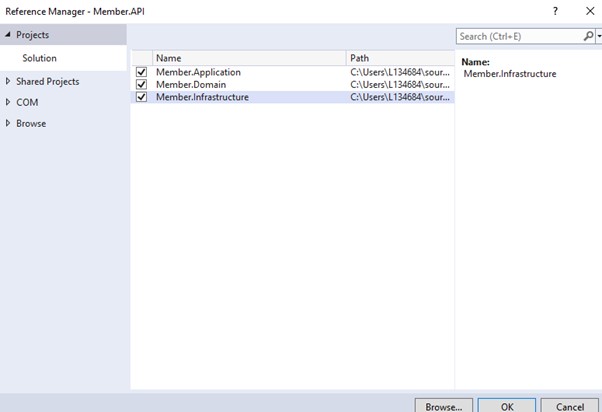
- To finalize the references, click on the OK button.
Further, access the Program.cs file and add the below code to it. You can find that methods in this code are defined in the files created at the infrastructure and application layer.
using Member.Application;
using Member.Infrastructure;
var builder = WebApplication.CreateBuilder(args);
// Add services to the container.
builder.Services.AddControllers();
// Learn more about configuring Swagger/OpenAPI at https://aka.ms/aspnetcore/swashbuckle
builder.Services.AddEndpointsApiExplorer();
builder.Services.AddSwaggerGen();
builder.Services.AddScoped < IMemberRepository, MemberRepository > ();
builder.Services.AddScoped < IMemberService, MemberService > ();
var app = builder.Build();
// Configure the HTTP request pipeline.
if (app.Environment.IsDevelopment()) {
    app.UseSwagger();
    app.UseSwaggerUI();
}
app.UseHttpsRedirection();
app.UseAuthorization();
app.MapControllers();
app.Run();
Additionally, you should extend the functionalities by adding an API controller. In this tutorial, we are naming it as ‘MembersController.cs’.
Add the below code to MembersController.cs file and save it. As a result, the constructor providing adding of dependency injection and calling the Get() method of API gets implemented.
using Member.Application;
using Microsoft.AspNetCore.Mvc;

// For more information on enabling Web API for empty projects, visit https://go.microsoft.com/fwlink/?LinkID=397860

namespace Member.API.Controllers
{
    [Route("api/[controller]")]
    [ApiController]
    public class MembersController : ControllerBase
    {

        private readonly IMemberService memberService;

        public MembersController(IMemberService memberService)
        {
          this.memberService = memberService;
        }
        // GET: api/<MembersController>
        [HttpGet]
        public ActionResult<IList<Domain.Member>> Get()
        {
            return Ok(this.memberService.GetAllMembers());
        }

    }
}
Here, all the layers of clean architecture are now configured, and only testing is remaining.
Phase 5: Test and Confirm
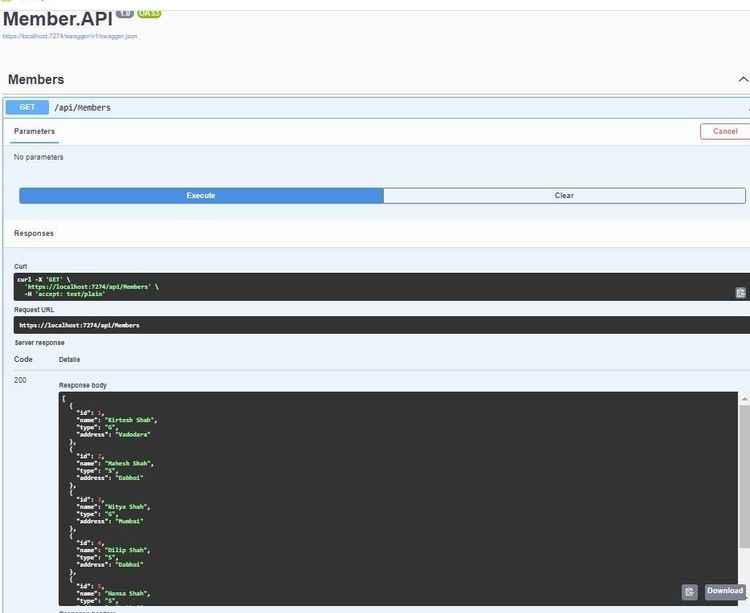
We are at the final stage, where you must test the API. Testing is quite easy using Visual Studio, as you need to run the project, and it will provide you with relevant output.
As you can see, our ASP.NET API based on clean architecture works fine. The get() method we implemented is retrieving and displaying the data on the screen.
Similarly, you can use the .NET Core clean architecture to build different kinds of applications, WPF, and APIs.
The Need To Hire Dedicated .NET Developers
The dedicated .NET developers are the foundation of any clean architecture .NET project. They understand every layer of the architecture and write the correct code where required. In addition, .NET professionals help with:
- Defining the project and business objectives
- Creating the application design
- Writing an error-free code
- Ensuring app performance, scalability, and reliability
- Debugging the app
- Handling exceptions and more
However, you should only hire dedicated .NET developers from a trusted company, like Positiwise Software Pvt Ltd.
Concluding Up on Clean Architecture .NET Core
Clean Architecture .NET core highly gets used by professionals to create applications based on a layered approach. It helps to reduce the dependability between business logic, use cases, and interface. And it supports in improving the testability, scalability, and app maintainability. To create a .NET app based on clean architecture, you need a visual studio, the latest version of .NET, and knowledge of ASP.NET.
Further, you can create different layers in your project, write code and reference them to build an API, WPF, and a full-fledged app. Although you can also outsource .NET developers for affordable and business-oriented .NET clean architecture solution development.

Expert in Software & Web App Engineering
Parag Mehta, the CEO and Founder of Positiwise Software Pvt Ltd has extensive knowledge of the development niche. He is implementing custom strategies to craft highly-appealing and robust applications for its clients and supporting employees to grow and ace the tasks. He is a consistent learner and always provides the best-in-quality solutions, accelerating productivity.


