Quick Overview:
The blog helps you learn the process of developing a RESTful API with ASP.NET Core. You only need a Visual Studio to execute the process and understand it thoroughly. It starts by creating a project in the VS IDE and ends with testing all the RESTful API methods, including GET, POST, PUT, and DELETE.
Build RESTful API with ASP.NET Core
RESTful API enables the dotnet applications to interact with other services, databases, and applications. It’s highly scalable, secure, and flexible, which is why most dotnet developers prefer it over other API architectures. To help you with creating a RESTful API with ASP.NET, we have provided a completely streamlined procedure.
By following all the mentioned steps, you can build a RESTful API within the minimal time possible.
The Complete Approach for Creating RESTful API with ASP.NET
The process of creating a RESTful API with ASP.NET Core is a seamless task. Here, we have listed all the required steps that you should follow to develop and test the API. Primarily, we are going to have three development phases and four testing phases to ensure the working of all significant operations.
Phase 1: Project Creation and Model Adding
To create the project, you should open the Visual Studio IDE and, under the .NET Core templates, choose the “ASP.NET Core Web Application” project. Further, provide the project details, such as name, location and click “OK”.
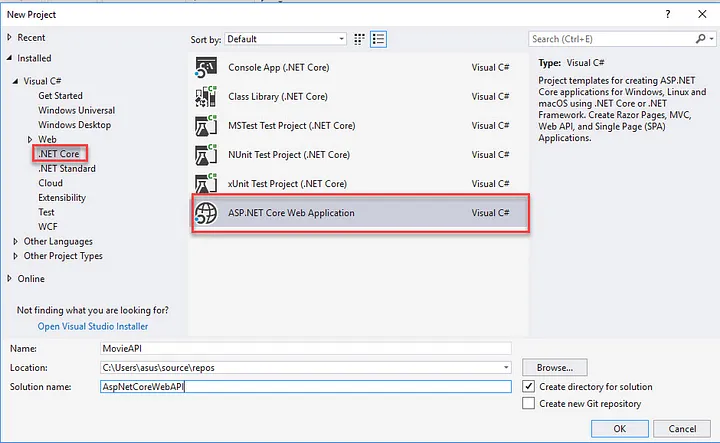
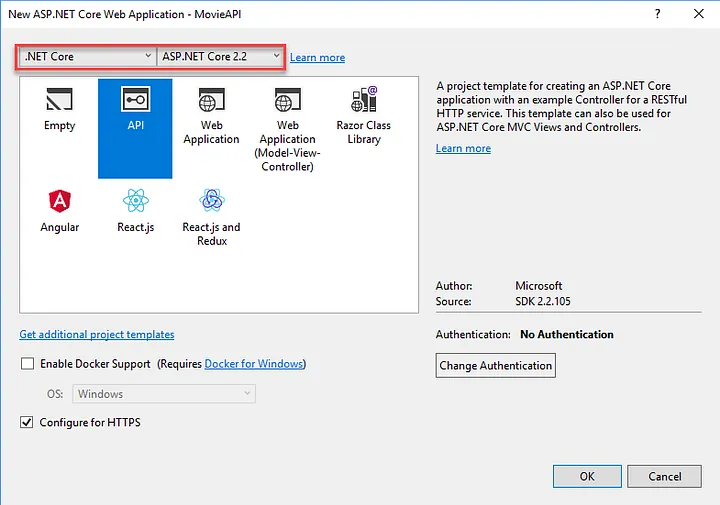
Following it, choose “API” as the preferred choice and click “OK” to create the project.
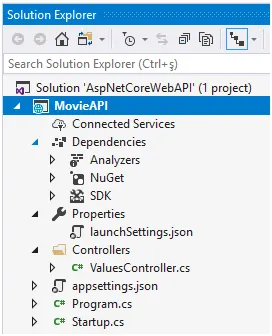
Once the project gets created, you’ll see a similar file structure in the solution explorer window.
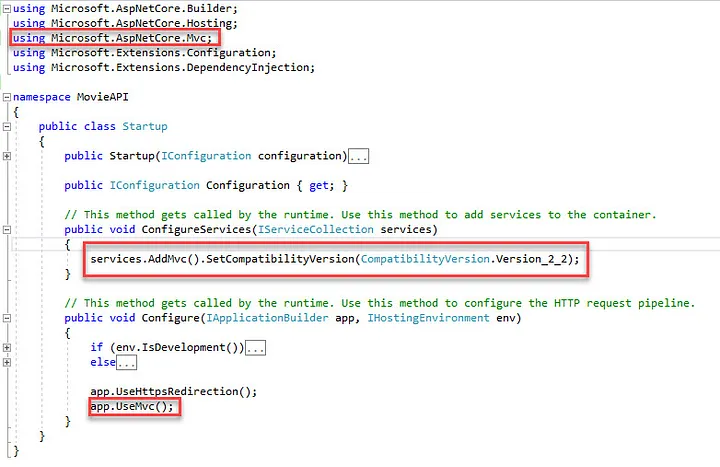
In addition, if you open the “Startup.cs” file, you’ll view the project’s MVC architecture. The code in the file will look similar to the following.
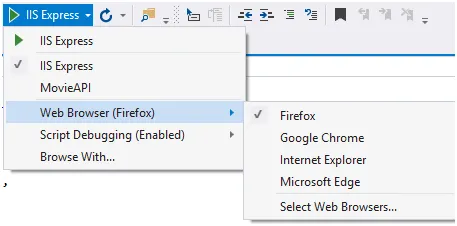
Furthermore, before moving to the configuration part, let’s look at the default output for better clarification. To do so, use the “Ctrl+F5” combination. You can choose your own web server and browser for this purpose. But, it’s recommended to use the default, which is the IIS server and Mozilla browser.
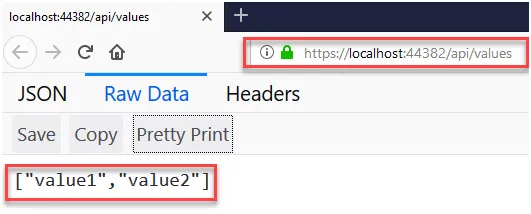
The output after running the application will be similar to the following.
Moreover, if you open the “launchSettings.json” file, you will see the defined default URL.

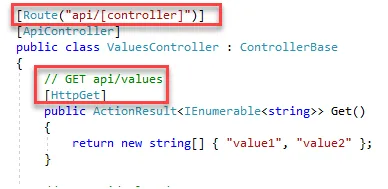
Similarly, by opening the “ValuesController.cs” file, you can see the defined logic of the GET method used by RESTful API.
Now, we will be configuring the model part of the MVC architecture. For this, you have to navigate to Solutions Explorer > Right-click the ASP.NET Project > Add > New Folder (Name it Models).
Further, right-click on Models > Add > Class (name it Movie.cs). Once the class file gets created, add the following code to it.
using System;
using System.ComponentModel.DataAnnotations;

namespace MovieAPI.Models
{
    public class Movie
    {
        public int Id { get; set; }

        [Required]
        [StringLength(60, MinimumLength = 3)]
        public string Title { get; set; }

        [Required]
        [StringLength(30)]
        [RegularExpression(@"^[A-Z]+[a-zA-Z""'\s-]*$")]
        public string Genre { get; set; }

        [DataType(DataType.Date)]
        public DateTime ReleaseDate { get; set; }
    }
}
As you analyze the above code, the “id” field will be utilized as a key by the database. In addition, numerous data annotations are also defined, such as “required” for compulsory properties, “RegularExpression” for limiting input, and “Genre” for letters only.
Phase 2: Controller and Scaffolding Configuration
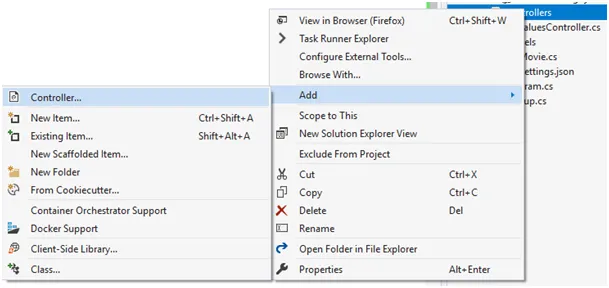
To add the controller part, use the right-click on Controller folder > Add > Controller.
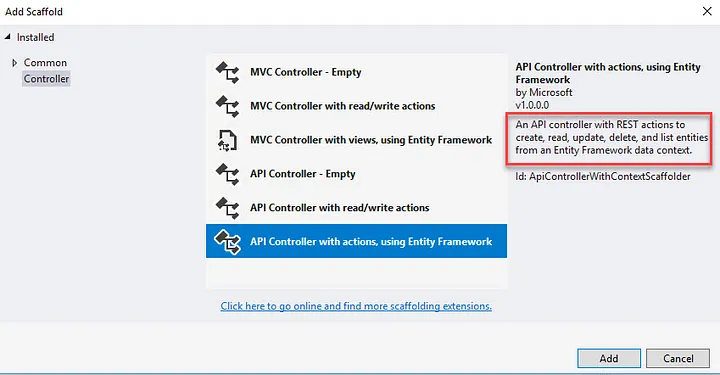
When you will add the controller, a Scaffold dialog will appear, where you have to choose “API Controller with actions with entity framework”.
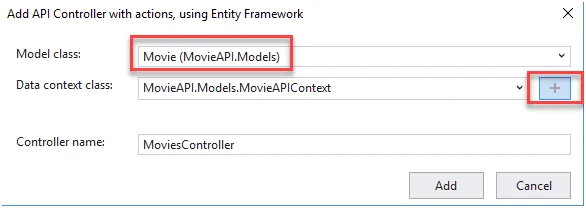
Further, choose the Model class as “Movie” and also add the data context class using the “+” symbol. Once you do it, the scaffolding will start working.
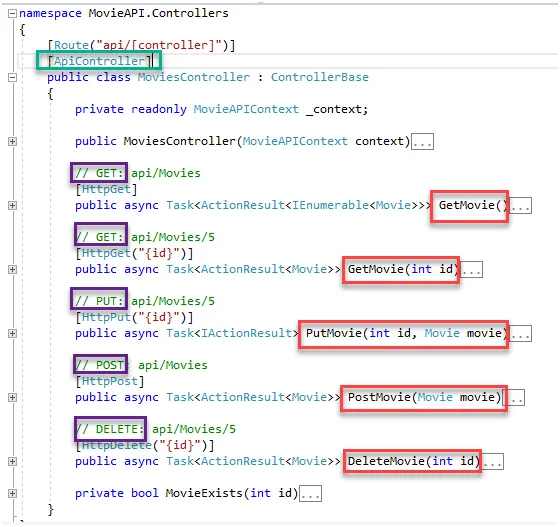
After completing this procedure, go to Controllers > MoviesController.cs file. You will see that the file contains all the API methods.
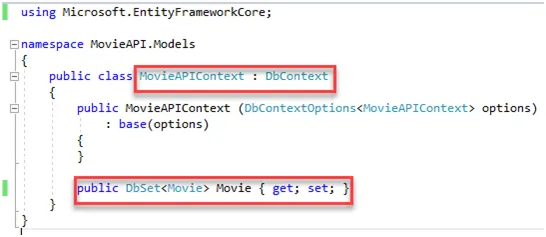
In addition, the go-to Data > MovieAPIContext.cs file. Here, the entities included in the model will be specified.
Phase 3: Database and Migration Implementation
For the database configurations, go to Tools à NuGet Package Manager à Package Manager Console and execute the below command.
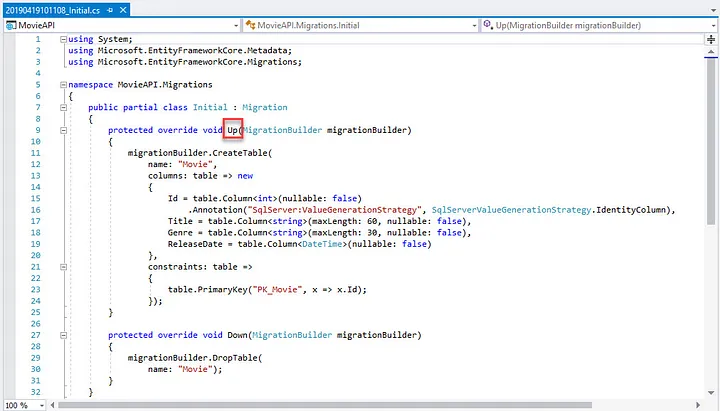
Command: Add-Migration Initial
As a result, you will have the code for the initial database schema, which can be used with the MovieAPIContext class model. In addition, your migration file will look similar to the following.
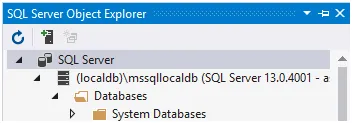
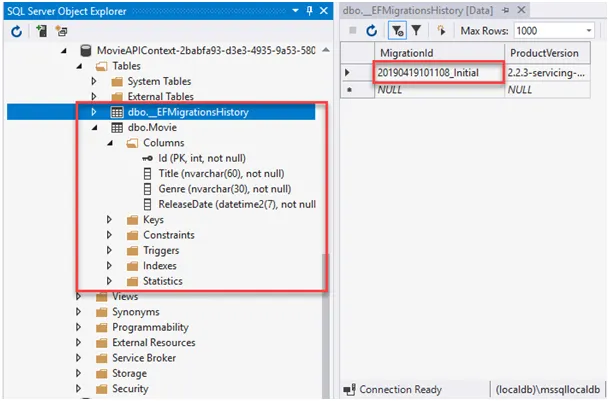
Furthermore, again, open the Package Manager console and run the command: Update-Database for creating the database. You can view it through the path: View > SQL Server Object Explorer.
Phase 4: GET Method Configuration and Testing
Firstly, we will be configuring the testing of the GET method. You need to ensure that whenever the API executes the GET operation, it returns the values in the database. Here, we are going to use two GET implementations as follows:
- GET /api/Movies
- GET /api/Movies/{id}
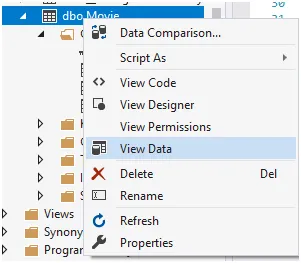
To test these endpoints, go to SQL server object explorer, then right-click on Movie table and choose View data. Once the database opens, add some details in its columns and rows.
Added data:

Now, open the browser and start testing.
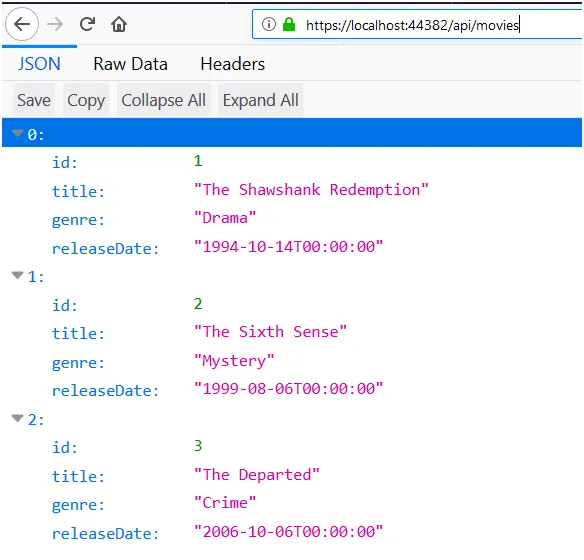
Test Case #1: Open the browser and enter the URL: https://localhost:{port}/api/movies.
The output must be all the movie details available in the database.
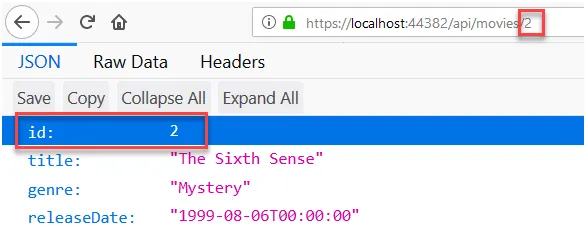
Test Case #2: Use the URL: https://localhost:{port}/api/movies/2.
Here, the ID is mentioned in the URL, which is “2”. So, the GET should provide the movie name that is available in the second row.
Output:
Phase 5: POST Method Implementation and Testing
The POST method is utilized to add values to the database. It returns the output as HTTP 201 code, meaning that the operation is successful. To test this endpoint, the POSTMAN tool gets utilized, and “location” is added to the header to define the location.
To test POST, configure the HTTP method as POST in the POSTMAN tool. Following it, input the URL: https://localhost:{port}/api/movies. Now, choose “Body” tab > “Raw” radio button > JSON (application/json).
Further, remove the ID part and, input movie record JSON details, and click “Send”.
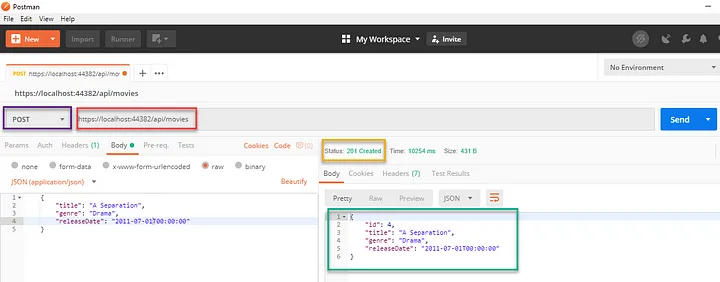
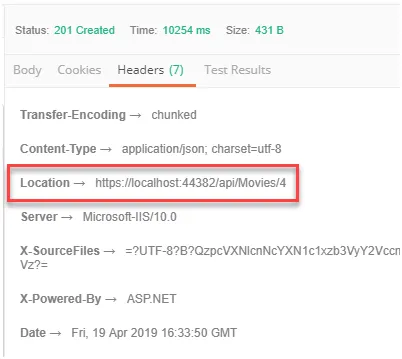
Once the POSTMAN tool completes the operation, open the Headers tab to view the location of the newly created database entry.
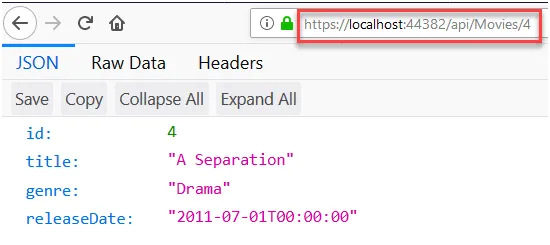
Additionally, if you want to validate the POST method, open the browser, use the id as “4,” and run the GET URL as demonstrated below.
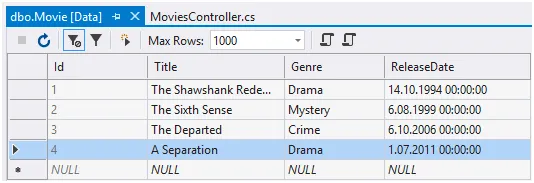
Also, you can view the database for verification.
As we have also utilized data annotations in our RESTful API with the ASP.NET Core project, you should also test them by inputting an invalid record.

Phase 6: PUT Method Configuration and Testing
The PUT method of RESTful API is used to update the information available in the database. It’s configured in the “HttpPut” attribute in the “MoviesController.cs” file.
To test the PUT method, open the POSTMAN tool and input the URL: https://localhost:{port}/api/movies/3. After this, go to the “Body” tab > “Raw” radio button > JSON. Lastly, enter the following record in JSON format and click on “Send.”
{
    "id": 3,
    "title": "The Departed",
    "genre": "Thriller",
    "releaseDate": "2006-10-06T00:00:00"
}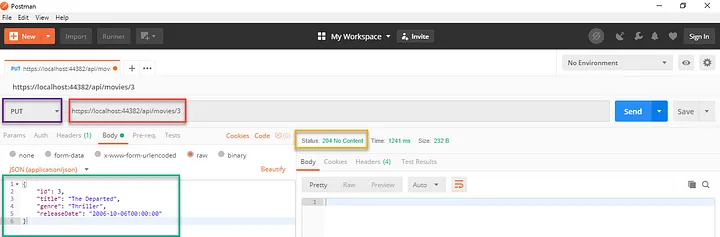
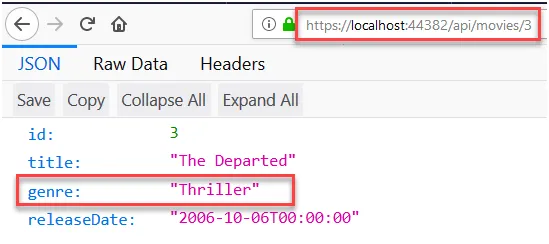
As we have updated the movie name listed at the third number, you should use the GET operation to fetch details and verify the PUT method.
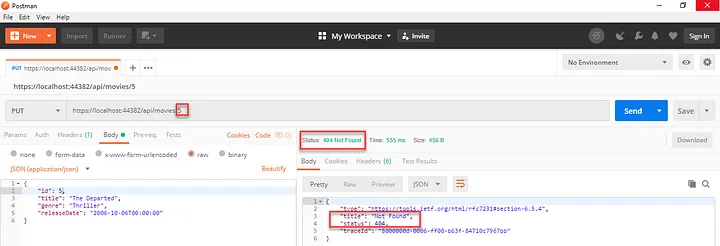
Similarly, you can update any database. However, if you enter an invalid input, a 404 error status code will be displayed.
Phase 7: DELETE Method Implementation and Testing
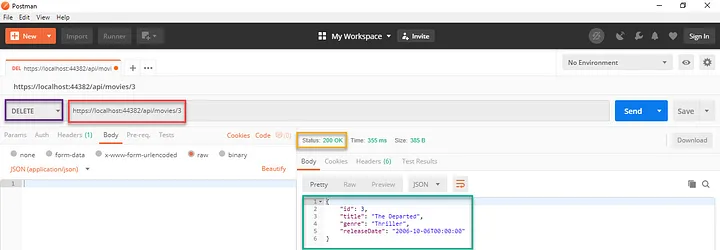
Now, we’ll test the DELETE method of RESTful API. Again, open the POSTMAN, configure the method as DELETE, and enter the URL with id as “3”: https://localhost:{port}/api/movies/3.
Click on “Send,” and you will have the output with a 200 status code.
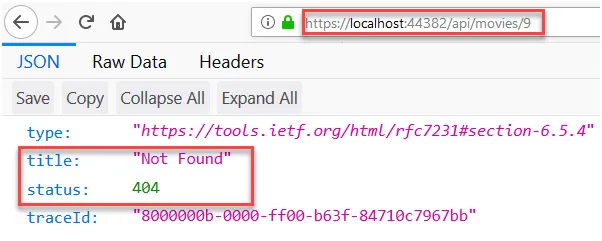
To verify the execution of the DELETE method, use GET to fetch the details of the movie at the “3” number. As it’s deleted, the 404 code must be returned.
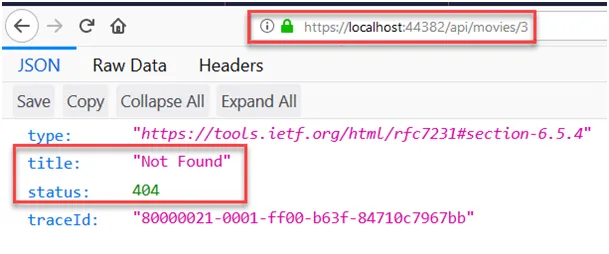
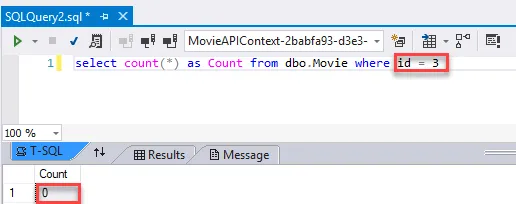
Additionally, you should also check the database manually for complete validation.
Concluding Up
Creating RESTful API with ASP.NET Core is a streamlined task with Visual Studio IDE, as it provides all the necessary tools in one place. You only need to create the project and then configure the model and the controller files. Following it, perform the database and migration procedure, and you are ready to test the GET, POST, PUT, and DELETE methods. Lastly, if the test results are satisfactory, your RESTful API creation gets completed.

Expert in Marketing Strategy and Brand Recognition
Jemin Desai is Chief Marketing Officer at Positiwise Software Pvt Ltd, he is responsible for creating and accelerating the company’s marketing strategy and brand recognition across the globe. He has more than 20 years of experience in senior marketing roles at the Inc. 5000 Fastest-Growing Private Companies.