
Quick Overview:
The blog provides an insight into the gRPC (google Remote Procedure Call) with a brief definition and its benefits. In addition, you will undergo each step to implement it and create a server and client application to test its functioning. The practical example will help you learn about all the required packages and files for building gRPC services with ASP.NET Core.
How to Use gRPC Services with ASP.NET Core
In the wide list of numerous API designs, there’s a new entry in the market known as gRPC. Nowadays, it’s highly trending among .NET developers for leveraging efficiency, interoperability, and advanced tooling mechanisms. In this post, you will also get to know about this trending technology.
By undergoing the sections further, you will have a brief understanding of gRPC and a detailed implementation procedure.
Let’s get started.
What is gRPC?
gRPC is an advanced mechanism used to boost the Remote Procedure Call functionality in the applications. Primarily, it is considered a framework that can be used with the Microsoft dotnet framework for efficiently providing client devices with required services.
In addition, it gets used in data centers as pluggable support, offering health checking, authentication, load balancing, and tracing. The .NET professionals prefer it for implementing reliable server-client architecture with the help of pre-defined interfaces.
Besides .NET and ASP.NET Core, it’s also compatible with the following technologies and programming languages:
- Java
- Go
- Python
- Ruby
- C#
- F#
You can use it with any of the mentioned technologies, but it’s considered highly compatible with ASP.NET Core applications. Once you configure it, you can connect mobile apps, browsers, and devices to the backend services for streamlined data flow.
The Benefits of ASP.NET Core gRPC Services
The benefits of gRPC in ASP.NET Core applications include the following:
- It helps to build a lightweight microservices architecture for the application.
- It boosts the speed and enables developers to implement language-agnostic implementations.
- It supports building efficient server-client communication.
- It enables the configuration of bi-directional communication between client and server.
- You can use it for real-time applications, such as streaming services, similar to Zoom meetings.
- It uses fewer network resources, leading to saving resources and costs.
Take Your Web Development to the Next Level with ASP.NET Core
Boost your web dev skills now with ASP.NET Core! Build robust, scalable web apps faster than ever before with our dedicated .NET Core Developers!
The Procedure of Building gRPC Services with ASP.NET Core
To learn about the implementation of gRPC in ASP.NET Core, we’ll be creating a server-client architecture using the Visual Studio IDE (Integrated Development Environment).
The server and client scenario will help you understand how the two devices communicate using gRPC. In addition, you will gain a brief idea of how gRPC can be configured in any other ASP.NET Core application of yours.
Here, we have divided the complete procedure into four main phases. Further, the phases are divided into brief steps for better understanding. As you move further in the process, you will avail yourself of more visibility of the packages, classes, and methods used to configure gRPC. The four phases are:
- Phase 1: Developing a gRPC Server
- Phase 2: Developing a gRPC Client
- Phase 3: Developing a gRPC Greeter Client
- Phase 4: Testing the gRPC Server and Client Communication
Let’s begin the gRPC implementation process.
Phase 1: Developing a gRPC Server
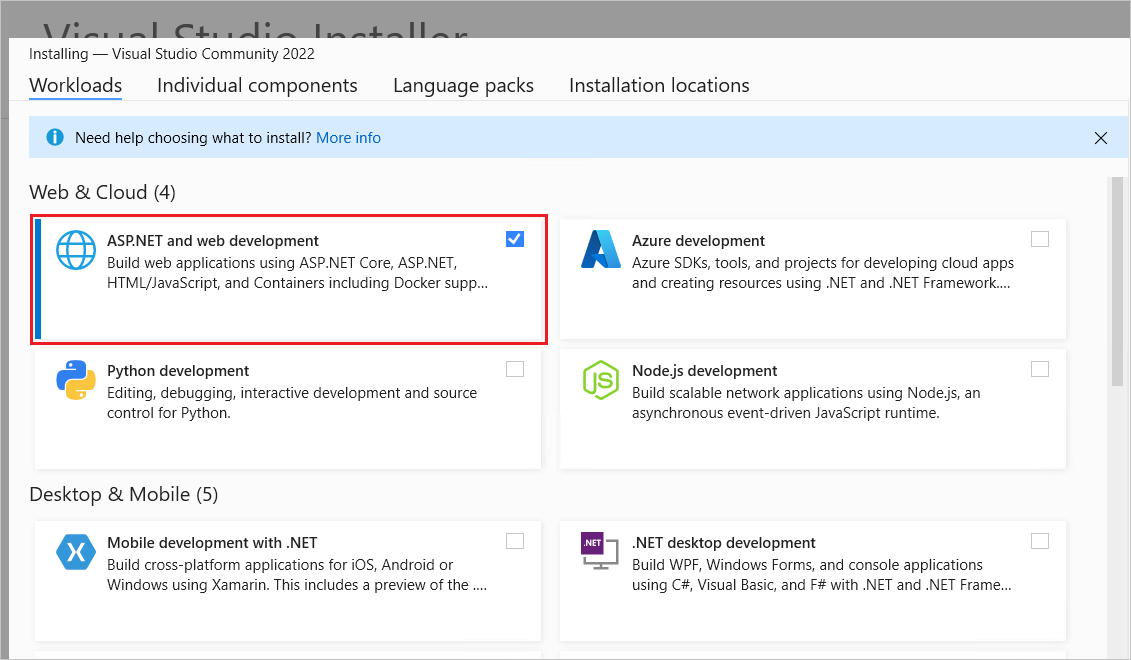
In this phase, we will enable the gRPC services for which you need to download Visual Studio 2022 with a workload named – ASP.NET and Web Development.
After the Visual Studio installation, follow the below steps.
- Step 1: Open the IDE and choose Create a new project option.
- Step 2: In the search box, input “gRPC” and choose the “ASP.NET Core gRPC service” option.
- Step 3: Click on the Next button.
- Step 4: Input the details for the “Configure your new project” window. For this practical task, provide the project name as “GrpcGreeter.”
- Step 5: Click on the “Next” button.
- Step 6: Choose “.NET 6.0 (Long-term support)” in the “Additional information” window.
- Step 7: Click on the “Create” button. Creating an ASP.NET Core gRPC project will result in your project being created.
- Step 8: Run the application with “Ctrl+F5” combination. It will run the ASP.NET project without the debugger.
- Step 9: You will see a dialog box similar to the below snippet. The lack of an installed SSL certificate displays it. Click on “Yes” to continue.
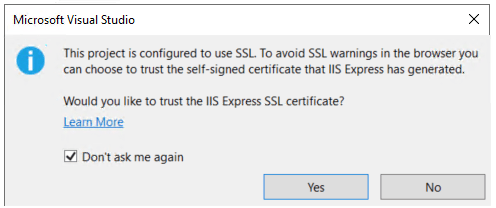
- Step 10: Again, you will see a new dialog box, whether you want to trust the development certificate. Click on Yes if you trust it. Otherwise, you can install your SSL certificate.
For learning purposes, click on “Yes” and continue.
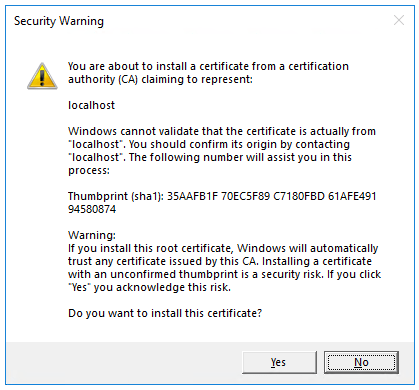
As a result of clicking Yes on this dialog box, Visual Studio will initiate a Kestrel Server, opening a browser. It will navigate you to “http://localhost:port .”Here, the port can be any random port assigned to run the application.
- Step 11: Analyze the gRPC service logs; you will see a similar output to the following snippet. It defines that the service is listening on the assigned port, configured in Properties/launchSettings.json.
info: Microsoft.Hosting.Lifetime[0]
      Now listening on: https://localhost:<port>
info: Microsoft.Hosting.Lifetime[0]
      Application started. Press Ctrl+C to shut down.
info: Microsoft.Hosting.Lifetime[0]
Hosting environment: Development- Step 12: Analyze the below-listed project files. It will help you thoroughly understand the code and file structure used for creating a gRPC server.
The files to examine include:
- Services folder: It will save the Greeter service implementation.
- Protos/greet.proto: It will define the gRPC Greeter and will also create server assets.
- appSettings.json: This file will store the Kestrel server configuration.
- Program.cs: It will have the app behavior code and gRPC service entry point details.
Phase 2: Developing a gRPC Client
- Step 1: Create a new instance/project using the Visual Studio IDE.
- Step 2: Left-click on “Create a new project” and choose “Console Application” for the client.
- Step 3: Click on “Next”.
- Step 4: Provide the project name as “GrpcGreeterClient” and move forward.
- Step 5: Similar to server project configuration, choose “.NET 6.0 (long-term support)” and hit on the Create button.
- Step 6: Once your gRPC project is created, you need to add some packages. Open the NuGet package manager from the Tools >> NuGet Package Manager >> Package Manager Console.
- Step 7: Execute the following command on the console to change the directory.
Command: cd GrpcGreeterClient- Step 8: Run the following commands in the GrpcGreeterClient directory.
Install-Package Grpc.Net.Client
Install-Package Google.Protobuf
Install-Package Grpc.Tools
The successful execution of these commands will install the following packages:
- Grpc.Net.Client: It installs the .NET Core client.
- Google.Protobuf: It provides the protobuf message APIs.
- Grpc.Tools: It provides the tools for supporting protobuf.
Furthermore, if you are not comfortable with using the console, you can utilize the Manage NuGet packages.
You can right-click on the project name from the Solution Explorer section to view and select the Manage NuGet Package option. Once it opens, go to the browse tab and enter the package name individually. Click on the install button, and all your packages will be installed on your gRPC project.
- Step 9: Under the gRPC client project, create a new folder with the name “Protos.”
- Step 10: Open the gRPC Greeter service (Server project) and copy the Protos\greet.proto file. Further, paste that copied file into the Protos folder of a client project.
- Step 11: After successful copying, open the file in the client project and update the namespace as provided below.
option csharp_namespace = "GrpcGreeterClient";- Step 12: From the Solution Explorer, right-click on Project and choose the “Edit project file” option.
- Step 13: Add a new item group in the file by copying the following XML code.
<ItemGroup>
  <Protobuf Include="Protos\greet.proto" GrpcServices="Client" />
</ItemGroup>
Phase 3: Developing a gRPC Greeter Client
Step 1: Open the Program.cs file of the gRPC client project and modify the code per the snippet below.
using System.Threading.Tasks;
using Grpc.Net.Client;
using GrpcGreeterClient;

// The port number must match the port of the gRPC server.
using var channel = GrpcChannel.ForAddress("https://localhost:7042");
var client = new Greeter.GreeterClient(channel);
var reply = await client.SayHelloAsync(
                  new HelloRequest { Name = "GreeterClient" });
Console.WriteLine("Greeting: " + reply.Message);
Console.WriteLine("Press any key to exit...");
Console.ReadKey();
In the above code, we have chosen port number 7042 and also defined HTTPS.
In addition, the GrpcChannel will provide all the details, initiating and establishing a connection with the gRPC service. Also, the client will call the “SayHello” method, and its result will be as below.
// The port number must match the port of the gRPC server.
using var channel = GrpcChannel.ForAddress("https://localhost:7042");
var client = new Greeter.GreeterClient(channel);
var reply = await client.SayHelloAsync(
                  new HelloRequest { Name = "GreeterClient" });
Console.WriteLine("Greeting: " + reply.Message);
Console.WriteLine("Press any key to exit...");
Console.ReadKey();
Phase 4: Testing the gRPC Server and Client Communication
Now, the only task left is to test the gRPC client and server. To test your ASP.NET Core gRPC services, undergo the below procedure.
- Step 1: Open the appsettings.Development.json file and modify it per the following code.
{
  "Logging": {
    "LogLevel": {
      "Default": "Information",
      "Microsoft.AspNetCore": "Warning"
      ,"Microsoft.AspNetCore.Hosting": "Information",
      "Microsoft.AspNetCore.Routing.EndpointMiddleware": "Information"
    }
  }
}- Step 2: Start the server and client project simultaneously using the Ctrl+F5 combination.
- Step 3: View the output and logs on the Console. The client will send its name to the gRPC server and receive a “Hello client-name” message. You will see “Hello GreeterClient” as an output for our written code.
Greeting: Hello GreeterClient
Press any key to exit...
In addition, analyze the logs for detailed insights about communication between the client and the server.
info: Microsoft.Hosting.Lifetime[0]
      Now listening on: https://localhost:<port>
info: Microsoft.Hosting.Lifetime[0]
      Application started. Press Ctrl+C to shut down.
info: Microsoft.Hosting.Lifetime[0]
      Hosting environment: Development
info: Microsoft.Hosting.Lifetime[0]
      Content root path: C:\GH\aspnet\docs\4\Docs\aspnetcore\tutorials\grpc\grpc-start\sample\GrpcGreeter
info: Microsoft.AspNetCore.Hosting.Diagnostics[1]
      Request starting HTTP/2 POST https://localhost:<port>/Greet.Greeter/SayHello application/grpc
info: Microsoft.AspNetCore.Routing.EndpointMiddleware[0]
      Executing endpoint 'gRPC - /Greet.Greeter/SayHello'
info: Microsoft.AspNetCore.Routing.EndpointMiddleware[1]
      Executed endpoint 'gRPC - /Greet.Greeter/SayHello'
info: Microsoft.AspNetCore.Hosting.Diagnostics[2]
      Request finished in 78.32260000000001ms 200 application/grpc
Here, the gRPC project is completed. Now, you can take reference from the project and implement gRPC services in your ASP.NET Core applications.
Why Prefer Microsoft Dotnet Framework Developer for gRPC Configuration
For the development of enterprise software, one should always prefer to hire developers from a reputed .NET development company. They hold the expertise and experience in curating applications enduring rise in productivity, improvement in collaboration, and automation to business procedures.
In addition, such companies help you onboard professional developers and start working on your project within 24 to 48 hours. Moreover, you also get the benefit of 24/7 support service, 100% transparency, agile development methodology, and affordable prices.
Whether you need gRPC configuration or any other .NET development service, always interview developers before finalizing them. Check their expertise based on technical, communication, and problem-solving factors. As a result, you will have a dedicated and perfect team to achieve your objectives.
Concluding Up
gRPC is highly used in ASP.NET Core applications for improving performance and supporting smooth communication between server and client machines. To implement it in your applications, you should understand its fundamentals. With the procedure provided above, you can learn how to configure gRPC services for both the server and client side.
Further, referencing the mentioned process, you can install the required packages in your ASP.NET core app to run gRPC services. But, if you are an enterprise looking for gRPC services, you should hire dedicated ASP.NET Core developers. Such engineers are experts in .NET programming, understand your needs, and provide software that offers accurate results.

Expert in Software & Web App Engineering
Parag Mehta, the CEO and Founder of Positiwise Software Pvt Ltd has extensive knowledge of the development niche. He is implementing custom strategies to craft highly-appealing and robust applications for its clients and supporting employees to grow and ace the tasks. He is a consistent learner and always provides the best-in-quality solutions, accelerating productivity.


