

Quick Overview:
The blog provides a detailed procedure to learn the use of FluentValidation in ASP.NET Core applications/API. By following the process, you will create a demo project and verify the functioning of rules defined using FluentValidation. In addition, you will get exposure to the xUnit project. As a result, you will understand how FluentValidation works, its implementation, and testing in ASP.NET Core.
Implementing Validation in .NET Core with Use FluentValidation
Validation rules are considered one of the most reliable ways of controlling input. It helps the organizations to receive correct data from the users. Mostly, such validations are configured at forms for verifying input. Its primary aim is to ensure that company standards are met and that all records are in the same format.
ASP.NET Core applications are highly used for providing such functionalities, so it’s essential to configure best-in-class validation. By implementing FluentValidation in ASP.NET Core apps and APIs, you can effortlessly validate data to store only sensible information.
Read through this blog to understand What fluent validation is in .NET Core and how you can use it.
What is FluentValidation .NET Core?
FluentValidation is one of the most popular .NET libraries used to define validation rules in the .NET applications. Primarily, it’s compatible and used with .NET Core 3.1, .NET 5, .NET 6, .NET Standard 2.0, and ASP.NET.
In addition, installing FluentValidation in your .NET project is quite an easy task. It can be installed using the NuGet package manager and command line interface. However, it’s preferred that you should use the latest Visual Studio version for using FluentValidation in ASP.NET Core applications.
Further, the FluentValidation library offers the following benefits:
- It makes unit testing easy for developers.
- It helps to define centralized rules for validators.
- It provides errors rather than throwing exceptions.
- It follows the fail-fast principle.
The Ways To Implement FluentValidation in ASP.NET Core
In ASP.NET Core web applications and ASP.NET Web API, FluentValidation can be used by the following three approaches:
- Manual Validation
- Automatic Validation
Further, automatic validation is divided into two categories, as follows:
- Automatic Validation for applications with ASP.NET validation pipeline.
- Automatic Validation for applications using the filter.
In the manual validation method, the validator is inside the controller or at the API endpoint. It first invokes the validator and then processes the result. However, the functioning gets reversed in automatic validation, as models get validated before a controller invokes an action. Therefore, you should always analyze your requirements before selecting any of the validation approaches.
Code Example To Configure FluentValidation in ASP Dot NET Core API
Let’s have a look at a practical example to learn about the working of FluentValidation in ASP.NET Core Web API. You can effortlessly follow this tutorial on your system by downloading the latest version of Visual Studio IDE.
After installing the IDE, open it and create a new project. You have to select the ASP.NET Core API template and fill out the required details to use it. In addition, you can also follow the below path for project creation:
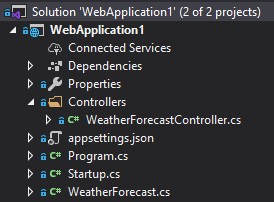
File >> New >> ASP.NET Core 3.1 API. (You should use the latest version of ASP.NET Core available on Visual Studio). Once the project gets created, its structure will display in Solutions Explorer, looking similar to the following snippet.
Further, to view what code this API template holds hit the combination of Ctrl+F5. It will run the API, and you will understand the working. Mainly, the API provides details about the weather forecast of upcoming days.
[
  {
    "date": "2020-07-01T14:34:13.7180989+10:00",
    "temperatureC": 42,
    "temperatureF": 107,
    "summary": "Bracing"
  },
  {
    "date": "2020-07-02T14:34:13.7181617+10:00",
    "temperatureC": 31,
    "temperatureF": 87,
    "summary": "Freezing"
  },
  {
    "date": "2020-07-03T14:34:13.7181627+10:00",
    "temperatureC": 24,
    "temperatureF": 75,
    "summary": "Scorching"
  },
  {
    "date": "2020-07-04T14:34:13.7181632+10:00",
    "temperatureC": -17,
    "temperatureF": 2,
    "summary": "Hot"
  },
  {
    "date": "2020-07-05T14:34:13.7181636+10:00",
    "temperatureC": 52,
    "temperatureF": 125,
    "summary": "Bracing"
  }
]
To learn about FluentValidation, we will be adding a new API method, enabling the addition of a new forecast. For streamlining the procedure, we have divided it into easy-to-execute steps as below.
Step 1: Open the WeatherForecastController.cs File
Open the WeatherForecastController.cs file. Inside it, you will see a Get() method, which provides the weather forecast details to the user.
[HttpGet]
public IEnumerable<WeatherForecast> Get()
{
    var rng = new Random();
    return Enumerable.Range(1, 5).Select(index => new WeatherForecast
    {
        Date = DateTime.Now.AddDays(index),
        TemperatureC = rng.Next(-20, 55),
        Summary = Summaries[rng.Next(Summaries.Length)]
    }).ToArray();
}
Step 2: Add a New Method
Add a new method in the file, similar to the following code block. The new method will return a “Success” string after accepting the WeatherForecast parameter.
[HttpPost]
public ActionResult Post([FromBody] WeatherForecast forecast)
{
    return Ok("Success!");
}
Step 3: Test the New Method
After adding a method, always test it before moving further. It ensures that the logic has been implemented correctly.
To test the API, we will use the POSTMAN tool. After opening it, click on “New” and define the below rules.

- HTTP verb should be POST
- The URL should be http://localhost:61997/weatherforecast
- Content-Type header should have “application/json” as the value
- The body type must be “JSON.“
- Configure the “TemperatureC” with a value of 6000 on the WeatherForecast model.
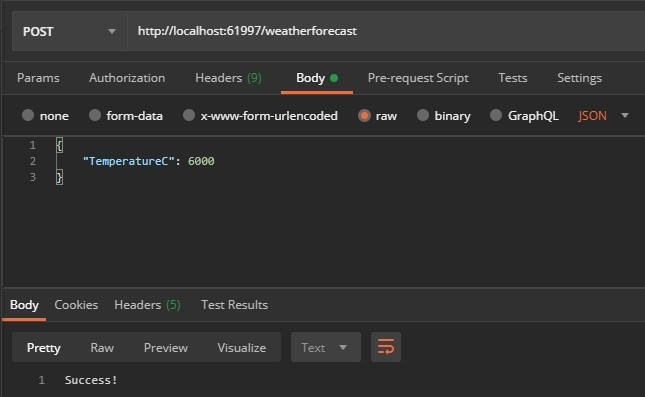
Run the test case and ensure that it returns Success. As a result, now you have the leverage to add a new weather forecast to the output. However, we have used the temperature value 6000, which is exponentially high for any living organism.
So, to pass only the appropriate temperature value, we will configure our API with FluentValidation. It will validate the temperature to a defined value, which is going to be 100 in our case. If the value is equal to or below 100, the Success string will be displayed as output. Otherwise, the user will see an error.
Let’s continue the procedure.
Step 4: Configure FluentValidation Mechanism
To configure the FluentValidation mechanism, we need its package. To download the package into your project, open the package manager console or NuGet package manager.
If you use the package manager console, run the below command. Otherwise, you can search for “FluentValidation.AspNetCore” on the NuGet package manager and install it.
PM>> install-package FluentValidation.AspNetCoreAfter the installation, your ASP.NET Core API project will contain the necessary FluentValidation file and associated additional mechanisms.
Step 5: Add a Validation Logic
Under the WeatherForecast class, add a validation logic like the following code block.
public class WeatherForecastValidator : AbstractValidator<WeatherForecast>
{
    public WeatherForecastValidator()
    {
        RuleFor(model => model.TemperatureC).LessThanOrEqualTo(100);
    }
}
In this code, the WeatherForecastValidator class is inherited from the AbstractValidator<T> class. It supports the FluentValidation mechanism to learn that the WeatherForecast class requires validation. Further, under the constructor, rules are specified to check TemperatureC to be equal to less than to value 100.
In addition, you can define as many rules as you want. But, to understand fundamentals, you should start from this only.
Step 6: Test the FluentValidation Rule
As mentioned above, always test when you define something new in the code. In accordance with that, we will now test the FluentValidation rule that we defined in Step 5.
To test the validation, add a new .NET Core project called the xUnit Test Project.

After the project creation, rename its “UnitTest.cs” file to “WeatherForecastValidatorTests.cs.” It’s not necessary to rename the file, but it’s always a best practice to do for better identification. Whenever some businesses hire dedicated .NET developers, they also follow this practice to streamline testing and maintenance procedures.
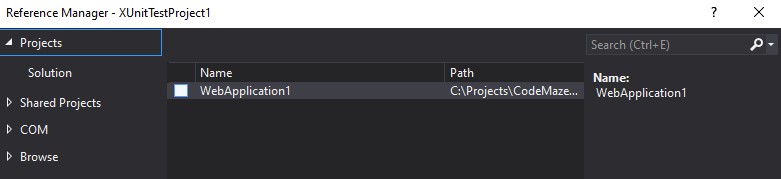
Step 7: Add the Reference
Add the reference to the project through the Reference Manager. Firstly, provide a reference to the project named WebApplication1.
Step 8: Install .NET Packages
Again, open the package manager and run the below-provided commands for installing required .NET packages. Primarily, we will be installing two packages, one for the FluentValidation library and the other for the xUnit Visual Studio test runner.
The command for FluentValidation installation:
PM>> install-package FluentValidation
The command for xUnit VS Test Runner:
PM>> install-package xunit.runner.visualstudioStep 9: Access the WeatherForecastValidatorTests.cs File
After installation of both packages, access the WeatherForecastValidatorTests.cs file. Here, we’ll be adding the test methods.
Add the two statements below to the file. The first statement enables the use of test helpers, and the second defines a reference to the application, having the validator.
using FluentValidation.TestHelper;
using WebApplication1;
Further, under the WeatherForecastValidatorTests class, add the following code. Using it will create an instance for the validator, which will be used during testing.
private readonly WeatherForecastValidator _validator = new WeatherForecastValidator();Step 10: Add the Logic to Test the Failing Validation
Add the logic for testing the failing validation, extending from FluentValidation.TestHelper.
[Fact]
public void GivenAnInvalidTemperatureCValue_ShouldHaveValidationError()
    => _validator.ShouldHaveValidationErrorFor(model => model.TemperatureC, 101);
The code contains three primary things. First is the property value, i.e., 101, in this tutorial. Second is the validator invoking, and third is causing the pass/fail per the result.
Step 11: Add a Successful Validation Testing Method
Include a method for successful validation testing by adding the below code. It enables the utilization of the xUnit theories, leading numerous values to pass the test.
[Theory]
[InlineData(99)]
[InlineData(100)]
public void GivenAValidTemperatureCValue_ShouldNotHaveValidationError(int temperatureC)
    => _validator.ShouldNotHaveValidationErrorFor(model => model.TemperatureC, temperatureC);
Step 12: Check the Functionality using Test Explorer
Navigate to the Test Explorer to check the functionality of the validator. Run the tests to see the output as below. If your output is different and any test fails, check the configuration and again test.
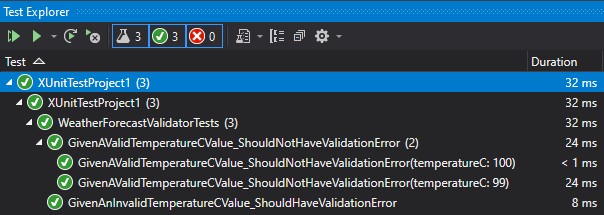
As a result, we are able to test every individual property with the help of the FluentValidation mechanism. Till this step, we have created the logic and defined the rule for validation, which is working fine. And now, we will be adding it to our ASP.NET Core API.
Step 13: Configure Methods for .NET Versions
At this step, the configuration differs for the .NET 5 or lower version and the .NET 6 and above version.
If you are using .NET 5 or lower, open the Startup.cs file, and under the ConfigureServices method, add the below code.
public void ConfigureServices(IServiceCollection services)
{
    services.AddControllers()
            .AddFluentValidation(fv => fv.RegisterValidatorsFromAssemblyContaining<WeatherForecastValidator>());
}
Further, if you are using the .NET 6 or above version, open the Program.cs file and modify it per the below snippet.
builder.Services.AddControllers()
    .AddFluentValidation(fv => fv.RegisterValidatorsFromAssemblyContaining<WeatherForecastValidator>());
By doing this, the FluentValidation middleware gets activated in the ASP.NET Core application and API. It tells the mechanism to discover validators in the API.
Step 14: Test FluentValidation Configurations using the POSTMAN Tool
Lastly, test all the FluentValidation configurations and their working in our API using the POSTMAN tool. Use the same rules defined in Step 3 and hit the send button.
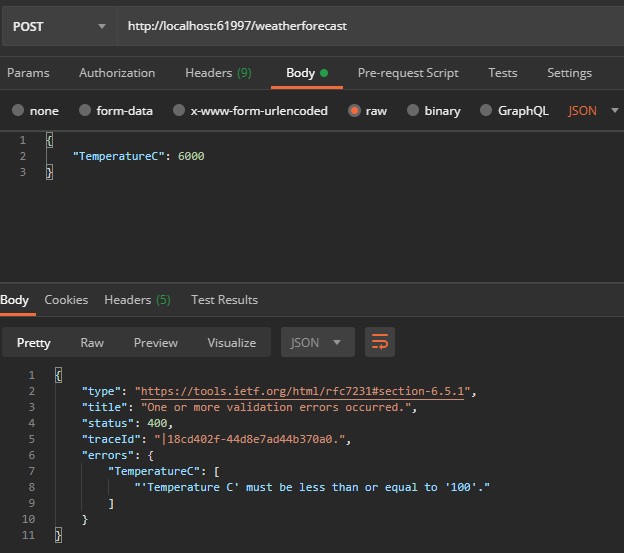
This time, you will see an error for the TemperatureC value as 6000. It means that the FluentValidation is working correctly. However, don’t end your testing here. Pass more values and verify the validation.
With the help of this approach or, more specifically, due to FluentValidation, the task of checking ModelState gets eliminated. All the validation work is completed automatically, providing the correct response to the user.
The Best ASP.NET Development Services For FluentValidation Implementation
Implementing validation in an ASP.NET Core app requires years of experience in the development domain. Only experts should be preferred for configuring FluentValidation and similar mechanisms in the software. The experts with 10+ years of experience understand how the validation should work and how to define a reliable logic. Moreover, they know the most appropriate way and test cases to verify the functioning.
If you want to leverage all such benefits and expertise, outsource the ASP.NET masters from a globally trusted firm like Positiwise Software Pvt Ltd. It will help you affordably avail of ASP.NET development services and build a business application from scratch or modify the current software with relevant validation. In addition, always review the portfolio of the company and compare prices, customer reviews, and feedback before onboarding.
Concluding Up
Concludingly, FluentValidation is a top-notch mechanism for ASP dot NET core API and applications. Its packages get installed within seconds, and it provides a streamlined way of defining rules. In addition, this validation method removes the additional task of model state viewing. All the validation finding and execution is completed automatically.
By following the above-defined procedure, you can efficiently learn the concept of FluentValidation in ASP.NET Core API. Also, you can use the same method and logic for your business applications. As a result of using FluentValidation, you will analyze lightweight controllers, easy-to-test and read validation rules, and improve model validation.

Expert in Software & Web App Engineering
Parag Mehta, the CEO and Founder of Positiwise Software Pvt Ltd has extensive knowledge of the development niche. He is implementing custom strategies to craft highly-appealing and robust applications for its clients and supporting employees to grow and ace the tasks. He is a consistent learner and always provides the best-in-quality solutions, accelerating productivity.


