
Quick Overview:
The blog provides insight into User Access Control (UAC), its benefits, and the procedure to implement it in a .NET application. As a .NET developer, you should understand the UAC concept and its configuration. It will help you solidify software security and fulfill the client requirements within minimal time, ensuring the utmost quality. You can follow the steps to enable UAC for .NET Applications to Run as an administrator.
Force .NET Applications to Run as Administrators using UAC
When you use a .NET application on a Windows machine, it uses a User Account Control (UAC) to prevent elevated privileges access. But, there can be a need for all such controls in an enterprise environment. Therefore, as a .NET client-server application developer, you should enable UAC if the client requirements state so.
You can complete the procedure to configure UAC within minutes. You can follow the procedure provided further to let admins take control of what they need.
What is User Account Control (UAC)?
For security reasons, Microsoft offers a User Account Control (UAC) mechanism to allow only authorized users to get hands-on admin controls. The main purpose of using UAC is to maintain differentiation between user-level permissions. Also, it helps to retain the system security by empowering only legitimate users to make informed system decisions.
You should know about the two user levels to understand it more efficiently. The first level is the standard user, and the second level is the admin user. The main difference between both users is resource access permission.
For instance, suppose an organization’s attendance system. In this, employees are standard users, as they can only punch in and punch out. However, the CEO or manager is the admin user, as they have permission to regularize attendance per policies from the backend. Also, an admin user holds permission for all the levels.
This same UAC procedure is used in .NET applications to allow only legitimate users to access the application. These types of apps are mainly used for processing confidential information and executing business-sensitive operations. In addition, dotnet application development companies and many enterprises categorize it as a legacy application.
The Benefits of Using Legacy Applications (UAC-Enabled Apps)
Configuring UAC (User Access Control) in your .NET application leverages the following benefits:
- It helps to prevent unauthorized personnel from accessing critical resources.
- By integrating a logging mechanism with the application, you can monitor when an admin has accessed the software. Also, you can log the actions taken by a logged-in user.
- It helps to prevent the execution of core business operations from a standard user account.
- The admin users avail of the correct permissions to configure devices, use critical resources, and more.
Develop .NET Web Application with ASP.NET Technologies
Bring your web app ideas to ASP.NET development experts. Hire our skilled .NET developers to build secure, scalable web & desktop web applications.
How To Enable UAC as a .NET Client-Server Application Developer?
For a .NET application to display a UAC prompt to end-users, you will be required to add a manifest file to the project. It’s preferred to use Visual Studio IDE for this purpose, as it offers all the files and associated code by default.
The main purpose of the manifest file is to collaborate with Windows OS, signaling to run software with administrative privileges. The file holds an XML code in a specific Windows-readable structure. Once you embed a manifest file, a prompt will be displayed to input admin credentials each time the user accesses the application.
5 Steps to Enable UAC for Your .NET Applications
Step 1: Open the Visual Studio IDE and create a .NET project. For learning purposes, you can create a Windows form project or a basic .NET project with Hello World or any other program.
Step 2: After the project creation, navigate to the Solutions Explorer section and right-click on the Project name. It will display a menu.
Step 3: Choose the “Add a New Item” option, and you will see a new window on the screen.
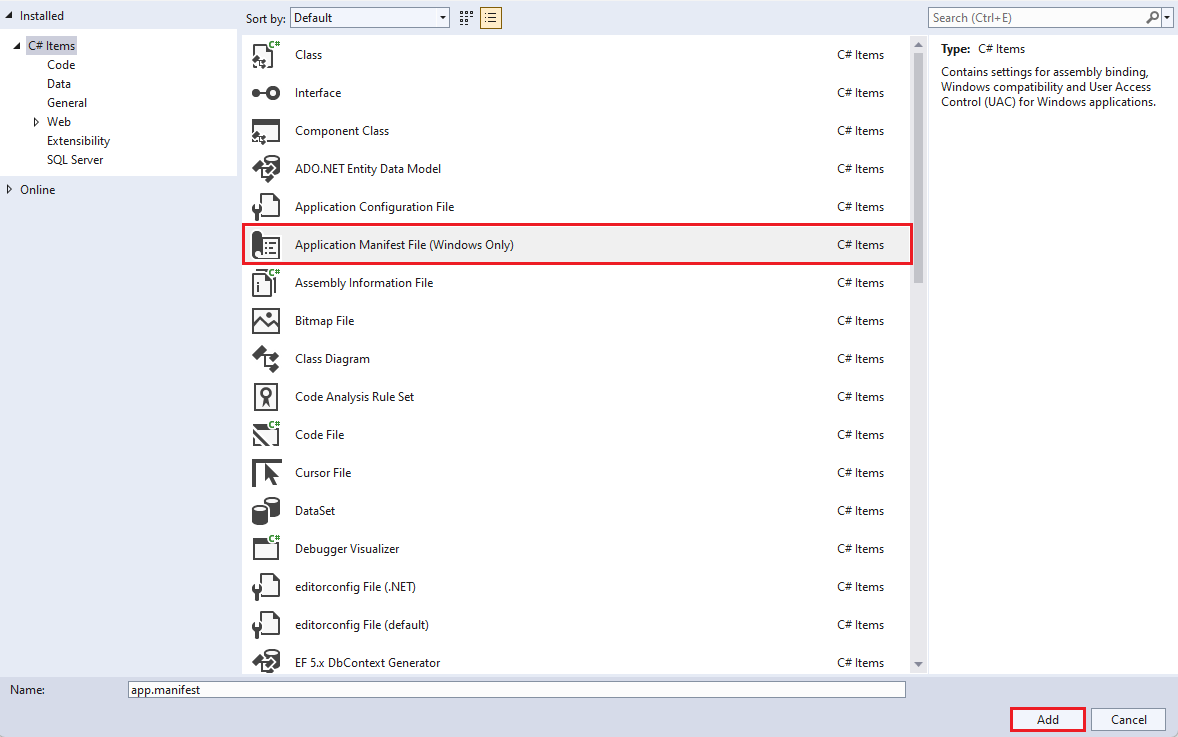
Step 4: Select “Application Manifest File” from the list and click on the Add button.
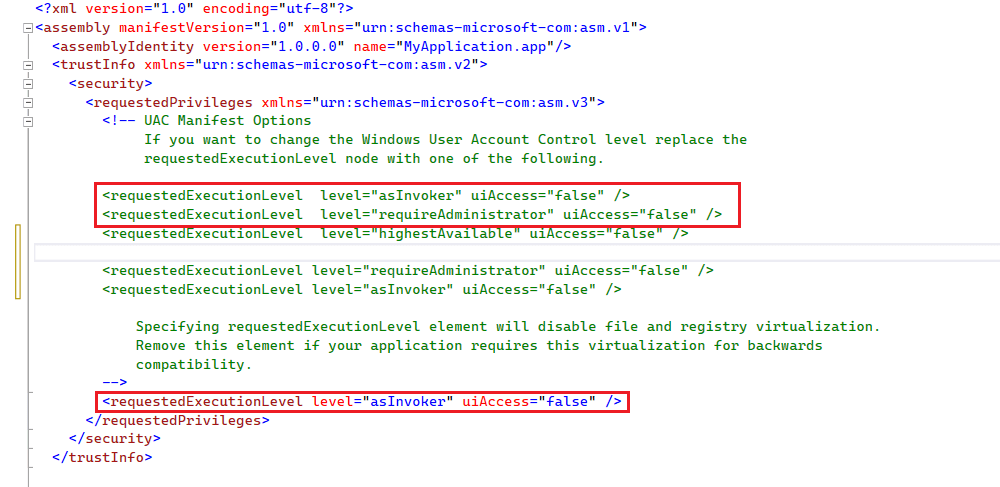
Step 5: After the successful addition of the manifest file with your .NET application project, open it and comment on the following line.
<requestedExecutionLevel level="asInvoker" uiAccess="false" /> In addition, add a new line in the file below the line you commented above.
<requestedExecutionLevel level="requireAdministrator" uiAccess="false" />The final XML code will look similar to the following snippet.
Here, we have modified the requestExecutionLevel element. It determines the access token in accordance with the current user. For instance, if a standard user is accessing the app, a standard token will be generated, and for an admin user, an admin token will be created.
But, when you modify this element to “requiredAdministrator,” the .NET software will ask for admin account credentials in the beginning only. Thus, the UAC prompt will be showcased to the user.
Step 6: Save the file and restart Visual Studio IDE.
Step 7: Run the application using Ctrl+F5, and you will see a prompt asking for admin credentials to run the software.
Why Need Dotnet Application Development Company?
Dotnet application development company holds expertise in implementing every module, API, and security mechanism in a .NET application. Also, their developers understand the exact needs of a firm and work accordingly to help them achieve business targets.
From the perspective of UAC, every enterprise should prefer to hire the best .NET developers. They will help you configure User Access Control for the overall application and separate AAA (Authorization, Authentication, and Accountability) for other components. In this way, the software will become more secure, reducing the possibility of unwanted access and data breaches.
But, whenever you collaborate with a .NET development firm, look for the following benefits/leverages:
- NDA (Non-Disclosure Agreement) Signing
- Flexible Pricing Model
- Dedicated .NET Development Team
- Seamless Communication Assurance
- 100% Transparency with zero hidden charges
- Post-Development Services (Maintenance and Support)
Concluding Up on to Enable UAC for .NET Applications
User Access Control, or UAC, is an integral mechanism for hardening the security of an application. You can use it to confirm the identity of a user demanding administrative privileges. To implement it in the .NET application, you only need to add the manifest file and replace the XML code line as provided above.
As a result, whenever the user opens the .NET app, it will ask for an administrator username and password. Also, the software will run automatically with administrative controls. It eliminates the need for the extra effort to right-click on the app icon and then select ‘Run as Admin.’ For apps processing confidential data, you should implement UAC functionality.

Expert in Software & Web App Engineering
Parag Mehta, the CEO and Founder of Positiwise Software Pvt Ltd has extensive knowledge of the development niche. He is implementing custom strategies to craft highly-appealing and robust applications for its clients and supporting employees to grow and ace the tasks. He is a consistent learner and always provides the best-in-quality solutions, accelerating productivity.


