
Quick Overview:
Web Application with ASP.NET MVC 5: ASP.NET MVC 5 is a top-notch framework for developing web applications. It leverages the MVC architecture and also has numerous benefits, such as scaffolding, filter overriding, and more. In this blog, you will discover the ASP.NET MVC 5 benefits and the steps to create an application using it.
Introduction
A dynamic web application is what you need in this technological world to improve business operations and take an edge in the industry. In a market full of development technologies, ASP.NET MVC 5 is considered a reliable choice for web apps.
ASP.NET MVC web applications are easy to develop, test, and maintain. Also, the services offered by an ASP.NET MVC development company are quite affordable. This technology is a boon for all, and you should know how exactly you can build an application with it.
So, let’s get started to quickly understand the ASP.NET MVC application project development.
What is ASP.NET MVC 5?
ASP.NET MVC 5 is a dynamic web application development framework from Microsoft, which is based on the Model, View, and Controller architecture. This architecture separates the business logic from the interface but also maintains communication between them for efficient working.
In simple terms, you are free to modify the backend without impacting the frontend code and vice versa. Nowadays, most organizations prefer this approach, as it supports efficiently performing software development, deployment, and maintenance.
Additionally, ASP.NET MVC 5 is used for building web applications of any size and type. It’s quite a robust, high-performing, TDD-friendly, and secure framework.
Why You Should Use ASP.NET MVC Web Development Framework?
There are numerous reasons that can attract you to use the ASP.NET MVC 5 framework. But, the following are the ones that are gonna clear your thoughts about choosing it for dynamic web applications development.
1: Bootstrap Support
In the ASP.NET MVC 5, Bootstrap has replaced the default MVC template. It leverages you to take advantage of an intuitive grid system and component library to make the interface more responsive and elegant. Due to it, you also get the following benefits:
- Interface development is completed within minimal time.
- The user interface becomes more responsive, leading to captivating end-users and increasing retention and conversion.
- It makes the application highly compatible with HTML and CSS templates.
- You don’t need to download any additional files, as they’re available by default in the ASP.NET MVC 5 web framework.
2: Built-in Authentication Filter
The authentication mechanism is one of the most crucial security features that must be embedded in every application. It helps to verify the user credentials and allows only legitimate ones to access the resources.
In ASP.NET MVC 5, you can implement an authentication mechanism on a control basis. For instance, if you want only the administrator to modify basic user information, it’s possible with ASP.NET MVC 5 authentication.
Moreover, this authentication can also be configured to custom logic and to all the application controls per your requirements. It will work before the authorization mechanism to let only authorized persons inside and halt unauthorized ones.
3: Filter Overriding
With the introduction of filter overriding, ASP.NET MVC 5 has been empowered, and its flexibility has also increased. It’s highly beneficial in controlling the application flow and maintaining global controls. Whether it’s an action or a controller, filter overriding supports customizing everything according to specific business, technical, and user needs.
In addition, you can exclude some controllers from the global filters list. Only the required actions and controllers will work as per the filter, and your task of repeating the filter configuration will be eliminated. Thus, time and effort will be saved, making the development process faster.
4: Scaffolding Code Generation
For improving the code generation speed, consistency, and accuracy of logic, scaffolding is a high-end feature of the ASP.NET MVC 5 framework. It helps to automatically create the code, which works efficiently with all three components of MVC architecture – Model, View, and Controller.
Also, it adds the required boilerplate code to the application along with the dependencies needed to run it. Once you enable this feature, you get a personal coding assistant and support to complete the project within a minimal time and with utmost accuracy. Furthermore, it’s also beneficial in terms of automated MVC generation per database schema.
5: Razor SDK Support
You can impeccably use Razor SDK with ASP.NET MVC 5. It lets you create alluring user interfaces, providing data-driven views to end-users. Also, it seamlessly works with the business logic and ensures to provide a seamless experience across devices and platforms.
In addition, due to the easy-to-understand syntax and implementation procedure, developers can effortlessly develop complex application features. It leads you to build a high-end application within minimal time, resources, effort, and cost. Also, its maintainability is quite affordable, and it can be managed single-handedly.
6: ASP.NET Identity
ASP.NET identity is the primary feature and benefits that you must know about. It’s one of the main reasons behind the usage of MVC 5 technology. Once you start utilizing the ASP.NET MVC 5, you can avail of the following identity benefits:
- It lets you utilize all ASP.NET frameworks, such as Web API, Web Pages, Web Forms, SignalR, and more.
- It helps you integrate third-party authentication and login mechanisms. For example, you can allow your users to log into the application using their Gmail, Facebook, Twitter, GitHub, or similar accounts.
- It enables the application to store all the details and maintain persistence throughout the workflow.
- It supports retaining the application security and data integrity, availability, and confidentiality.
7: One ASP.NET
One ASP.NET lets you use any of the compatible technologies and merge them together to build the features of your choice. For instance, if you want your ASP.NET MVC 5 app to offer real-time status or use similar data, then you can integrate SignalR with it.
Similarly, it makes the usage of Web Forms, Web API, and all such technologies possible with ASP.NET. You get the advantage of choosing between the best of every tech and utilizing it in your software. Thus, it’s an easy way to develop a masterpiece.
8: Attribute Routing
With the help of attribute routing, you can gain better control over your Web APIs and the data being transmitted through them. Also, it eases the task of defining hierarchies and routes directly to the controllers and actions.
Furthermore, it helps with the following tasks:
- It eases the troubleshooting and debugging operations by providing accurate router details.
- It performs the decoupling of actions and controllers from the defined route.
- It helps in quickly aligning two or more routes to a single action.
- The probability of an error is minimized with attribute routing.
The Process To Follow For ASP.NET MVC Application Project
Here are some of the general steps to consider while developing any of the ASP dot net MVC 5 projects.
Step 1: Fulfill all the requisites, such as downloading the required IDE, packages, and third-party applications needed for development, testing, and maintenance. In addition, tune the hardware and operating system according to the project.
Step 2: Utilize the right pre-built project structure in the Visual Studio IDE. In the next section, we have demonstrated all the required steps. You can follow them to understand the fundamentals.
Step 3: Firstly, focus on creating the user journey and interface. It will help you build the appropriate logic and algorithms to perform every task and make the application intuitive.
Step 4: According to the features and functionalities of your application, create the models inside the “Models” folder. Models will use all the data and entities associated with your software.
Step 5: Now, navigate to the “Controllers” folder to create the individual controllers for the defined models and views. In addition, configure the home controller according to the required set of actions you need.
Step 6: After model, view and controller, configure the routing for your application. In ASP.NET MVC 5, you get the benefit of attribute-based routing, helping to define the specific action and associated controller. It will help the app process different URLs and accurately respond to them.
Step 7: After all the development, test your application using manual and automated tools. Also, if any loophole is identified, patch it before deployment.
Step 8: Lastly, configure your hosting server and deploy the application. And that’s how you can design, develop, test, and deploy any application based on the ASP.NET MVC 5 framework.
A Quick Demo: Dynamic Web Application Development with ASP.NET MVC 5
In this demo project, we’ll be using the Visual Studio IDE version 2019. You should also download the same or the newer version and perform the practical simultaneously to understand every step. We’ll be creating a dynamic web application, providing the requested employee details.
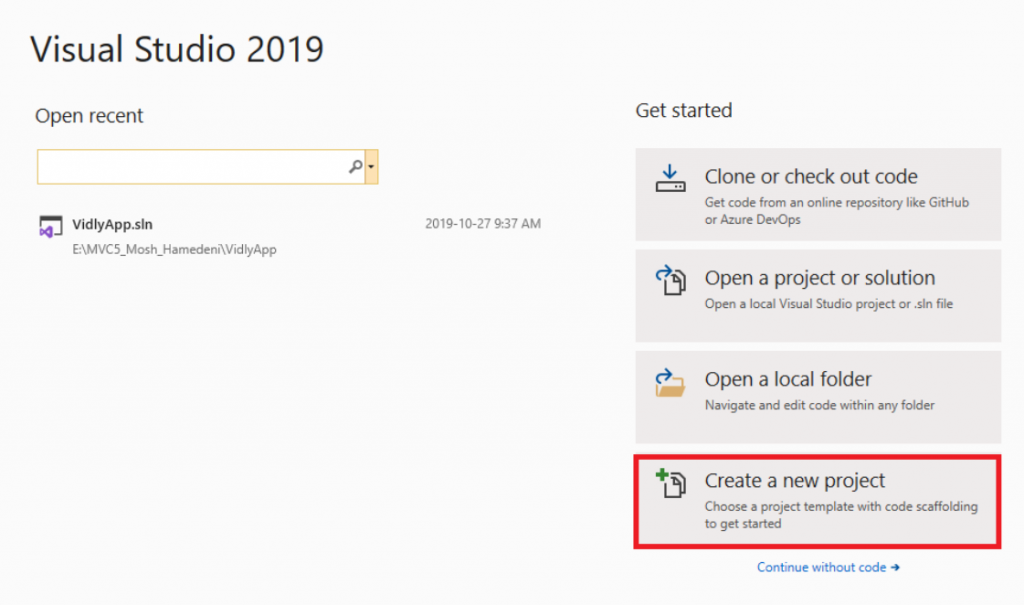
Step 1: Open the Visual Studio on your desktop and click on the “Create a new project” option.
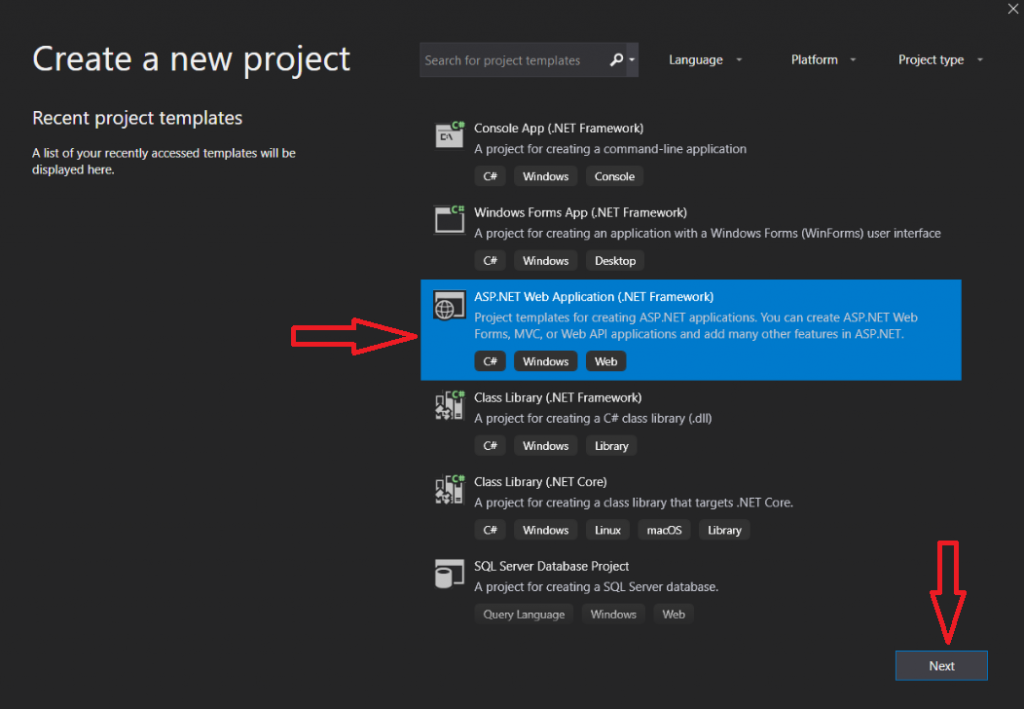
Step 2: Use the search bar and input “ASP.NET Web”. You will see a number of pre-built projects and templates. Among them all, choose “ASP.NET Web Application (.NET Framework), as highlighted in the snippet below.
Following it, hit on the “Next.”
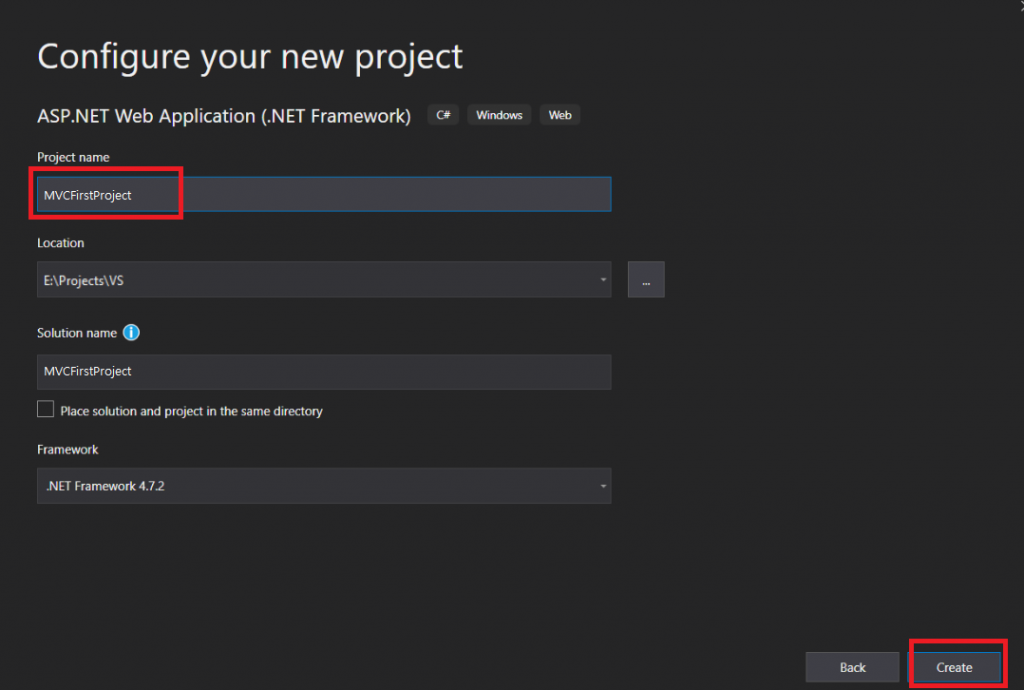
Step 3: Input the details of your project. For this demo, we have defined the name as “MVCFirstProject.” Further, choose the location where you want Visual Studio to save your project, then select a solution name, and lastly, select the version of the .NET framework that you want to utilize.
After you input all the details, click “Create.”
Step 4: Now, the MVC project has been created, and you can see the file structure in the Solutions Explorer tab. The structure will be similar to the following snippet.
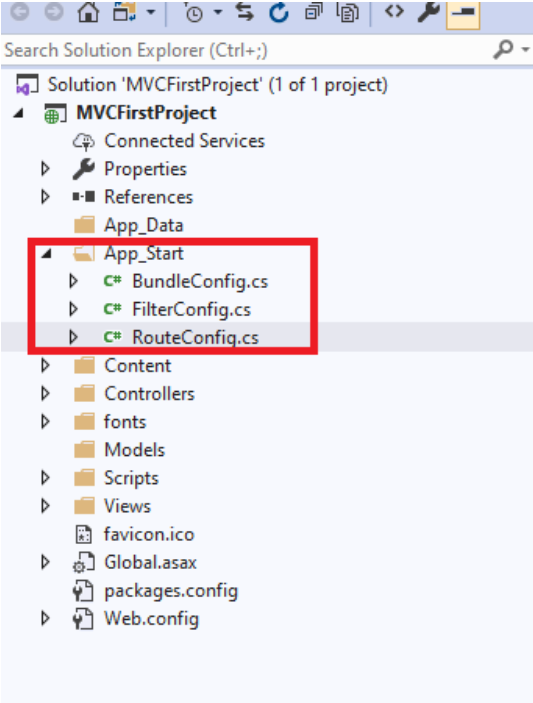
By analyzing the file structure, you can see that the folders for Model, View, and Controller are different, meaning that you can individualize their development. In addition, there are a lot more folders for content, controllers, fonts, scripts, app data, views, app start, and more.
Step 5: Undergo the files that you want to edit and modify them per requirements.
For instance, under the “App_Start” folder, three files are available, namely “BundleConfig.cs”, “FilterConfig.cs,” and “RouteConfig.cs.”
Click on the “RouteConfig.cs” file to open and view its content. You will see a similar code structure as below. But we have modified it according to our requirements. In the last statement, Home is defined as the controller, and Index is defined as the action.
namespace MVCFirstProject
{
    public class RouteConfig
    {
        public static void RegisterRoutes(RouteCollection routes)
        {
            routes.IgnoreRoute("{resource}.axd/{*pathInfo}");

            routes.MapRoute(
                name: "Default",
                url: "{controller}/{action}/{id}",
                defaults: new
                {
                    controller = "Home",
                    action = "Index",
                    id = UrlParameter.Optional
                }
            );
        }
    }
}
The URL in this route file uses the {Controller}/{action}/{id} syntax. Whenever the ASP.NET MVC 5 application receives a request in a similar format, it will send a reply to the end user. Further, in case the request doesn’t align with the defined syntax, an error will be triggered and showcased.
Additionally, among all three components (controller, action, and id), it’s compulsory for the URL to contain “id” information. If details of the other two are not available, the application will use the default value.
Step 6: After saving the content of the “RouteConfig.cs” file, go to the “Models” folder.
Inside the “Models” folder, add a model in which we’ll be defining some properties. These properties will help you to fetch employee details when requested by the end user. To do so, select the “Models” folder, right-click on it, and select “Add.” Further, choose “class” and name it “Employee. cs” and click on “Add” again.
Open the “Employee.cs” file and add the below-provided code to it.
namespace MVCFirstProject.Models
{
    public class Employee
    {
        public int EmployeeId { get; set; }
        public string EmployeeName { get; set; }
        public string EmployeeLocation { get; set; }
    }
}
Save the file and move further.
Step 7: Now, add a controller for the employee model. For this, navigate to the “Controllers” folder and right-click on it. Further, select “Add” -> “Controller” -> “MVC 5 Controller” -> “Add.” In addition, name it as “EmployeeController” for this project.
Once the controller is created, go to the “Views” folder and expand it. You will see that a new file is created with the same name as the controller you created.
Following it, open the new controller that you created and add the below code to it.
namespace MVCFirstProject.Controllers
{
    public class EmployeeController : Controller
    {
        // GET: Employee
        public ActionResult EmployeeInfo()
        {
            Employee employee = new Employee()
            {
                EmployeeId = 1001,
                EmployeeName = "Khaja Moiz",
                EmployeeLocation = "Hyderabad"
            };

            return View(employee);
        }
    }
}
Step 8: Go to the “Views” folder -> right-click on the “Employee” folder -> “Add,” -> “Add View.” After this, set the view name as “EmployeeInfo” and choose the “Add” option. As a result, a file will be generated with the name “EmployeeInfo.cshtml.”
Now, open the file (EmployeeInfo.cshtml) and add the code below.
@model MVCFirstProject.Models.Employee
@{
ViewBag.Title = "EmployeeInfo";
Layout = "~/Views/Shared/_Layout.cshtml";
}
<style>
table {
font-family: arial, sans-serif;
border-collapse: collapse;
width: 100%;
}
td, th {
border: 1px solid #dddddd;
text-align: left;
padding: 8px;
}
</style>
<h3>Employee Information</h3>
<table>
<tr>
<th>EmployeeId</th>
<th>EmployeeName</th>
<th>EmployeeLocation</th>
</tr>
<tr>
<td>@Model.EmployeeId</td>
<td>@Model.EmployeeName</td>
<td>@Model.EmployeeLocation</td>
</tr>
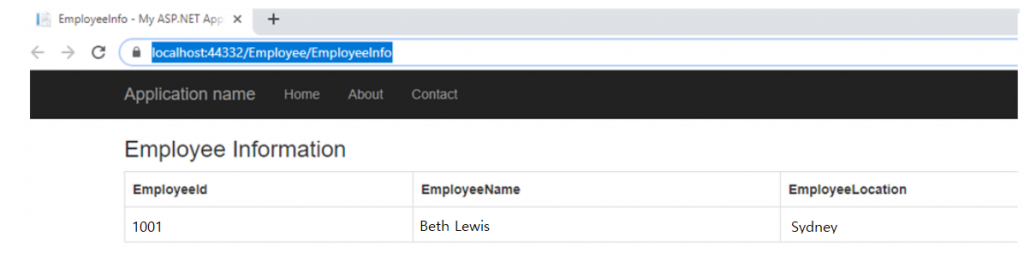
</table> Step 9: We have completed all the configurations. So, you should build, compile, and run the application. To do so, open your web browser and navigate to the local host address, which is “https://localhost:44332/Employee/EmployeeInfo”.
As you can see, the URL has all three components that we defined. Once you open this URL, the following output will be displayed.
Similarly, you can create any dynamic web application with ASP.NET MVC 5 web development framework.
Looking to Effortlessly Boost Your .NET Project?
Equip your team with exceptional .NET expertise. Bring our skilled .NET Developer on board for your projects now!
Concluding Up
ASP.NET MVC 5 is a new-age development framework that works on the principle of model-view-controller architecture. To utilize it, you need Visual Studio IDE and the packages according to your project requirements. It helps to speed up development, minimize resource utilization, and establish seamless communication between all the components.
Thus, for dynamic web app development, ASP dot net MVC 5 is a web framework that is all you need.

Expert in Software & Web App Engineering
Parag Mehta, the CEO and Founder of Positiwise Software Pvt Ltd has extensive knowledge of the development niche. He is implementing custom strategies to craft highly-appealing and robust applications for its clients and supporting employees to grow and ace the tasks. He is a consistent learner and always provides the best-in-quality solutions, accelerating productivity.


