
Quick Overview:
Verifying the user is now a necessity to maintain data security and allow only authorized users on the platform. But, as cyber-attacks are increasing, it’s important to take some additional measures, such as two-factor authentication using the Google authenticator app. You can use Google Authenticator with software based on any software. But, in this blog, you will find the details about two-factor authentication using Google authenticator in ASP.NET MVC application.
Integrating Google Authenticator into an ASP.NET MVC Project
In the app development domain, data security is taken as a priority while configuring the security mechanisms. Authentication is considered the prime pillar, which is a must for every software to support retaining data integrity and preventing unauthorized access. More specifically, with the advancements, two-factor authentication using the Google authenticator app is preferred now. We have curated a complete tutorial to help you understand how two-factor authentication using Google authenticator in ASP.NET MVC works. A step-by-step explanation provided further will clear all your doubts. So, let’s get started.
What is Google Authenticator?
Google Authenticator is a mobile application that aids in strengthening security by supporting two-factor authentication. The app provides a unique code that users need to enter before accessing the platform resources and data.
To thoroughly understand, let’s break it down into two layers. Suppose the first layer is your account credentials, which are username and password. The second layer is the unique code provided by the Google Authenticator app. First, you need to input the credentials, and if the app verifies them as correct, you pass the first layer.
Further, the platform will demand a code, which the Google authenticator app will provide. When you input the correct code on the platform, you will pass the second security layer and get access to authorized resources. Thus, two-factor authentication will come into effect by using Google Authenticator.
How Does Two-Factor Authentication Work?
The working of Google authenticator is quite streamlined. It works per the following steps:
- Open the platform or web app where you want to log in.
- Input your correct credentials for enabling the web app to display a QR code.
- Now, using the Google authenticator, scan the QR code.
- After the scan, the authenticator will generate a code.
- Input the code on the web app.
- After verifying the code, the web app will grant access.
You will see the same functioning in the provided tutorial for better clarification.
The Need for Two-Factor Using ASP.NET MVC Application
Two-factor authentication is the prime need in this digital landscape. It supports maintaining the overall security of the application and retaining data integrity and confidentiality. In addition, it benefits with:
- Double checking of the user’s identity.
- Prevention of unauthorized access.
- Extended security for two-factor authentication.
- Minimal possibility of account breach.
- User convenience and satisfaction.
- Saving cost, as Google authenticator is a free-to-download and use application
Steps to Implement Two-Factor Authentication Using Google Authenticator in ASP.NET MVC
To solidify the security of your ASP.NET MVC application, you will require Visual Studio IDE. It will help you configure two-factor authentication using the Google authenticator app. Before you start with the implementation, ensure that Visual Studio version 2019 or above is installed. However, if you are utilizing an older version, integrate the NuGet package installer with it.
Additionally, you will need a mobile phone to download, install, and access the Google Authenticator app. You can use any Android and iOS mobile compatible and supporting the application.
After the Visual Studio IDE installation, follow the below steps as defined:
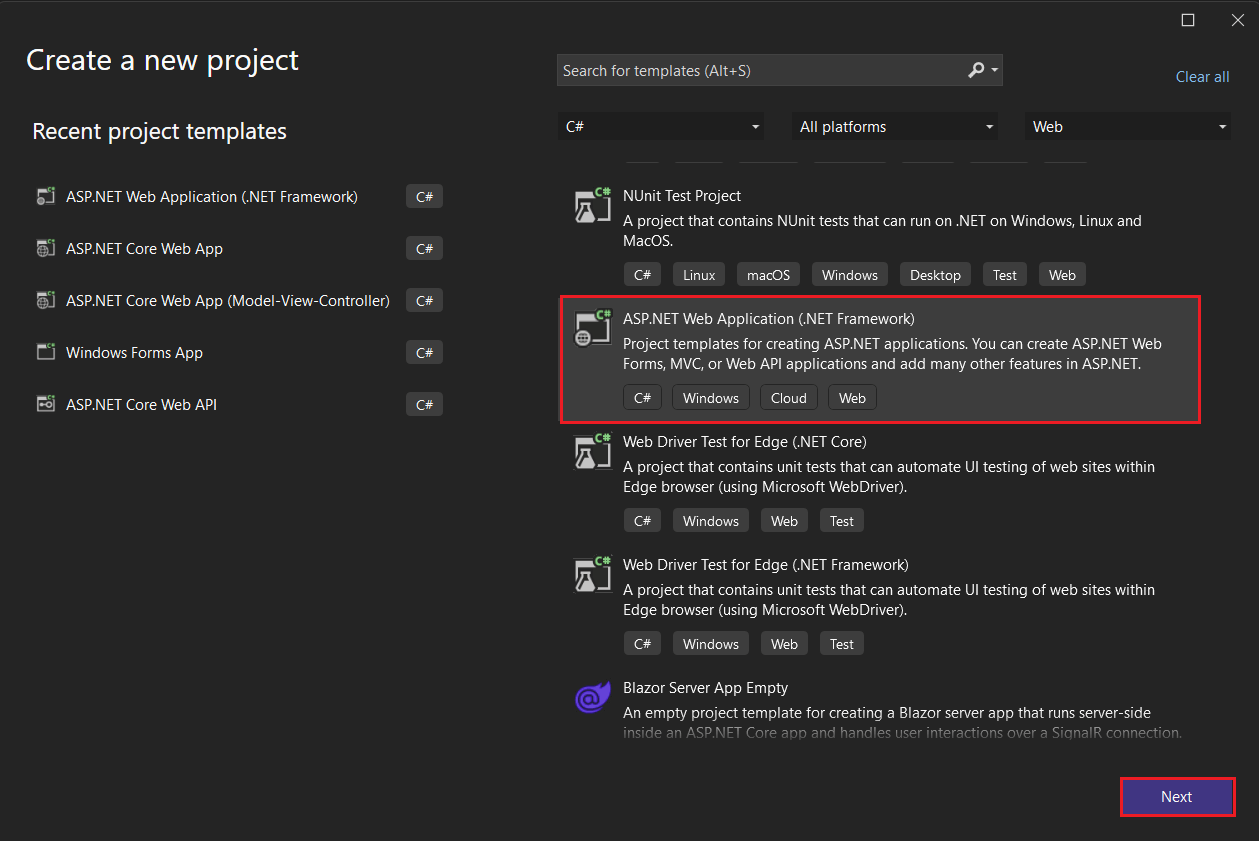
- Step 1: Open the Visual Studio IDE to create a new ASP.NET MVC project. Once the application gets opened, choose the ASP.NET Web application (.NET Framework) template and click on Next.
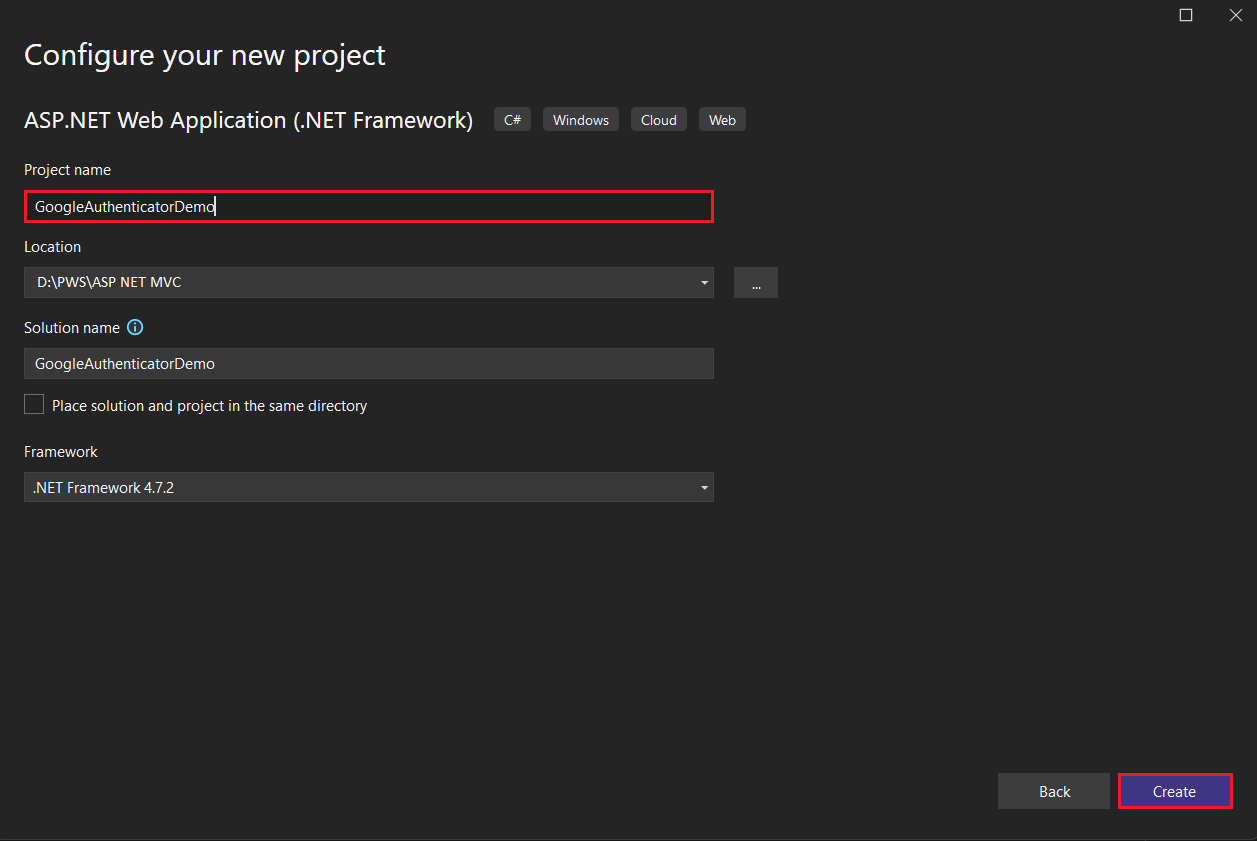
- Step 2: Fill out the information of the ASP.NET web application project. You need to define a project name, solution name, framework version, and location to save the project files. After finalizing all the details, click on Create.
- Step 3: Before the final creation of the project, Visual Studio will ask you to define the type of web application. Here, you’ll need to choose MVC (Model-View-Controller) from the provided options. Again, click on Create.

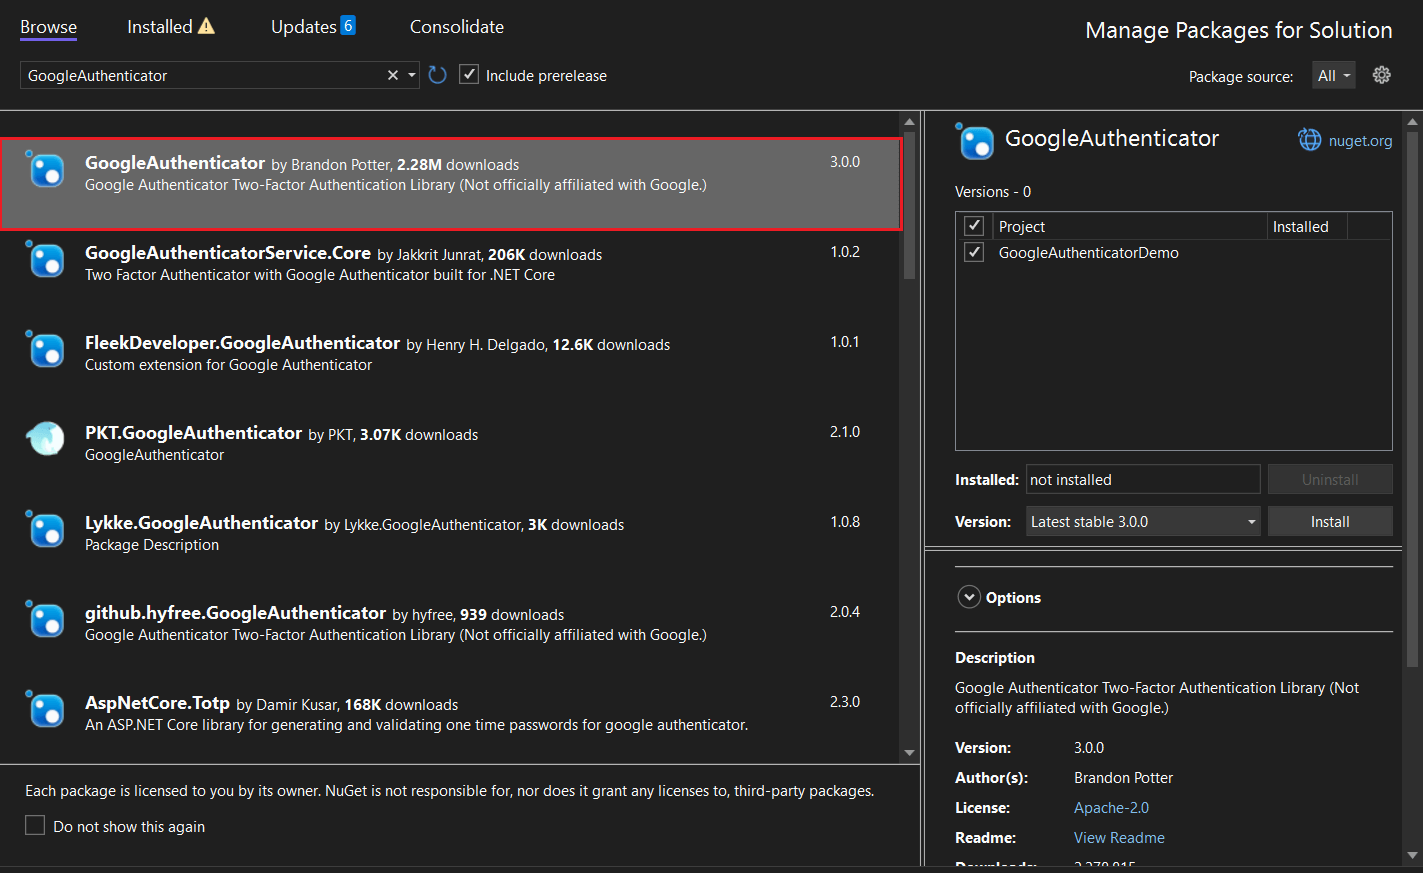
- Step 4: Now, go to the solutions explorer, and by using the right click on the project’s name, open the menu. From the numerous options displayed, choose to manage NuGet packages. It will open the NuGet package manager.
Further, using the search field, find Google.Authenticator package. Once it gets displayed, Select and Install it for your ASP.NET web app project.
- Step 5: After successful package installation, access the Model Folder. Under it, add a new class with the name “LoginModel.cs“.
The primary purpose of adding this class is to store the credentials that we are going to use to log in to the application. The code snippet is as follows:
using System;
using System.Collections.Generic;
using System.Linq;
using System.Web;

namespace GoogleAuthenticatorDemo.Models
{
    public class LoginModel
    {
        public string UserName { get; set; }

        public string Password { get; set; }
    }
}- Step 6: In this step, you have to add the Google authentication private key.
To do so, open and access the Web.Config file. And funder the <appSettings>, define the following code block.
<appSettings>
    <add key="webpages:Version" value="3.0.0.0" />
    <add key="webpages:Enabled" value="false" />
    <add key="ClientValidationEnabled" value="true" />
    <add key="UnobtrusiveJavaScriptEnabled" value="true" />

	<add key="GoogleAuthKey" value="P0W48S53" />
</appSettings>
The value defined in this code block can be changed to any string per your requirements. From a professional’s perspective, using a character combination tool for creating a strong string is always preferred. The reason behind using a tool is that this value is used as a private key by the Google authenticator app.
- Step 7: We need an action button to perform the login functionality. To configure the Login action method, we will use the HomeController with the following code.
public ActionResult Login()
{
    Session["UserName"] = null;
    Session["IsValidTwoFactorAuthentication"] = null;
    return View();
}
Let’s Design the Perfect ASP.NET Application for Your Enterprise Business
Bring your unique software & web application vision to a team of ASP.NET experts for Enterprise business. Our dedicated .NET developers design and build custom .NET app solutions for your needs.
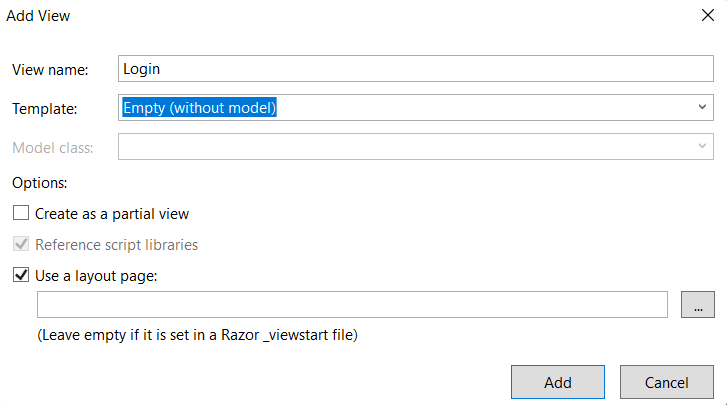
- Step 8: We need a view for this method after creating the Login action. To implement it, use the right click on the action method and choose the Add View option. It will open a new window for configuring the additional details.
In the provided details, input the view name as Login, the template as Empty (without model), and check the use of a layout box. Lastly, click on the Add button. As a result, you will see a new name, “Login.cshtml” under the View -> Home.
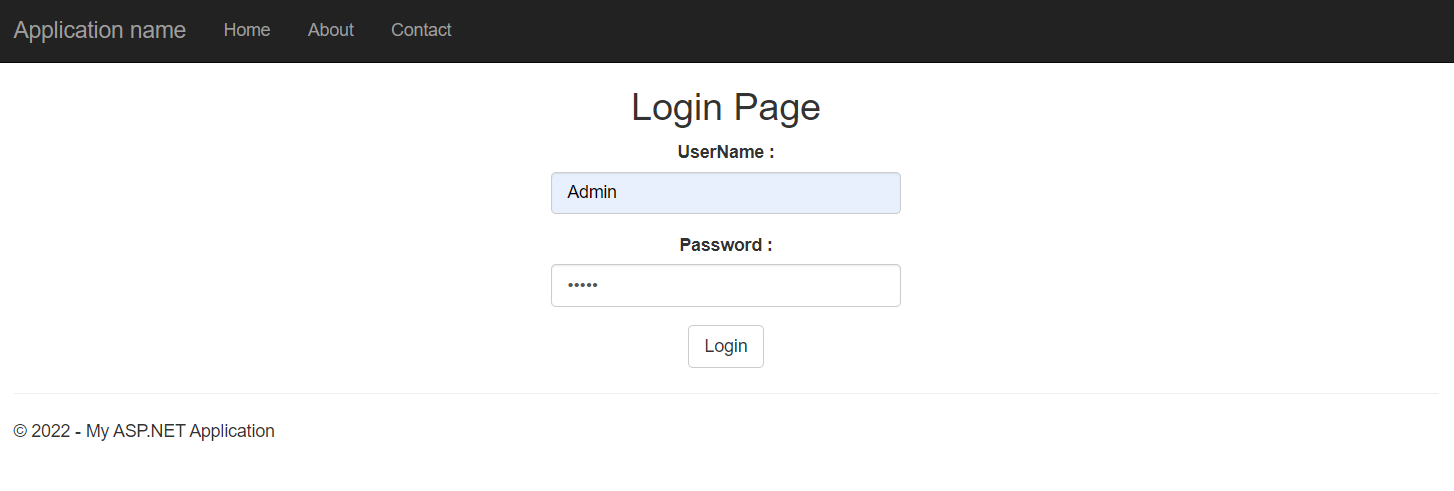
- Step 9: Open the Login.cshtml file and the below code to it. It defines the layout of the login page and the form shown to end-users.
@model GoogleAuthenticatorDemo.Models.LoginModel
@{
    ViewBag.Title = "Login";
}

<center>
    <h2>Login Page</h2>
    @if (ViewBag.Status == null || !ViewBag.Status)
    {
        <div>@ViewBag.Message</div>
        <div>
            @using (Html.BeginForm())
            {
                <div class="form-group">
                    <label for="UserName">UserName : </label>
                    @Html.TextBoxFor(a => a.UserName, new { @class = "form-control" })
                </div>
                <div class="form-group">
                    <label for="Password">Password : </label>
                    @Html.TextBoxFor(a => a.Password, new { @class = "form-control", type = "password" })
                </div>
                <input type="submit" value="Login" class="btn btn-default" />
            }
        </div>
    }
    else
    {

        <div>@ViewBag.Message</div>
        <div>
            <img src="@ViewBag.BarcodeImageUrl" width="300" height="300" />

        </div>
        <div>
            Manual Setup Code : @ViewBag.SetupCode
        </div>
        <div>
            @using (Html.BeginForm("TwoFactorAuthenticate", "Home", FormMethod.Post))
            {
                <input type="text" name="CodeDigit" />
                <input type="submit" class="btn btn-success" />
            }
        </div>
    }
</center>- Step 10: Now, in the Login Action Method, you need a Post type in the controller. To build it, add the below code to your project. We are using the static username and password for this tutorial, so the credentials are also defined in this piece of code. However, if you want to use dynamic credentials, you should connect the database and modify the code accordingly.
In addition, this code block also contains the two-factor authentication setup.
[HttpPost]
public ActionResult Login(LoginModel login)
{
  bool status = false;

  if (Session["Username"] == null || Session["IsValidTwoFactorAuthentication"] == null || !(bool) Session["IsValidTwoFactorAuthentication"])
  {
      string googleAuthKey = WebConfigurationManager.AppSettings["GoogleAuthKey"];
      string UserUniqueKey = (login.UserName + googleAuthKey);

      //Take UserName And Password As Static - Admin As User And 456789 As Password
      if (login.UserName == "Admin" && login.Password == "456789")
      {
         Session["UserName"] = login.UserName;

         //Two Factor Authentication Setup
         TwoFactorAuthenticator TwoFacAuth = new TwoFactorAuthenticator();
         var setupInfo = TwoFacAuth.GenerateSetupCode("UdayDodiyaAuthDemo.com", login.UserName, ConvertSecretToBytes(UserUniqueKey, false), 300);
         Session["UserUniqueKey"] = UserUniqueKey;
         ViewBag.BarcodeImageUrl = setupInfo.QrCodeSetupImageUrl;
         ViewBag.SetupCode = setupInfo.ManualEntryKey;
         status = true;
      }
  }
  else
  {
    return RedirectToAction("Index");
  }
  ViewBag.Status = status;
  return View();
}- Step 11: Again, in the controller, develop a function of ConvertSecretToBytes.
private static byte[] ConvertSecretToBytes(string secret, bool secretIsBase32) =>
secretIsBase32 ? Base32Encoding.ToBytes(secret) : Encoding.UTF8.GetBytes(secret);- Step 12: Build a TwoFactorAuthenticate action method for your controller.
public ActionResult TwoFactorAuthenticate()
{
     var token = Request["CodeDigit"];
     TwoFactorAuthenticator TwoFacAuth = new TwoFactorAuthenticator();
     string UserUniqueKey = Session["UserUniqueKey"].ToString();
     bool isValid = TwoFacAuth.ValidateTwoFactorPIN(UserUniqueKey, token, false);
     if (isValid)
     {
         HttpCookie TwoFCookie = new HttpCookie("TwoFCookie");
         string UserCode =Convert.ToBase64String(MachineKey.Protect(Encoding.UTF8.GetBytes(UserUniqueKey)));

         Session["IsValidTwoFactorAuthentication"] = true;
         return RedirectToAction("Index");
      }

      ViewBag.Message = "Google Two Factor PIN is expired or wrong";
      return RedirectToAction("Login");
}- Step 13: Likewise, regarding login functionality, we also need our application to securely logout the user. To implement it, you should build a Logoff Action method.
public ActionResult Logoff()
{
     Session["UserName"] = null;
     Session["IsValidTwoFactorAuthentication"] = null;
     return RedirectToAction("Login");
}- Step 14: For projects with authentication functionality, it’s essential to build a logic for managing unauthorized login. For this ASP.NET web app, you should add the following code to all the action methods.
public ActionResult Index()
{
    if (Session["Username"] == null || Session["IsValidTwoFactorAuthentication"] == null || !(bool)Session["IsValidTwoFactorAuthentication"])
    {
        return RedirectToAction("Login");
    }
    return View();
}

public ActionResult About()
{
     if (Session["Username"] == null || Session["IsValidTwoFactorAuthentication"] == null || !(bool)Session["IsValidTwoFactorAuthentication"])
     {
         return RedirectToAction("Login");
     }

     ViewBag.Message = "Your application description page.";
     return View();
}

public ActionResult Contact()
{
     if (Session["Username"] == null || Session["IsValidTwoFactorAuthentication"] == null || !(bool)Session["IsValidTwoFactorAuthentication"])
     {
         return RedirectToAction("Login");
     }

     ViewBag.Message = "Your contact page.";
     return View();
}- Step 15: After adding all the code to the specific files mentioned above, your Final HomeController.cs File will look like the following.
using Google.Authenticator;
using GoogleAuthenticatorDemo.Models;
using System;
using System.Collections.Generic;
using System.Linq;
using System.Text;
using System.Web;
using System.Web.Configuration;
using System.Web.Mvc;
using System.Web.Security;

namespace GoogleAuthenticatorDemo.Controllers
{
    public class HomeController : Controller
    {
        public ActionResult Index()
        {
            if (Session["Username"] == null || Session["IsValidTwoFactorAuthentication"] == null || !(bool)Session["IsValidTwoFactorAuthentication"])
            {
                return RedirectToAction("Login");
            }
            return View();
        }

        public ActionResult About()
        {
            if (Session["Username"] == null || Session["IsValidTwoFactorAuthentication"] == null || !(bool)Session["IsValidTwoFactorAuthentication"])
            {
                return RedirectToAction("Login");
            }

            ViewBag.Message = "Your application description page.";
            return View();
        }

        public ActionResult Contact()
        {
            if (Session["Username"] == null || Session["IsValidTwoFactorAuthentication"] == null || !(bool)Session["IsValidTwoFactorAuthentication"])
            {
                return RedirectToAction("Login");
            }

            ViewBag.Message = "Your contact page.";
            return View();
        }

        public ActionResult Login()
        {
            Session["UserName"] = null;
            Session["IsValidTwoFactorAuthentication"] = null;
            return View();
        }

        [HttpPost]
        public ActionResult Login(LoginModel login)
        {
            bool status = false;

            if (Session["Username"] == null || Session["IsValidTwoFactorAuthentication"] == null || !(bool)Session["IsValidTwoFactorAuthentication"])
            {
                string googleAuthKey = WebConfigurationManager.AppSettings["GoogleAuthKey"];
                string UserUniqueKey = (login.UserName + googleAuthKey);


                //Take UserName And Password As Static - Admin As User And 12345 As Password
                if (login.UserName == "Admin" && login.Password == "12345")
                {
                    Session["UserName"] = login.UserName;

                    //Two Factor Authentication Setup
                    TwoFactorAuthenticator TwoFacAuth = new TwoFactorAuthenticator();
                    var setupInfo = TwoFacAuth.GenerateSetupCode("UdayDodiyaAuthDemo.com", login.UserName, ConvertSecretToBytes(UserUniqueKey, false), 300);
                    Session["UserUniqueKey"] = UserUniqueKey;
                    ViewBag.BarcodeImageUrl = setupInfo.QrCodeSetupImageUrl;
                    ViewBag.SetupCode = setupInfo.ManualEntryKey;
                    status = true;
                }
            }
            else
            {
                return RedirectToAction("Index");
            }
            ViewBag.Status = status;
            return View();
        }


        private static byte[] ConvertSecretToBytes(string secret, bool secretIsBase32) =>
           secretIsBase32 ? Base32Encoding.ToBytes(secret) : Encoding.UTF8.GetBytes(secret);


        public ActionResult TwoFactorAuthenticate()
        {
            var token = Request["CodeDigit"];
            TwoFactorAuthenticator TwoFacAuth = new TwoFactorAuthenticator();
            string UserUniqueKey = Session["UserUniqueKey"].ToString();
            bool isValid = TwoFacAuth.ValidateTwoFactorPIN(UserUniqueKey, token, false);
            if (isValid)
            {
                HttpCookie TwoFCookie = new HttpCookie("TwoFCookie");
                string UserCode = Convert.ToBase64String(MachineKey.Protect(Encoding.UTF8.GetBytes(UserUniqueKey)));

                Session["IsValidTwoFactorAuthentication"] = true;
                return RedirectToAction("Index");
            }
            ViewBag.Message = "Google Two Factor PIN is expired or wrong";
            return RedirectToAction("Login");
        }

        public ActionResult Logoff()
        {
            Session["UserName"] = null;
            Session["IsValidTwoFactorAuthentication"] = null;
            return RedirectToAction("Login");
        }
    }
}- Step 16: Further, navigate to the _Layout.cshtml page code and modify it with the following block.
<!DOCTYPE html>
<html>
<head>
<meta charset="utf-8" />
<meta name="viewport" content="width=device-width, initial-scale=1.0">
<title>@ViewBag.Title - My ASP.NET Application</title>
@Styles.Render("~/Content/css")
@Scripts.Render("~/bundles/modernizr")
</head>
<body>
<div class="navbar navbar-inverse navbar-fixed-top">
<div class="container">
<div class="navbar-header">
<button type="button" class="navbar-toggle" data-toggle="collapse" data-target=".navbar-collapse" title="more options">
<span class="icon-bar"></span>
<span class="icon-bar"></span>
<span class="icon-bar"></span>
</button>
@Html.ActionLink("Application name", "Index", "Home", new { area = "" }, new { @class = "navbar-brand" })
</div>
<div class="navbar-collapse collapse">
<ul class="nav navbar-nav">
<li>@Html.ActionLink("Home", "Index", "Home")</li>
<li>@Html.ActionLink("About", "About", "Home")</li>
<li>@Html.ActionLink("Contact", "Contact", "Home")</li>
</ul>
@if (@HttpContext.Current.Session["UserName"] != null && @HttpContext.Current.Session["IsValidTwoFactorAuthentication"] != null)
{
if(bool.Parse(@HttpContext.Current.Session["IsValidTwoFactorAuthentication"].ToString()) == true)
{
<ul class="nav navbar-nav navbar-right">
<li style="color: White; font-size: 15px; margin-top: 10px; margin-right: 100px;">
USER: @HttpContext.Current.Session["UserName"].ToString()
</li>
<li>
@Html.ActionLink("Log Out", "Logoff", "Home", new { style = "color:White; font-size: 15px" })
</li>
</ul>
}
}
</div>
</div>
</div>
<div class="container body-content">
@RenderBody()
<hr />
<footer>
<p>© @DateTime.Now.Year - My ASP.NET Application</p>
</footer>
</div>
@Scripts.Render("~/bundles/jquery")
@Scripts.Render("~/bundles/bootstrap")
@RenderSection("scripts", required: false)
</body>
</html>- Step 17: To showcase the username on the index page, you will need the below-provided code in your index.cshtml file. Adding this code block depends on the layout of your page. We have added this feature only because of the default look of the app. Otherwise, you can change it per your needs.
@{
ViewBag.Title = "Home Page";
}
<div class="jumbotron">
<h1>ASP.NET</h1>
<p class="lead">ASP.NET is a free web framework for building great Web sites and Web applications using HTML, CSS and JavaScript.</p>
<p><a href="https://asp.net" class="btn btn-primary btn-lg">Learn more »</a></p>
</div>
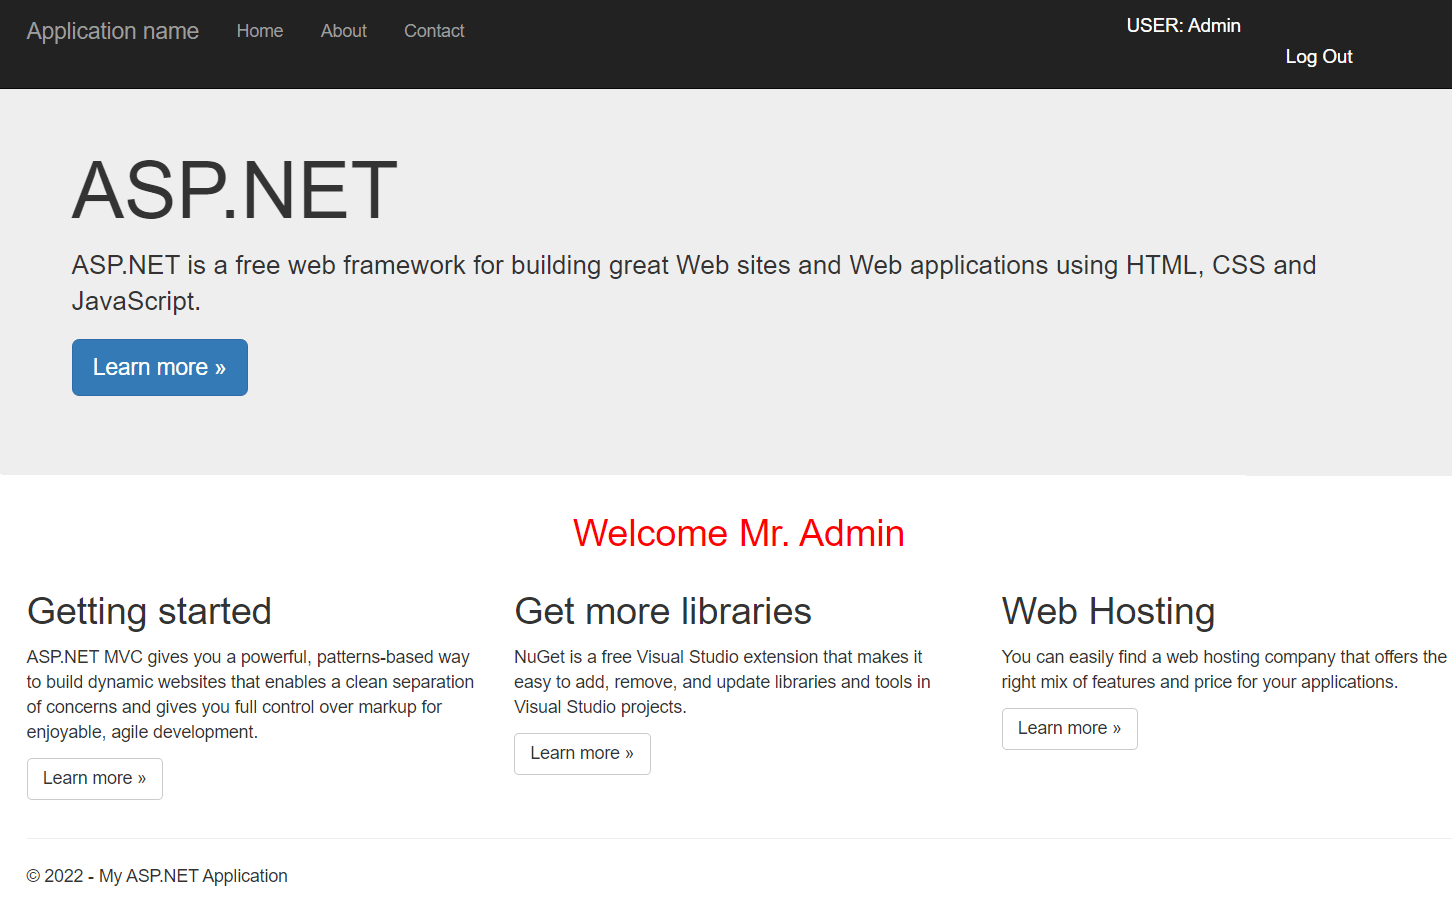
<center><h2 style="color: red;">Welcome Mr. @HttpContext.Current.Session["UserName"].ToString()</h2></center>
<div class="row">
<div class="col-md-4">
<h2>Getting started</h2>
<p>
ASP.NET MVC gives you a powerful, patterns-based way to build dynamic websites that
enables a clean separation of concerns and gives you full control over markup
for enjoyable, agile development.
</p>
<p><a class="btn btn-default" href="https://go.microsoft.com/fwlink/?LinkId=301865">Learn more »</a></p>
</div>
<div class="col-md-4">
<h2>Get more libraries</h2>
<p>NuGet is a free Visual Studio extension that makes it easy to add, remove, and update libraries and tools in Visual Studio projects.</p>
<p><a class="btn btn-default" href="https://go.microsoft.com/fwlink/?LinkId=301866">Learn more »</a></p>
</div>
<div class="col-md-4">
<h2>Web Hosting</h2>
<p>You can easily find a web hosting company that offers the right mix of features and price for your applications.</p>
<p><a class="btn btn-default" href="https://go.microsoft.com/fwlink/?LinkId=301867">Learn more »</a></p>
</div>
</div>- Step 18: After all the coding, it’s time to test the application. Take a mobile phone and download the Google Authenticator app on it. Simultaneously, run the ASP.NET web application.
The app will show you a login, where you need to enter the static username and password, which we defined. In our case, username = admin and password = 456789. Further, click on Login.
- Step 19: As you click login, the app will generate a QR Code, requiring a Google Authenticator code to confirm your identity.
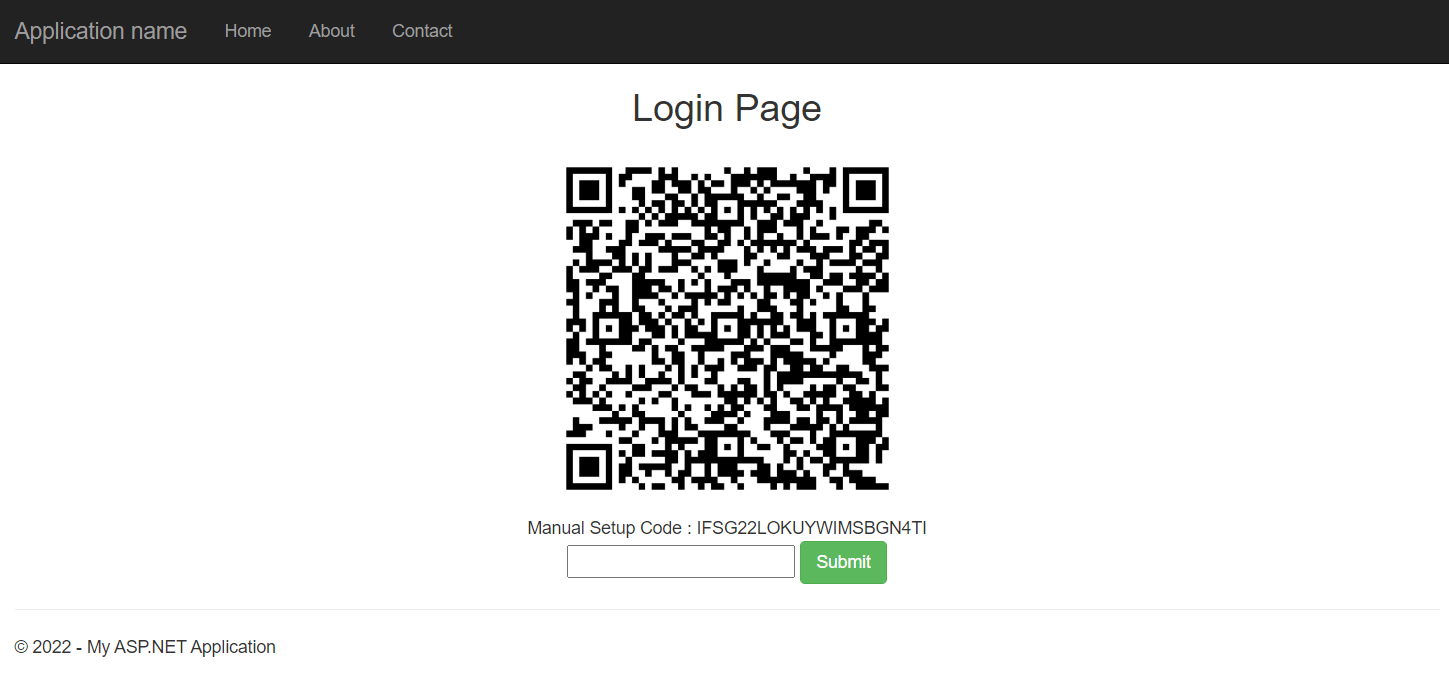
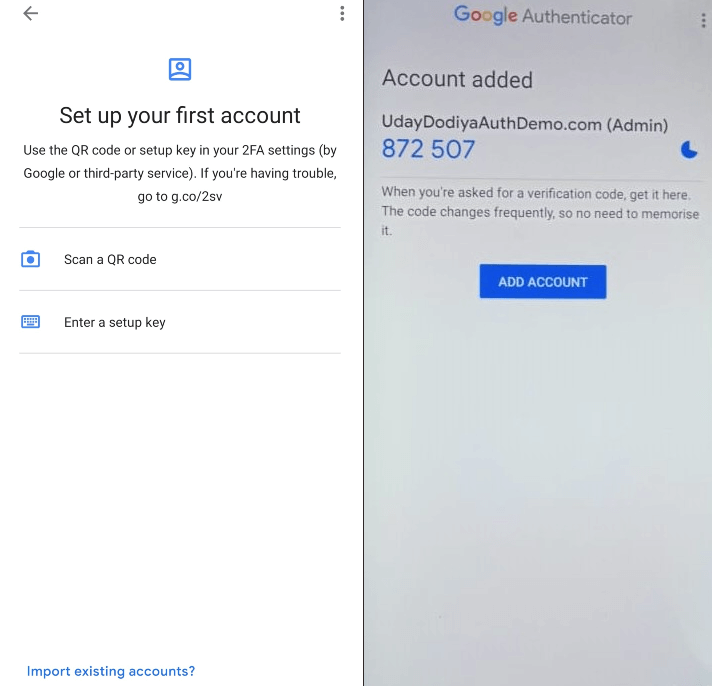
- Step 20: Open the Google Authenticator app (get it from here) and choose the Scan a QR Code option.
After scanning the ASP.NET web app QR code will generate a code for you. You should input the generated code in the required field.
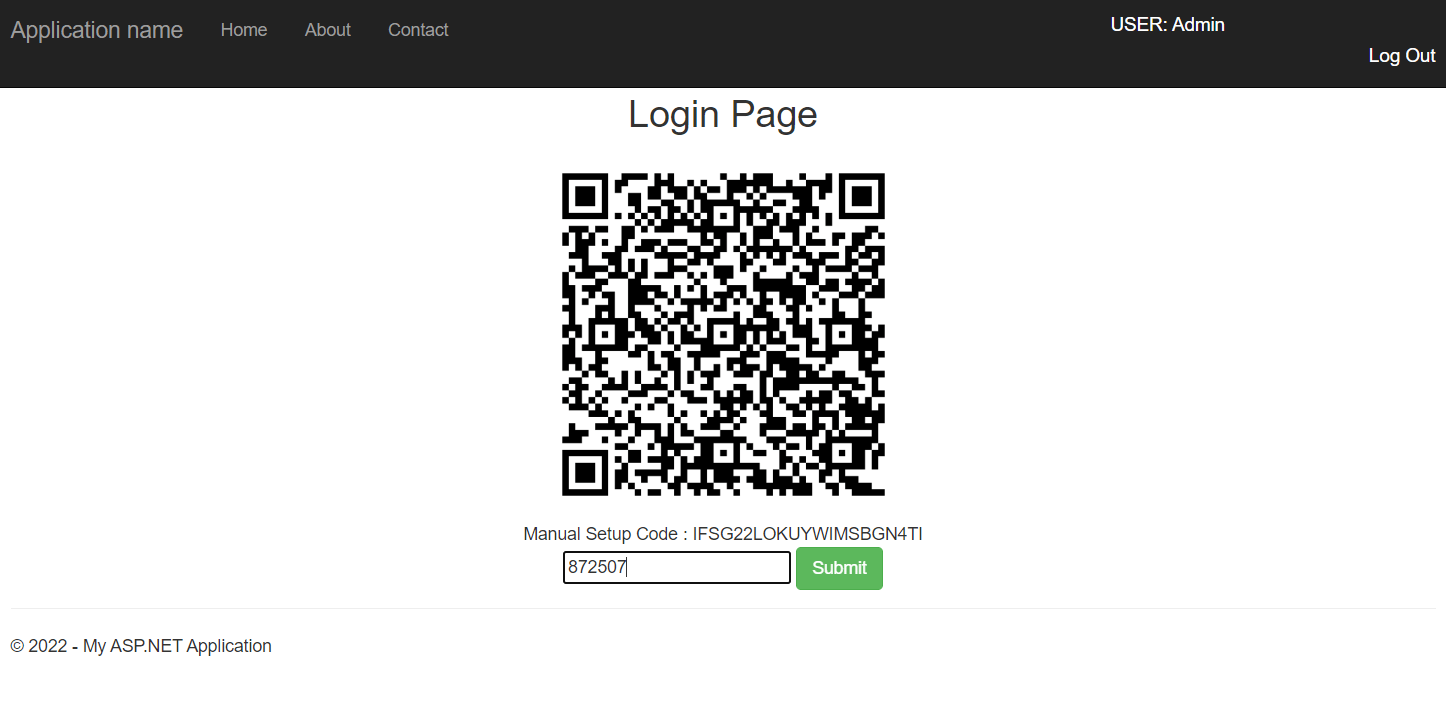
Final Result:
You successfully log into the application after passing a two-factor authentication mechanism using the Google authenticator app.
Similarly, you can try different username and password combinations to test the unauthorized user functionality. Also, log out from the Admin account to verify the working of the logout method.
What You Need To Configure Google Authenticator App With ASP.NET Web Application?
To enable your application to work with the Google authenticator app, you should hire ASP.NET developers. They can help you with building an avant-garde application with utmost security to prevent unauthorized access and retain data integrity. However, you should only hire developers from an experienced and globally recognized firm, such as Positiwise Software Pvt Ltd.
In addition, before you finalize an ASP.NET MVC development company, ensure that it offers the following benefits:
- Agile development methodology for fulfilling dynamic requirements
- A dedicated team consisting of designers, developers, testers, and QA analysts.
- Utilization of top tools for development, communication, and project management.
- Flexible pricing model for cost-saving.
- NDA signing and assurance of timely software delivery.
The right team of ASP.NET developers will streamline all tasks to configure Google two-factor authentication.
Concluding Up on ASP.NET MVC Google Authentication
ASP.NET MVC Google Authentication is a new-age security mechanism that provides the two-factor authentication benefit to users. It helps to set up an additional layer of security, helping to avoid unauthorized access to resources and data. To configure an ASP.NET MVC Google Authentication web app effortlessly, you need Visual Studio IDE; however, you can use it with any application.
Once you create your project in the VS IDE, you must create login and logout action methods. These action methods will consist of the logic of generating a QR code for the Google Authenticator app after verifying the account credentials. Further, the authenticator app will scan the QR to generate a code. If the code entered is correct, ASP.NET MVC Google Authentication web will allow the login; otherwise, deny it.
That’s how two-factor authentication will be implemented in an ASP.NET app using ASP.NET MVC Google Authentication.

Expert in Software & Web App Engineering
Parag Mehta, the CEO and Founder of Positiwise Software Pvt Ltd has extensive knowledge of the development niche. He is implementing custom strategies to craft highly-appealing and robust applications for its clients and supporting employees to grow and ace the tasks. He is a consistent learner and always provides the best-in-quality solutions, accelerating productivity.


